Showing posts with label Database. Show all posts

Monday, 13 February 2017

Installing Apache2 With PHP5 And MySQL Support On Ubuntu 14.04LTS (LAMP)

Anonymous
LAMP is short for Linux, Apache, MySQL, PHP. This tutorial shows how you can install an Apache2 webserver on anUbuntu 13.04 server with PHP5 support (mod_php) and MySQL support.
I do not issue any guarantee that this will work for you!

1 Preliminary Note

In this tutorial I use the hostname server1.example.com with the IP address 192.168.0.100. These settings might differ for you, so you have to replace them where appropriate.
I'm running all the steps in this tutorial with root privileges, so make sure you're logged in as root:
sudo su

2 Installing MySQL 5

First we install MySQL 5 like this:
apt-get install mysql-server mysql-client
You will be asked to provide a password for the MySQL root user - this password is valid for the user root@localhost as well as root@server1.example.com, so we don't have to specify a MySQL root password manually later on:
New password for the MySQL "root" user: <-- yourrootsqlpassword
Repeat password for the MySQL "root" user: <-- yourrootsqlpassword

3 Installing Apache2

Apache2 is installed by default in ubuntu14.04, If not installed then install it. Apache2 is available as an Ubuntu package, therefore we can install it like this:
apt-get install apache2
Now direct your browser to http://192.168.0.100, and you should see the Apache2 placeholder page (It works!):
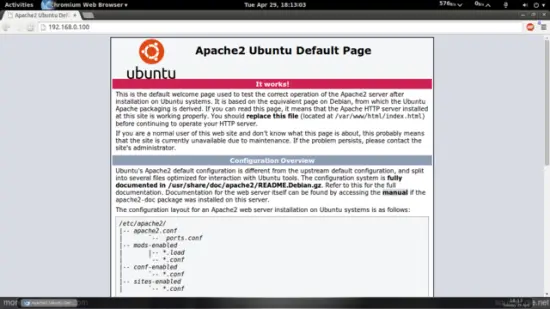
Apache's default document root is /var/www/html on Ubuntu, and the configuration file is /etc/apache2/apache2.conf. The configuration system is fully documented in /usr/share/doc/apache2/README.Debian.gz

4 Installing PHP5

We can install PHP5 and the Apache PHP5 module as follows:
apt-get install php5 libapache2-mod-php5
We must restart Apache afterwards:
service apache2 restart

5 Testing PHP5 / Getting Details About Your PHP5 Installation

The document root of the default web site is /var/www/html. We will now create a small PHP file (info.php) in that directory and call it in a browser. The file will display lots of useful details about our PHP installation, such as the installed PHP version.
vi /var/www/html/info.php
<?php
phpinfo();
?>
Now we call that file in a browser (e.g. http://192.168.0.100/info.php):
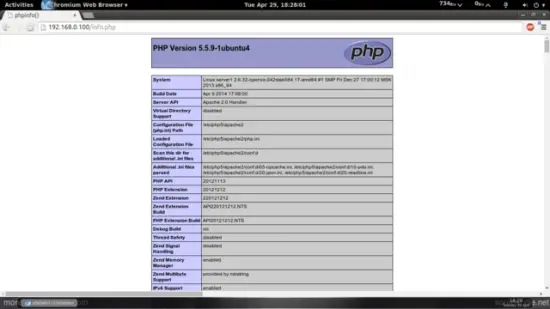
As you see, PHP5 is working, and it's working through the Apache 2.0 Handler, as shown in the Server API line. If you scroll further down, you will see all modules that arealready enabled in PHP5. MySQL is not listed there which means we don't have MySQL support in PHP5 yet.

6 Getting MySQL Support In PHP5

To get MySQL support in PHP, we can install the php5-mysql package. It's a good idea to install some other PHP5 modules as well asyou might need them for your applications. You can search for available PHP5 modules like this:
apt-cache search php5
Pick the ones you need and install them like this:
apt-get install php5-mysql php5-curl php5-gd php5-intl php-pear php5-imagick php5-imap php5-mcrypt php5-memcache php5-ming php5-ps php5-pspell php5-recode php5-snmp php5-sqlite php5-tidy php5-xmlrpc php5-xsl
Now restart Apache2:
service apache2 restart
Xcache is a free and open PHP opcode cacher for caching and optimizing PHP intermediate code. It's similar to other PHP opcode cachers, such as eAccelerator and APC. It is strongly recommended to have one of these installed to speed up your PHP page.
Xcache can be installed as follows:
apt-get install php5-xcache
Now restart Apache:
service apache2 restart
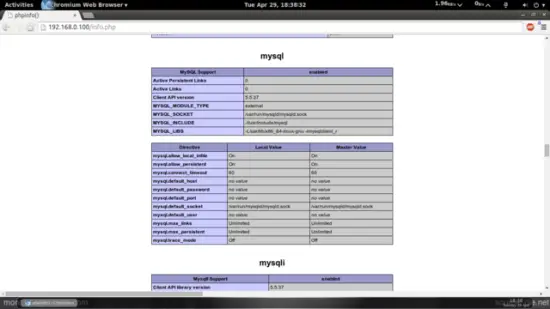
Now reload http://192.168.0.100/info.php in your browser and scroll down to the modules section again. You should now find lots of new modules there, including the MySQL module:
7 phpMyAdmin

phpMyAdmin is a web interface through which you can manage your MySQL databases. It's a good idea to install it:
apt-get install phpmyadmin
You will see the following questions:
Web server to reconfigure automatically: <-- apache2
Configure database for phpmyadmin with dbconfig-common? <-- No
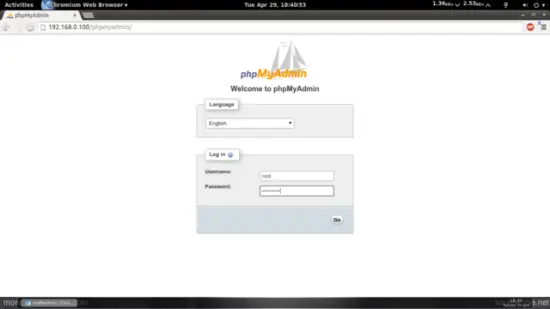
Afterwards, you can access phpMyAdmin under http://192.168.0.100/phpmyadmin/:
Monday, 23 January 2017

Download Docker For Ubuntu

Anonymous
Docker For UbuntuDocker Container For Ubuntu
Hello everyone, how are you all doing today? I hope you are all having a great week so far. My day has been crazy to say the least, we had a massive power outage here yesterday, we had no lights in the whole town, it was annoying to say the least. Today, the lights are back but the stupid energy company that supplies lights here apparently hasn’t fully fixed the problem. At this rate I really might have to move permanently to another country, I have a few in mind, lol anyway, please read on…
Today we will highlight one of the best and most useful apps for Ubuntu and Linux administrators. I am talking about Docker. Heard of it? Probably but at the time you probably had no idea what it is or why you see it pop up on some web sites here and there. Okay, maybe that is just my experience but while at work, a co-worker recommended upgrade our network and he recommended Docker. I was like, wtf is Docker? Let’s find out.

What Is Docker?

Docker is an app that makes it simple and easy to run application processes in a container, which are like virtual machines, only more portable, more lightweight which means they are naturally resource friendly, and more dependent on the host operating system. Docker provides an open platform for developers and sysadmins to build, package, and run applications anywhere as a lightweight Docker container. Docker automates the deployment of applications inside software containers.

Install Docker For Ubuntu

  1. Log into your Ubuntu installation as a user with sudo privileges.
  2. Update your APT package index.
    $ sudo apt-get update
    
  3. Install Docker.
    $ sudo apt-get install docker-engine
    
  4. Start the docker daemon.
    $ sudo service docker start
    
  5. Verify docker is installed correctly.
    $ sudo docker run hello-world
    
    This command downloads a test image and runs it in a container. When the container runs, it prints an informational message. Then, it exits.

Docker Container Screenshots

Tuesday, 10 January 2017

How to Install and Configure phpMyAdmin on Ubuntu 14.04

Anonymous
phpMyAdmin is an open source tool used for the administration of MySQL. In addition to offering the capability to perform administration tasks such as creating, editing, or deleting databases, and managing users and permissions, phpMyAdmin provides a graphical user interface to do all of these tasks and more.

Pre-Flight Check

  • These instructions are intended specifically for installing phpMyAdmin on Ubuntu 14.04 LTS.
  • I’ll be working from a Liquid Web Core Managed Ubuntu 14.04 LTS server, and I’ll be logged in as root.
  • A LAMP, Linux, Apache, MySQL and PHP, must be installed on your server. If you’re working from a Liquid Web Core Managed Ubuntu 14.04 LTS server as I am, then the LAMP stack is already installed!

Step 1: Install phpMyAdmin

First, you’ll follow a simple best practice: ensuring the list of available packages is up to date before installing anything new.
apt-get -y update
Then it’s a matter of just running one command for installation via apt-get:
apt-get -y install phpmyadmin

Step 2: Basic Configuration

As the installation runs you’ll be asked a few simple questions regarding the basic configuration of phpMyAdmin.
At the first screen, select apache2 by using the space bar, then hit enter to continue.
How To Install and Secure phpMyAdmin on Ubuntu 12.04
At the second screen, which asks “configure the database for phpmyadmin with dbconfig-common?”, select Yes, then hit enter to continue.
How to Install and Secure phpMyAdmin on Ubuntu 12.04
At the third screen enter your MySQL password, then hit enter to continue.
How to Install and Secure phpMyAdmin on Ubuntu 12.04
And finally at the fourth screen set the password you’ll use to log into phpmyadmin, hit enter to continue, and confirm your password.
How to Install and Secure phpMyAdmin on Ubuntu 12.04

Step 3: Finish the Configuration of Apache

For a refresher on editing files with vim see: New User Tutorial: Overview of the Vim Text Editor
vim /etc/apache2/apache2.conf
Add the following to the bottom of the file:
# phpMyAdmin Configuration
Include /etc/phpmyadmin/apache.conf

Then exit and save the file with the command :wq.
And, restart Apache 2 with the following command:
service apache2 restart
Verify that phpMyAdmin is working by visiting the_IP_of_your_server/phpmyadmin. For example: http://127.0.0.1/phpmyadmin
Be Sociable, Share!

How to Install the MongoDB PHP Driver (Extension) on CentOS 7

Anonymous

Pre-Flight Check
  • These instructions are intended specifically for installing the MongoDB PHP Driver (Extension) on CentOS 7.
  • I’ll be working from a Liquid Web Core Managed CentOS 7 server with HTTPD already installed, configured, and running, and I’ll be logged in as root.

Step 1: Setup Environment, Install PHP Extension & Application Repository (PEAR)
As a matter of best practice we’ll update our packages:
yum -y update
Then let’s install a compiler, the PHP Extension and Application Repository (PEAR), and PHP development tools:
yum -y install gcc php-pear php-devel
Step 2: Installation with the PHP Extension Community Library (PECL)
Now let’s install the MongoDB PHP driver (extension) with PECL:
pecl install mongo
Next you’ll be prompted regarding ‘MongoDB Enterprise Authentication’. If you’re not specifically using SASL (and already have it installed), then hit enter to continue (thus answering ‘no’):
Build with Cyrus SASL (MongoDB Enterprise Authentication) support? [no] :
Step 3:Configure PHP
For a refresher on editing files with vim see: New User Tutorial: Overview of the Vim Text Editor
vim /etc/php.ini
It is possible to place the following bit of code anywhere in the php.ini file. However, the most common location for extensions is in the Dynamic Extensions section.
Find Dynamic Extensions and insert the following in that section:
extension=mongo.so
Then exit and save the file with the command :wq .
And now we’ll restart Apache:
systemctl restart httpd
Step 4: Verify the Extension is Available
Now verify that the extension is available by using the following command:
php -m | grep -i mongo
Your result should be:
mongo

How to Install MongoDB 3.4 on Ubuntu 16.04, 14.04, 12.04 and Debian 8/7

Anonymous

MongoDB is a NoSQL database intended for storing large amounts of data in document-oriented storage with dynamic schemas. NoSQL refers to a database with a data model other than the tabular format used in relational databases such as MySQL, PostgreSQL, and Microsoft SQL. MongoDB features include: full index support, replication, high availability, and auto-sharding.
Pre-Flight Check
  • These instructions are intended for installing MongoDB on a single Ubuntu 14.04 LTS node.
  • I’ll be working from a Liquid Web Core Managed Ubuntu 14.04 LTS server, and I’ll be logged in as a non-root user, but with sudo access. For information on giving a user sudo access visit our page on How to Add a User and Grant Root Privileges on Ubuntu 14.04.

Step #1: Setup a the Package Database
First we’ll import the MongoDB public key used by the package management system:
sudo apt-key adv --keyserver hkp://keyserver.ubuntu.com:80 --recv 7F0CEB10
Then we’ll create a list file for MongoDB:
echo 'deb http://downloads-distro.mongodb.org/repo/ubuntu-upstart dist 10gen' | sudo tee /etc/apt/sources.list.d/mongodb.list
Now reload the package database:
sudo apt-get update
Step #2: Install Latest Stable Version MongoDB
At this point, installing MongoDB is as simple as running just one command:
sudo apt-get install -y mongodb-org
If you’d like MongoDB to auto-update with apt-get than you’re done with the installation. But, it’s possible to ‘pin’ the version of MongoDB you just installed to prevent apt-get from auto-updating.
echo "mongodb-org hold" | sudo dpkg --set-selections
echo "mongodb-org-server hold" | sudo dpkg --set-selections
echo "mongodb-org-shell hold" | sudo dpkg --set-selections
echo "mongodb-org-mongos hold" | sudo dpkg --set-selections
echo "mongodb-org-tools hold" | sudo dpkg --set-selections

Step #3: Get MongoDB Running
Start-Up MongoDB
sudo service mongod start
Check MongoDB Service Status
sudo service mongod status
Summary List of Status Statistics (Continuous)
mongostat
Summary List of Status Statistics (5 Rows, Summarized Every 2 Seconds)
mongostat --rowcount 5 2
Enter the MongoDB Command Line
mongo
By default, running this command will look for a MongoDB server listening on port 27017 on the localhost interface.
If you’d like to connect to a MongoDB server running on a different port, then use the –port option. For example, if you wanted to connect to a local MongoDB server listening on port 22222, then you’d issue the following command:
mongo --port 22222
Shutdown MongoDB
sudo service mongod stop
Restart MongoDB
sudo service mongod restart
Be Sociable, Share!

Monday, 9 January 2017

How to reset MySQL root password on Ubuntu

Anonymous


When you install mysql database server on ubuntu, you will prompted to enter password for user root, if you skip this password or leave it blank, you are out of luck my friend, because you can't login to mysql database server.

This is what happened to me a few days ago, during the installation of mysql server (version 5.7.16 on ubuntu 16.04), i skip entering the password, i was hopping i could login without password for user root, but it doesn't seems to work.
The problem is on mysql 5.7.x if you set empty password during installation, mysql will use auth_socket plugin, auth_socket plugin doesn't need password, but you only can login through UNIX socket connection, therefore any connection using local IP or network will fail.

How to solve this problem?
The solution is to change mysql root password and not leave it blank/empty, first we need to find a way to login to mysql using user other than root (because wa can't login using root at this point).
On ubuntu 16.04, if you look at /etc/mysql/debian.cnf, you will see user called 'debian-sys-maint' and it's password, use that to login into mysql server.
sudo cat /etc/mysql/debian.cnf
Use the username and password on that file to login into mysql
sudo mysql -u debian-sys-maint -h localhost -p
Inside mysql database run this command to reset password for user root:
FLUSH PRIVILEGES;
ALTER USER 'root'@'localhost' IDENTIFIED WITH mysql_native_password BY 'newpass';
NOTE: change 'newpass' to whatever you want, this will be your root password.

This method works well on mysql server version 5.7.16, ubuntu 16.04

Thank you and have a nice day