Showing posts with label PHP. Show all posts

Tuesday, 7 March 2017

Schedule Tasks on Linux Using Crontab

Anonymous
If you've got a website that's heavy on your web server, you might want to run some processes like generating thumbnails or enriching data in the background. This way it can not interfere with the user interface. Linux has a great program for this called cron. It allows tasks to be automatically run in the background at regular intervals. You could also use it to automatically create backups, synchronize files, schedule updates, and much more. Welcome to the wonderful world of crontab.

Crontab

The crontab (cron derives from chronos, Greek for time; tab stands for table) command, found in Unix and Unix-like operating systems, is used to schedule commands to be executed periodically. To see what crontabs are currently running on your system, you can open a terminal and run:
$ sudo crontab -l
To edit the list of cronjobs you can run:
$ sudo crontab -e
This wil open a the default editor (could be vi or pico, if you want you can change the default editor) to let us manipulate the crontab. If you save and exit the editor, all your cronjobs are saved into crontab. Cronjobs are written in the following format:
* * * * * /bin/execute/this/script.sh

Scheduling explained

As you can see there are 5 stars. The stars represent different date parts in the following order:
  • minute (from 0 to 59)
  • hour (from 0 to 23)
  • day of month (from 1 to 31)
  • month (from 1 to 12)
  • day of week (from 0 to 6) (0=Sunday)

Execute every minute

If you leave the star, or asterisk, it means every. Maybe that's a bit unclear. Let's use the the previous example again:
* * * * * /bin/execute/this/script.sh
They are all still asterisks! So this means execute /bin/execute/this/script.sh:
  • every minute
  • of every hour
  • of every day of the month
  • of every month
  • and every day in the week.
In short: This script is being executed every minute. Without exception.

Execute every Friday 1AM

So if we want to schedule the script to run at 1AM every Friday, we would need the following cronjob:
0 1 * * 5 /bin/execute/this/script.sh
Get it? The script is now being executed when the system clock hits:
  • minute: 0
  • of hour: 1
  • of day of month: * (every day of month)
  • of month: * (every month)
  • and weekday: 5 (=Friday)

Execute on workdays 1AM

So if we want to schedule the script to Monday till Friday at 1 AM, we would need the following cronjob:
0 1 * * 1-5 /bin/execute/this/script.sh
Get it? The script is now being executed when the system clock hits:
  • minute: 0
  • of hour: 1
  • of day of month: * (every day of month)
  • of month: * (every month)
  • and weekday: 1-5 (=Monday til Friday)

Execute 10 past after every hour on the 1st of every month

Here's another one, just for practicing
10 * 1 * * /bin/execute/this/script.sh
Fair enough, it takes some getting used to, but it offers great flexibility.

Neat scheduling tricks

What if you'd want to run something every 10 minutes? Well you could do this:
0,10,20,30,40,50 * * * * /bin/execute/this/script.sh
But crontab allows you to do this as well:
*/10 * * * * /bin/execute/this/script.sh
Which will do exactly the same. Can you do the the math? ; )

Special words

For the first (minute) field, you can also put in a keyword instead of a number:
@reboot     Run once, at startup
@yearly     Run once  a year     "0 0 1 1 *"
@annually   (same as  @yearly)
@monthly    Run once  a month    "0 0 1 * *"
@weekly     Run once  a week     "0 0 * * 0"
@daily      Run once  a day      "0 0 * * *"
@midnight   (same as  @daily)
@hourly     Run once  an hour    "0 * * * *"
Leaving the rest of the fields empty, this would be valid:
@daily /bin/execute/this/script.sh

Storing the crontab output

By default cron saves the output of /bin/execute/this/script.sh in the user's mailbox (root in this case). But it's prettier if the output is saved in a separate logfile. Here's how:
*/10 * * * * /bin/execute/this/script.sh >> /var/log/script_output.log 2>&1

Explained

Linux can report on different levels. There's standard output (STDOUT) and standard errors (STDERR). STDOUT is marked 1, STDERR is marked 2. So the following statement tells Linux to store STDERR in STDOUT as well, creating one datastream for messages & errors:
2>&1
Now that we have 1 output stream, we can pour it into a file. Where > will overwrite the file, >> will append to the file. In this case we'd like to to append:
>> /var/log/script_output.log

Mailing the crontab output

By default cron saves the output in the user's mailbox (root in this case) on the local system. But you can also configure crontab to forward all output to a real email address by starting your crontab with the following line:
MAILTO="yourname@yourdomain.com"

Mailing the crontab output of just one cronjob

If you'd rather receive only one cronjob's output in your mail, make sure this package is installed:
$ aptitude install mailx
And change the cronjob like this:
*/10 * * * * /bin/execute/this/script.sh 2>&1 | mail -s "Cronjob ouput" yourname@yourdomain.com

Trashing the crontab output

Now that's easy:
*/10 * * * * /bin/execute/this/script.sh > /dev/null 2>&1
Just pipe all the output to the null device, also known as the black hole. On Unix-like operating systems, /dev/null is a special file that discards all data written to it.

Caveats

Many scripts are tested in a Bash environment with the PATH variable set. This way it's possible your scripts work in your shell, but when run from cron (where the PATH variable is different), the script cannot find referenced executables, and fails.
It's not the job of the script to set PATH, it's the responsibility of the caller, so it can help to echo $PATH, and put PATH=<the result> at the top of your cron files (right below MAILTO).
Monday, 13 February 2017

Installing Apache2 With PHP5 And MySQL Support On Ubuntu 14.04LTS (LAMP)

Anonymous
LAMP is short for Linux, Apache, MySQL, PHP. This tutorial shows how you can install an Apache2 webserver on anUbuntu 13.04 server with PHP5 support (mod_php) and MySQL support.
I do not issue any guarantee that this will work for you!

1 Preliminary Note

In this tutorial I use the hostname server1.example.com with the IP address 192.168.0.100. These settings might differ for you, so you have to replace them where appropriate.
I'm running all the steps in this tutorial with root privileges, so make sure you're logged in as root:
sudo su

2 Installing MySQL 5

First we install MySQL 5 like this:
apt-get install mysql-server mysql-client
You will be asked to provide a password for the MySQL root user - this password is valid for the user root@localhost as well as root@server1.example.com, so we don't have to specify a MySQL root password manually later on:
New password for the MySQL "root" user: <-- yourrootsqlpassword
Repeat password for the MySQL "root" user: <-- yourrootsqlpassword

3 Installing Apache2

Apache2 is installed by default in ubuntu14.04, If not installed then install it. Apache2 is available as an Ubuntu package, therefore we can install it like this:
apt-get install apache2
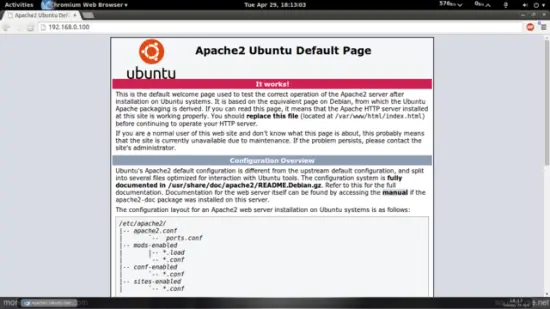
Now direct your browser to http://192.168.0.100, and you should see the Apache2 placeholder page (It works!):
Apache's default document root is /var/www/html on Ubuntu, and the configuration file is /etc/apache2/apache2.conf. The configuration system is fully documented in /usr/share/doc/apache2/README.Debian.gz

4 Installing PHP5

We can install PHP5 and the Apache PHP5 module as follows:
apt-get install php5 libapache2-mod-php5
We must restart Apache afterwards:
service apache2 restart

5 Testing PHP5 / Getting Details About Your PHP5 Installation

The document root of the default web site is /var/www/html. We will now create a small PHP file (info.php) in that directory and call it in a browser. The file will display lots of useful details about our PHP installation, such as the installed PHP version.
vi /var/www/html/info.php
<?php
phpinfo();
?>
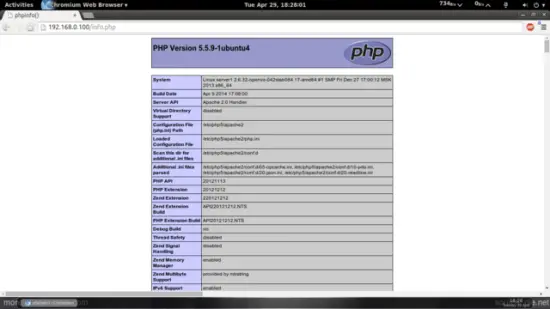
Now we call that file in a browser (e.g. http://192.168.0.100/info.php):
As you see, PHP5 is working, and it's working through the Apache 2.0 Handler, as shown in the Server API line. If you scroll further down, you will see all modules that arealready enabled in PHP5. MySQL is not listed there which means we don't have MySQL support in PHP5 yet.
6 Getting MySQL Support In PHP5

To get MySQL support in PHP, we can install the php5-mysql package. It's a good idea to install some other PHP5 modules as well asyou might need them for your applications. You can search for available PHP5 modules like this:
apt-cache search php5
Pick the ones you need and install them like this:
apt-get install php5-mysql php5-curl php5-gd php5-intl php-pear php5-imagick php5-imap php5-mcrypt php5-memcache php5-ming php5-ps php5-pspell php5-recode php5-snmp php5-sqlite php5-tidy php5-xmlrpc php5-xsl
Now restart Apache2:
service apache2 restart
Xcache is a free and open PHP opcode cacher for caching and optimizing PHP intermediate code. It's similar to other PHP opcode cachers, such as eAccelerator and APC. It is strongly recommended to have one of these installed to speed up your PHP page.
Xcache can be installed as follows:
apt-get install php5-xcache
Now restart Apache:
service apache2 restart
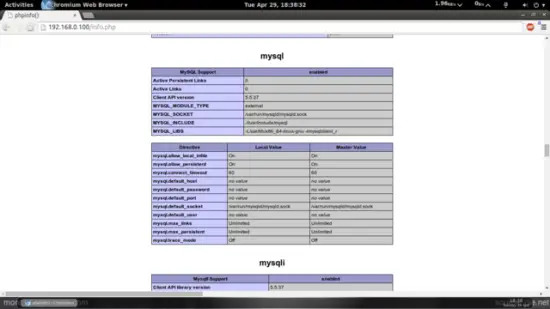
Now reload http://192.168.0.100/info.php in your browser and scroll down to the modules section again. You should now find lots of new modules there, including the MySQL module:

7 phpMyAdmin

phpMyAdmin is a web interface through which you can manage your MySQL databases. It's a good idea to install it:
apt-get install phpmyadmin
You will see the following questions:
Web server to reconfigure automatically: <-- apache2
Configure database for phpmyadmin with dbconfig-common? <-- No
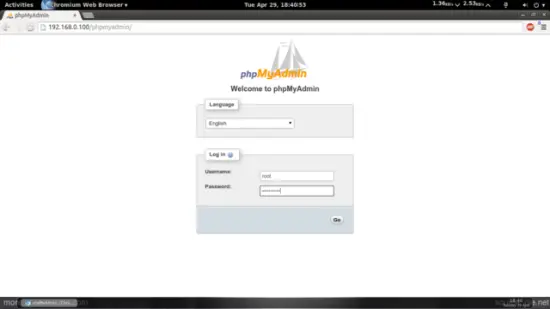
Afterwards, you can access phpMyAdmin under http://192.168.0.100/phpmyadmin/:

Monday, 6 February 2017

How to change XAMPP Apache port

Harry

About XAMPP

XAMPP is a free and open source cross-platform web server solution stack package, consisting mainly of the Apache HTTP Server, MySQL database, and interpreters for scripts written in the PHP and Perl programming languages.
The program is released under the terms of the GNU General Public License and acts as a free web server capable of serving dynamic pages. XAMPP is available for Microsoft Windows, Linux, Solaris, and Mac OS X, and is mainly used for web development projects. This software is useful while you are creating dynamic webpages using programming languages like PHP, JSP, Servlets.

Why to change default Apache port in XAMPP

If you are a developer or a QA and you want to use XAMPP it is great probability that port 80 is already in use by some other application, or maybe blocked by an administrator.
In order to avoid problems, change Apache port in XAMPP to some other value, e.g. 8080
Consider that regardless of which port you specify Apache to listen to, the XAMPP Control Panel will always display:
"Apache started [Port 80]"


  How to change Apache port in XAMPP

1) Open xampp/apache/conf/http.conf
2) Find a line "Listen 80"
3) Change port from default 80 to e.g. 8080
4) Then search for the string “ServerName” and update the port number there also. Find a line:
"ServerName localhost:80"
5) Change it to e.g. localhost:8080
6) Save the file
7) Restart XAMPP server


  How to use new port in XAMPP Apache

Let's say that your machine is localhost, so in that case you only need to add port number at the end in browser's addressbar, e.g.:
http://localhost:8080


If you like the article please share it with others!

Wednesday, 25 January 2017

How to Configure MongoDB with PHP for XAMPP on Windows

Anonymous
XAMPP is an open source, easy to use and easy to install stack that contains Apache webserver, MySQL database, PHP compiler and Perl.
MongoDB is one of the most widely NoSQL database in market today. We often end up in a situation where we might find it useful to set up mongodb also along with PHP in the XAMPP stack.
Since mongoDB is not an integral part of this stack, we have to set it up manually as the XAMPP installer is not going to take care of it for you.

Follow the steps below to configure MongoDB for the XAMPP stack.

1. Install and Configure XAMPP

First, you should install the XAMPP stack. Download and install the XAMPP stack from Apache friends project.
Also, keep in mind that you can also install XAMPP on Linux as we discussed earlier.
After the install, start your Apache server from XAMPP controls and create a simple PHP file to get the detailed info about the PHP running with your stack. Just copy paste the below lines to a test.php file in the htdocs folder and execute it to see the output.
<?php
 echo phpinfo();
?>
As highlighted in the screenshot below, you will find the PHP version, Architecture, Compiler in use and can see whether thread safety is enabled or not.
XAMPP phpinfo

2. Download PHP Mongo Driver

From this PHP Mongo Driver download page, download the appropriate file that matches the PHP version, Architecture, Compiler in use and Thread Safety from the XAMPP that is installed on your system.

3. Copy PHP Mongo DDL to EXT Directory

After you unzip the php monngo driver zip file, copy and paste the “.dll” file to the folder “C:\xampp\php\ext”( Assuming that xampp is installed on C drive).
This ext folder all the “.dll” files of all the extensions that are installed. XAMPP loads the driver files for the extensions from this folder.
After copying the file over here, rename the “.dll” file to “php_mongo.dll” for simplicity.

4. Add Extension to php.ini

Next, open the “php.ini” file from the path “C:\xampp\php” (again, assuming that xampp is installed on C drive), and edit this file to add the name of the “.dll” file as an extension.
Add the following line to the php.ini file.
extension=php_mongo.dll
Later, if you like, you can also disable this extension by adding a semicolon before the line so that it becomes as shown below:
;extension=php_mongo.dll

5. Modify the PATH Variable

Go to control panel, and open the system settings to add the “Environment Variable”.
Add the path of the xampp php installation ( C:\xampp\php ) to the path variable, if it is not present already. This ensures that the newly added “.dll” file is loaded when xampp is started.
XAMPP Add to PATH

6. Restart Apache and Verify

Finally, restart the Apache server from the XAMPP control panel.
If everything is configured properly, xampp should not throw any error messages while starting apache. You can also check the loaded extension by going through the first step and looking into the php information.
You will be able to see the loaded extension information on the page as shown below.
XAMPP phpinfo with Mongo Support