Saturday, 28 January 2017

How to Create Multiboot USB to install Ubuntu, Windows 7, 8,10

Harry
We have 2 options here: either create a bootable USB stick or a installation DVD.
For convenience and not wanting to waste another DVD, I recommend using the USB Stick method, specially when you have USB 3.0 available (computer and stick).
For those that wish to burn a DVD : Use your favorite disk burning application to burn the downloaded Ubuntu ISO file to DVD.
Creating a bootable USB stick is relatively easy with “Universal USB Installer“.
Download the application and double click it to get it started.
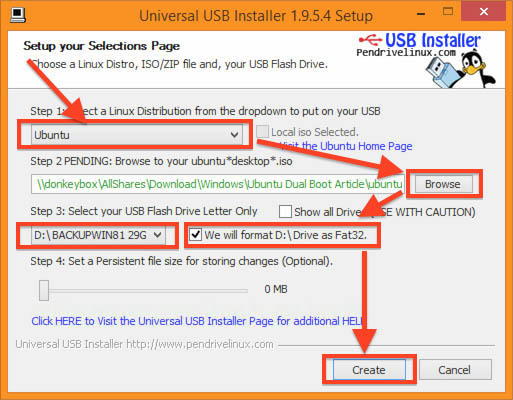
  1. Select Ubuntu from the “Select a Linux Distribution” drop down.
  2. Click “Browse” and select the downloaded Ubuntu ISO file.
  3. Select the correct drive at “Select your USB Flash Drive Letter“.
  4. CheckWe will format X:\ Drive as Fast32“.
  5. Click “Create” to start the process.

Universal USB installer
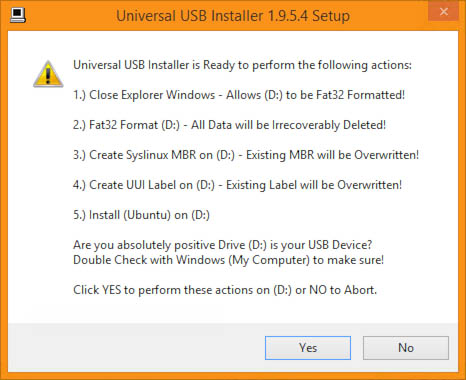
After clicking “Create” a recap will be shown of the planned actions – please verify them before clickingYes“.
Universal USB Installer - Planned Actions
Universal USB Installer – Planned Actions
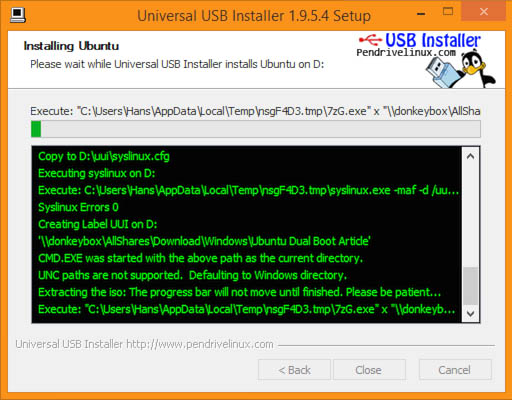
After clicking “Yes”, a few windows will fly by indicating work in progress …
Universal USB Installer - Prepping USB Drive
Universal USB Installer – Prepping USB Drive
Note that during this process, the ISO fill will be taken apart (which takes a little time), and your USB stick will be prepped.
Once you see the message “Installation Done, Process is Complete!” (in the black part of the window, in green text), your USB stick is done and ready.
Click “Close” to close Universal USB Installer.

How to reset Administrator/Root password in Ubuntu 14.04 LTS

Harry
Almost all Linux distros won’t give you with an easy password reset option at the login screen like typically seen in a Windows computer. But don’t worry, it is simple to change the password through the Ubuntu Recovery mode. This tutorial should work for almost all Ubuntu versions, but just in case if it didn’t do let us know in comments of which version didn’t work for you. I have tested it on Ubuntu 14.04.4 LTS successfully.
Ubuntu Password Reset

Reset root login password in Ubuntu

Step 1: Shutdown the computer.
Step 2: Start the computer and keep the left SHIFT key pressed to boot into Ubuntu boot menu. If you are dual booting with other OS like Windows, then select Ubuntu and then immediately keep the SHIFT key pressing. Note that you are running Ubuntu on VMware, you have to hit ESC button instead.
Step 3: Use UP/DOWN arrow keys to navigate and select ‘Advanced options for Ubuntu’.
Grub - Ubuntu
Grub – Ubuntu
Step 4: Select second item in the list ‘Ubuntu, with Linux 4.2.0-30-generic (recovery mode)’. The Linux version in your case may be different depending on your Ubuntu version.
Launch Ubuntu Recovery Mode
Step 5: Once in Recovery mode (also termed as Safe mode), use arrow keys to navigate and select ‘root’ and hit enter.
Step 6: You should now see a root prompt at the bottom of the same screen.
root@ubuntu:~#
Currently, Ubuntu file system will be read-only. You must remount it with write permissions:
mount -rw -o remount /
Ubuntu Recovery Mode
Now we shall use unix ‘passwd’ command to reset the password for an account. You must know the account login name.
root@ubuntu:~# passwd kiran
Enter new UNIX password:
Retype new UNIX password:
passwd: password updated successfully
Ubuntu Password Reset Success
That’s it.

How to Create Loop in Shell Scripting in ubuntu

Harry

Flow Control - Part 1

In this lesson, we will look at how to add intelligence to our scripts. So far, our script has only consisted of a sequence of commands that starts at the first line and continues line by line until it reaches the end. Most programs do more than this. They make decisions and perform different actions depending on conditions.
The shell provides several commands that we can use to control the flow of execution in our program. These include:
  • if
  • exit
  • for
  • while
  • until
  • case
  • break
  • continue

if

The first command we will look at is if. The if command is fairly simple on the surface; it makes a decision based on a condition. The if command has three forms:
# First form

if condition ; then
    commands
fi

# Second form

if condition ; then
    commands
else
    commands
fi

# Third form

if condition ; then
    commands
elif condition ; then
    commands
fi
       
In the first form, if the condition is true, then commands are performed. If the condition is false, nothing is done.
In the second form, if the condition is true, then the first set of commands is performed. If the condition is false, the second set of commands is performed.
In the third form, if the condition is true, then the first set of commands is performed. If the condition is false, and if the second condition is true, then the second set of commands is performed.

What is a "condition"?

To be honest, it took me a long time to really understand how this worked. To help answer this, there is yet another basic behavior of commands we must discuss.

Exit status

A properly written Unix application will tell the operating system if it was successful or not. It does this by means of an exit status. The exit status is a numeric value in the range of 0 to 255. A "0" indicates success; any other value indicates failure. Exit status provides two important features. First, it can be used to detect and handle errors and second, it can be used to perform true/false tests.
It is easy to see that handling errors would be valuable. For example, in our script we will want to look at what kind of hardware is installed so we can include it in our report. Typically, we will try to query the hardware, and if an error is reported by whatever tool we use to do the query, our script will be able to skip the portion of the script which deals with the missing hardware.
We can also use the exit status to perform simple true/false decisions. We will cover this next.

test

The test command is used most often with the if command to perform true/false decisions. The command is unusual in that it has two different syntactic forms:
# First form

test expression

# Second form

[ expression ]
       
The test command works simply. If the given expression is true, test exits with a status of zero; otherwise it exits with a status of 1.
The neat feature of test is the variety of expressions you can create. Here is an example:
if [ -f .bash_profile ]; then
    echo "You have a .bash_profile. Things are fine."
else
    echo "Yikes! You have no .bash_profile!"
fi
       
In this example, we use the expression " -f .bash_profile ". This expression asks, "Is .bash_profile a file?" If the expression is true, then test exits with a zero (indicating true) and the if command executes the command(s) following the word then. If the expression is false, then test exits with a status of one and the if command executes the command(s) following the word else.
Here is a partial list of the conditions that test can evaluate. Since test is a shell builtin, use "help test" to see a complete list.


Expression
Description
-d file
True if file is a directory.
-e file
True if file exists.
-f file
True if file exists and is a regular file.
-L file
True if file is a symbolic link.
-r file
True if file is a file readable by you.
-w file
True if file is a file writable by you.
-x file
True if file is a file executable by you.
file1 -nt file2
True if file1 is newer than (according to modification time) file2
file1 -ot file2
True if file1 is older than file2
-z string
True if string is empty.
-n string
True if string is not empty.
string1 = string2
True if string1 equals string2.
string1 != string2
True if string1 does not equal string2.
Before we go on, I want to explain the rest of the example above, since it also reveals more important ideas.
In the first line of the script, we see the if command followed by the test command, followed by a semicolon, and finally the word then. I chose to use the [ expression ] form of the test command since most people think it's easier to read. Notice that the spaces between the "[" and the beginning of the expression are required. Likewise, the space between the end of the expression and the trailing "]".
The semicolon is a command separator. Using it allows you to put more than one command on a line. For example:
[me@linuxbox me]$ clear; ls
will clear the screen and execute the ls command.
I use the semicolon as I did to allow me to put the word then on the same line as the if command, because I think it is easier to read that way.
On the second line, there is our old friend echo. The only thing of note on this line is the indentation. Again for the benefit of readability, it is traditional to indent all blocks of conditional code; that is, any code that will only be executed if certain conditions are met. The shell does not require this; it is done to make the code easier to read.
In other words, we could write the following and get the same results:
# Alternate form

if [ -f .bash_profile ]
then
    echo "You have a .bash_profile. Things are fine."
else
    echo "Yikes! You have no .bash_profile!"
fi

# Another alternate form

if [ -f .bash_profile ]
then echo "You have a .bash_profile. Things are fine."
else echo "Yikes! You have no .bash_profile!"
fi
       

exit

In order to be good script writers, we must set the exit status when our scripts finish. To do this, use the exit command. The exit command causes the script to terminate immediately and set the exit status to whatever value is given as an argument. For example:
exit 0
       
exits your script and sets the exit status to 0 (success), whereas
exit 1
       
exits your script and sets the exit status to 1 (failure).

Testing for root

When we last left our script, we required that it be run with superuser privileges. This is because the home_space function needs to examine the size of each user's home directory, and only the superuser is allowed to do that.
But what happens if a regular user runs our script? It produces a lot of ugly error messages. What if we could put something in the script to stop it if a regular user attempts to run it?
The id command can tell us who the current user is. When executed with the "-u" option, it prints the numeric user id of the current user.
[me@linuxbox me]$ id -u
501
[me@linuxbox me]$ su
Password:
[root@linuxbox me]# id -u
0
If the superuser executes id -u, the command will output "0." This fact can be the basis of our test:
if [ $(id -u) = "0" ]; then
    echo "superuser"
fi
       
In this example, if the output of the command id -u is equal to the string "0", then print the string "superuser."
While this code will detect if the user is the superuser, it does not really solve the problem yet. We want to stop the script if the user is not the superuser, so we will code it like so:
if [ $(id -u) != "0" ]; then
    echo "You must be the superuser to run this script" >&2
    exit 1
fi
       
With this code, if the output of the id -u command is not equal to "0", then the script prints a descriptive error message, exits, and sets the exit status to 1, indicating to the operating system that the script executed unsuccessfully.
Notice the ">&2" at the end of the echo command. This is another form of I/O direction. You will often notice this in routines that display error messages. If this redirection were not done, the error message would go to standard output. With this redirection, the message is sent to standard error. Since we are executing our script and redirecting its standard output to a file, we want the error messages separated from the normal output.
We could put this routine near the beginning of our script so it has a chance to detect a possible error before things get under way, but in order to run this script as an ordinary user, we will use the same idea and modify the home_space function to test for proper privileges instead, like so:
function home_space
{
    # Only the superuser can get this information

    if [ "$(id -u)" = "0" ]; then
        echo "<h2>Home directory space by user</h2>"
        echo "<pre>"
        echo "Bytes Directory"
            du -s /home/* | sort -nr
        echo "</pre>"
    fi

}   # end of home_space
       
This way, if an ordinary user runs the script, the troublesome code will be passed over, rather than executed and the problem will be solved.
Thursday, 26 January 2017

Unix - Virtual Terminal

Anonymous

Linux is a multi-user system, which allows many users to work on it simultaneously. So what if different users need to work on the same system at a time? How do you do that? This is where we need the virtual terminals, let us learn about them.
Please be patient. The Video will load in some time. If you still face issue viewing video click here

What are virtual terminals?

Unix - Virtual Terminal
Virtual Terminals are similar to Terminal that you have been using so far.  They are used for executing commands and offering input. The only difference is that you cannot use the mouse with the Virtual Terminals. Therefore, you need to know the keyboard shortcuts.
Virtual Terminals enable a number of users to work on different programs at same time on the same computer. This is the reason they are one of the most distinguished feature of Linux.
 
Let us learn how to access and utilize them.

Starting a Virtual terminal

Usually there are six (default) virtual terminals on a Linux operating system and you can log in to them as different users to conducts different tasks. The steps to launch a Virtual terminal are:
1) Press Ctrl+Alt+F1
Unix - Virtual Terminal
2) Enter User ID and Password
Unix - Virtual Terminal
3) Now the Virtual Terminal is ready to work on
Unix - Virtual Terminal

Navigating through Virtual Terminals

You can navigate between the 6 virtual terminals using the following command
Ctrl + Alt + F (1 to 6) key
F1 being the first while F6 being the last virtual terminal.
You can work on all of at the same time.
In order to know which virtual terminal you are working on, note tty given at the top.
Unix - Virtual Terminal
tty is the teletype number which you can also know by typing the command "tty".
Unix - Virtual Terminal

The seventh terminal

The seventh terminal is the one which we have been using so for in Linux tutorials. It can be accessed by pressing the below given key combination.
Ctrl + Alt + F7

Virtual Terminal shortcuts

These are some of the shortcuts that you should be aware of while working on virtual terminals.
Shortcut Function
Home or Ctrl + a Move the cursor to the start of the current line
End or Ctrl + e Move the cursor to the end of the current line
Tab Autocomplete commands
Ctrl + u Erase the current line
Ctrl + w Delete the word before the cursor
Ctrl + k Delete the line from the cursor position to the end
reset Reset the terminal
history List of commands executed by the user
Arrow up Scroll up in history and enter to execute
Arrow down Scroll down in history and enter to execute
Ctrl + d Logout from the terminal
Ctrl + Alt + Del Reboot the system
 
Unix - Virtual Terminal

Summary:

  •  Virtual terminals are CLIs which execute the user commands
  • There are six virtual terminals which can be launched using the shortcut keys
  • They offer multi-user environment and up to six users can work on them at the same time
  • Unlike terminals you cannot use mouse with virtual terminals
  • To launch a virtual terminal press Ctrl+Alt+F(1 to 6) on the keyboard
  • Use the same command for navigating through the different terminals
  • To return to the home screen of the Linux system, use Ctrl+Alt+F7 and it would take to you the terminal

Introduction to PERL Programming

Anonymous

Introduction to PERL Programming

What is Perl?

Perl is a programming language especially  designed for text editing. It is now widely used for a variety of purposes including Linux system administration, network programming, web development etc.
Perl is of great importance in a Linux operating system where it can be used to create programs, handle Databases and e-mails, GUI (Graphical User Interface) development, Networking and System Administration.
 
Please be patient. The Video will load in some time. If you still face issue viewing video click here

PERL V/s Shell Scripting

Introduction to PERL Programming
Even though, shell scripting is available to programmers, they prefer Perl because:
  • Programming on Perl does not cause portability issues, which is common when using different shells in shell scripting.
  • Error handling is very easy on Perl
  • You can write long and complex programs on Perl easily due to its vastness. This is in contrast with Shell that does not support namespaces , modules , object , inheritance etc.
  • Shell has fewer reusable libraries available . Nothing compared to Perl's CPAN
  • Shell is less secure. Its calls external functions(commands like mv , cp etc depend on the shell being used) . On the contrary PERL does useful work while using internal functions.

Perl Basics

Always start your script with  
#!/usr/bin/perl
It directs the execution to Perl interpreter on your system.
Introduction to PERL Programming
The path is usually the same on most of the Linux distributions.
 

Storing Variables, Input and Output

Action Description Syntax Example
Defining a Variable value Storing values to a Variable in form of string and number $variable = "value"; $name = "Ronald";
Output in Perl If you want a string or a value to display on the screen then you can use the print command print ("value to be printed") ;   Print("thanks");
Input in Perl If you want a user input to be assigned to a variable use $variable = ; $username = ;
Important points
  • With this, if you want the Perl interpreter to ignore a statement, prefix it with a # symbol.
  • Remember that every statement in Perl ends with a semi-colon.
  • Perl is case-sensitive . Make sure you use the right case.
  • You can use any text editor to write your PERL scripts.
  • You should then save the script file in .pl extension which will make it recognizable.
  • Make sure you do not use spaces when you are naming the Perl script file.
 
Introduction to PERL Programming

Creating a PERL Script

Let us understand the steps in creating a PERL Script
 
  1. Create a file using a vi editor(or any other editor).  Name  script file with extension .pl
  2. Start the script with #! /bin/perl
  3. Write some code.
  4. Save the script file  as filename.pl
  5. For executing the script type perl filename.pl
 
Let's write a PERL script which will take input from the user and display it back through the script.
#!/usr/bin/perl
print("May I take your name please?") ;
$name = ;
print("Thank you $name");
 
Let's see the steps to create this script -
Introduction to PERL Programming
Summary:
  • Perl is a general-purpose programming language originally developed for text manipulation
  • Now used for a wide range of tasks including system administration, web development, network programming, GUI development, and more.
  • Perl files have .pl extension
  • There are three types of variables in Perl, Scalar, Lists and Hashes.

Introduction to Shell Scripting

Anonymous

What is a Shell?

An Operating is made of many components but its  two prime components are -
  • Kernel
  • Shell
Introduction to Shell Scripting
Please be patient. The Video will load in some time. If you still face issue viewing video click here
Kernel is at the nucleus of a computer. It makes the communication between the hardware and software possible. While the Kernel is the innermost part of an operating system, a shell is the outermost one.
A shell in a Linux operating system takes input from you in the form of commands, processes it, and then gives an output. It is the interface through which a user works on the programs, commands and scripts. A shell is accessed by a terminal which runs it.
When you run the terminal, the Shell issues a command prompt (usually $), where you can type your input, which is then executed when you hit the Enter key. The output or the result is thereafter displayed on the terminal.
The Shell wraps around the delicate interior of an Operating system protecting it from accidental damage. Hence the name Shell.

Types of Shell

There are two main shells in Linux:
1. The Bourne Shell: The prompt for this shell is $ and its derivatives are listed below:
  • POSIX shell  also known as sh
  • Korn Shell also known as sh
  • Bourne Again SHell also known as bash (most popular)
2. The C shell: The prompt for this shell is % and its subcategories are:
  • C shell also known as csh
  • Tops C shell also known as tcsh
We will discuss bash shell based shell scripting in this tutorial.

What is Shell scripting and why do I need it?

Writing a series of command for the shell to execute is called shell scripting.It can combine lengthy and repetitive sequences of commands into a single and simple script, which can be stored and executed anytime. This reduces the effort required by the end user..
Let us understand the steps in creating a Shell Script
  1. Create a file using a vi editor(or any other editor).  Name  script file with extension .sh
  2. Start the script with #! /bin/sh
  3. Write some code.
  4. Save the script file as filename.sh
  5. For executing the script type bash filename.sh
"#!" is an operator called shebang which directs the script to the interpreter location. So, if we use"#! /bin/sh" the script gets directed to the bourne-shell.
Let  create a small script -
#!/bin/sh
ls
Let's see the steps to create it -
Introduction to Shell Scripting
 
Command 'ls' is executed when we execute the scripsample.sh file.

Adding shell comments

Commenting is important in any program. In Shell, the syntax to add a comment is
#comment
Let understand this with an example
Introduction to Shell Scripting

What are Shell Variables?

As discussed earlier, Variables store data in the form of characters and numbers. Similarly, Shell variables are used to store information and they can by the shell only.
For example, the following creates a shell variable and then prints it:
variable ="Hello"
echo $variable
Below is a  small script which will use a variable.
#!/bin/sh
echo "what is your name?"
read name
echo "How do you do, $name?"
read remark
echo "I am $remark too!"
Let's understand,  the steps to create and execute the script
Introduction to Shell Scripting
As you see, the program picked the value of the variable 'name' as Joy and 'remark' as excellent.
This is a simple script. You can develop advanced scripts which contain conditional statements, loops and functions.  Shell scripting will make your life easy and Linux administration a breeze. 
Introduction to Shell Scripting

Summary:

  • Kernel is the nucleus of the operating systems and it communicates between hardware and software
  • Shell is a program which interprets user commands through CLI like Terminal
  • The Bourne shell and the C shell are the most used shells in Linux
  • Shell scripting is writing a series of command for the shell to execute
  • Shell variables store the value of a string or a number for the shell to read
  • Shell scripting can help you create complex programs containing conditional statements, loops and functions

Linux - Finger Command To Find User Details

Anonymous

more linux commands
On Linux operating system, you can simply check the information of any user from remote or local command line interface. That is ‘finger’ command. To use this command, your Linux machine need have ‘finger’ utility installed on it. This feature is a very basic with Linux system, so you can easily find install package proper with you Linux system. This article will focus on usage of ‘finger’ command and its options with demonstration command run on Ubuntu Linux.
Syntax
finger [-lmsp] [user1 user2 ….. ]

Finger command with option -s

With option –s ‘finger’ displays the user's login name, real name, terminal name and write status ( the asterisk before terminal name mean that you don’t have write permission with that device ), idle time, login time, office location and office phone number. The login time is displayed with format MM DD HH:mm. If the time exceeds six months, the year is displayed rather than the hours and minutes.
Unknown devices as well as nonexistent idle and login times are displayed as single asterisk.
Linux finger command

Finger command with option -l

The option –l follow the ‘finger’ command with produces a multi-line format displaying all of the information described for the -s option as well as the user's home directory, home phone number, login shell, mail status, and the contents of the files “.plan”, “.project”, “.pgpkey” and “.forward” from the user's home directory.
linux finger command
The phrase “(messages off)'' mean that user ‘harry’ don’t have write permission to ‘root’ on the devices pts/4 and pts/7. One entry per user is displayed with the –l option; if a user is logged on multiple times, terminal information is repeated once per login.
Mail status is shown as ``No Mail.'' if there is no mail at all, ``Mail last read DDD MMM ## HH:MM YYYY (TZ)'' if the person has looked at their mailbox since new mail arriving, or ``New mail received ...'', “Unread since ...'' if they have new mail.

Finger command with option -p

The option –p is completely same with option –l, except it doesn’t include“.plan”, “.project” and “.pgpkey” files of users in returned result.
linux finger command

Finger command with option -m

With the option –m ‘finger’ will prevent matching of user names in returned result. User is usually a login name; however, matching will also be done on the users' real names, unless the -m option is supplied. All name matching performed by finger is case insensitive. For example, our system has two users named ‘harry’ and ‘harry1’. Without option –m, ‘finger’ will return information of both users and only return information of user ‘harry’ if there –m follow.
With option ‘-m’
linux finger command
Without option ‘-m’
linux finger command options
If no options are specified, finger defaults to the -l style output if operands are provided, otherwise to the -s style. Note that some fields may be missing, in either format, if information is not available for them.
If no arguments are specified, finger will print an entry for each user currently logged into the system.
linux command finger