You have finished your Android app, and celebrated its perfection
with many flagons of ale (or
 pitchers of beer). Hooray! Now you’re ready
to send your app out into the world. Soon it will reside not only on
your own Android device, but on the devices of people around the globe.
It’s an exciting step!
pitchers of beer). Hooray! Now you’re ready
to send your app out into the world. Soon it will reside not only on
your own Android device, but on the devices of people around the globe.
It’s an exciting step!
There are several ways to distribute your Android app. This Android app distribution tutorial will cover two of the most common channels: the Google Play Store, where over 1.8 million Android apps are available, and the Amazon Appstore, which has over 300,000.
In this step-by-step tutorial, you’ll see how to take your finished Android app and release it to the Google Play Store and other stores. Let’s get shipping! :]
Download and unzip this archive and open the project in Android Studio.
Currently, the best way to refactor an app’s package name in Android Studio is to start in the Project pane of Android Studio, with the Android view chosen. Select the gear icon that looks like this:

You will see a drop-down menu with several project viewing options. Uncheck Compact Empty Middle Packages if it is not already unchecked:

Now you can refactor the parts of the package name separately. Right-click on the package named example, select Refactor\Rename, and change it to your name or domain name. Then do the same for the package omgandroid. Your project should now look like this (with your own names instead of mine):

Next, open build.gradle (the one labeled Module: OMGAndroid, NOT the one for whole project), and find
Finally, open manifest\AndroidManifest.xml, find the
Build and run to verify that your refactoring worked correctly. With
your unique package name in hand, you’re now ready to package your app
for distribution.
Android requires that APKs are digitally signed with a certificate before they can be installed. The certificate is used to identify the author of the app. More information about app signing can be found here.
A signed APK can be generated manually from command line or in Android Studio.
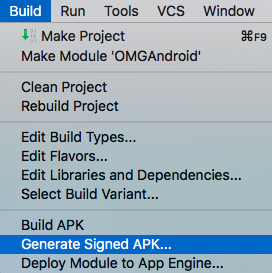
In Android Studio, select Build\Generate Signed APK….
Your app only has one module, so select Next.

With your app module chosen, you need to tell Android Studio how to sign the APK. You’ll use a key store, which will stay private to you. Android Studio will guide you through creating a new key store; start by selecting Create new….

Choose a filename and location on your system, set and confirm a secure password, and fill in the rest of the information about yourself:

Click OK, and Android Studio will create your key store. You’ll need that file, with its password info, to make any updates to your app, so don’t lose it!
With your new key store, Android Studio returns you to the dialog box you saw before. Now the key store information is pre-filled, so just click Next.

Choose a destination folder for your signed APK, specify your Build Type as release, and click Finish.

When the packaging process is complete, Android Studio will notify you that your APK is ready, and let you open it in Finder:

With your APK in hand, it’s time to head to the store.
When you are signed into your Google Account, navigate to the Google Play Developer Console. You should see a screen like this:

Agree to the Google Play Developer distribution agreement, pay the one-time $25 Google Developer Registration Fee, then complete your Developer Profile on this screen:

With your developer account now registered, your developer console has more options. Click Publish an Android App on Google Play to continue.

Since this is your first application, you’re given a dialog box to specify the app name and a choice on how to begin. Type in your app name and choose Upload APK.

This creates a draft store listing for your app, currently containing nothing except the app title. To begin, click Upload your first APK to Production.

Choose the APK file you created earlier, and upload it. When the upload is complete, you will see the app listing updated like this:

Notice that the check mark next to APK is green, indicating that your APK is ready!
Time to move on to the remaining check marks…

If you prefer to use an emulator for the screenshots, you can easily make these in Android Studio. Build and run the app, then navigate to the part of the app where you’d like the screenshot.
With the Android Monitor tab opened in Android Studio, click the camera icon on the far left:

Android Studio will present you with the captured image from the emulator. Click Save and select the file location on your system.
Drag these images onto your store listing where you see the following prompt:
In addition to screenshots, you need to upload a 512×512 high-resolution version of the app icon and a 1024×500 “feature graphic” to display at the top of the page. For our sample app, use these resources:
Sample App Icon
Sample Feature Graphic
Complete the store listing by specifying an Application Type, Category, Content rating, and Contact Email. Other fields are optional.
Scroll back to the top of the store listing and click Save draft. Since the listing is now complete, the Store Listing check mark is now green. We’re making progress!
Click on the Content Rating check mark to see a description of the upcoming content rating questionnaire.

This questionnaire asks a straightforward series of questions about the content of the app. For those using our sample app, Bookmaster General is in the Reference, News, or Educational category; answer No to all the content questions. If you’re using your own app, give the appropriate answers.
Once you are finished, click Save questionnaire, then Calculate rating. You will see the ratings for the various locales where your app may be on sale:

Scroll to the bottom of the list and click Apply rating. The Content Rating check mark is now green.
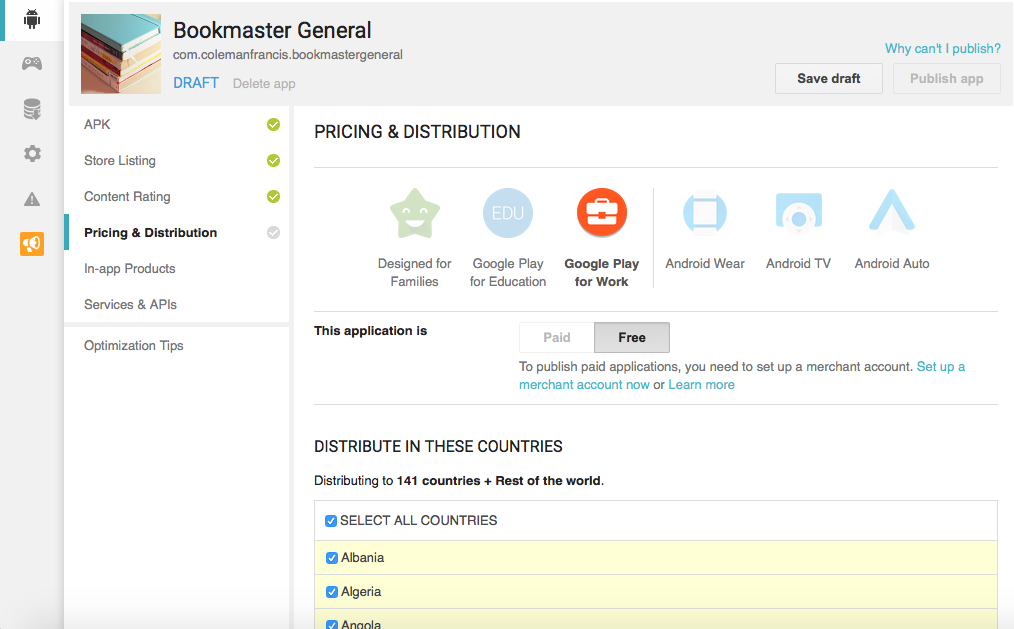
Select the Pricing & Distribution check mark for the final step: setting the price of your app, and in which countries it will be available. For this example, the app will be free and available universally.
The Free pricing option is selected by default, so keep that choice. Check the box next to SELECT ALL COUNTRIES.

Scroll down past the list of countries, and you will find several more distribution options. Check the boxes by Content guidelines and US export laws to indicate your app’s compliance with relevant rules, then scroll to the top of the page and click Save draft.
With that, the final check box is green, and the Publish app button in the top-right of the console is now active! When you’re satisfied with your app and store listing, go ahead and click it.
Your app listing status now updates to Pending Publication, like this:

It generally takes at least a few hours for your app to be available in Google Play, so go grab some pizza. Eventually you’ll see a listing like this one:

Congratulations on your first app in Google Play!
This option is usually available in the Settings app under Security:

Note that, on some devices, there is a rather foreboding message to warn the user of malicious APKs when the user turns on Unknown sources:


Just be aware that some users are not going to want to live dangerously.
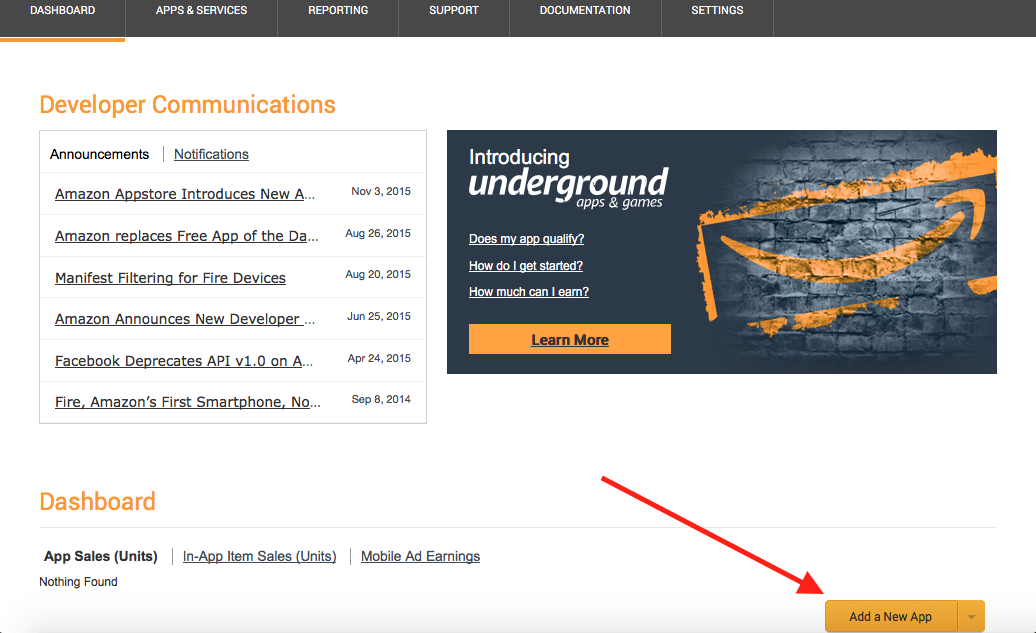
To get started here, navigate to the Amazon developer portal. Create a new Amazon account or sign in with an existing one.
When you first join the developer program, you are asked to verify address and company information for use in your app listings. You also have a developer agreement to accept, and Amazon asks you if you plan to charge money for your apps. If you are publishing your apps for free, mark that choice and complete your registration. If you do plan to monetize your app, Amazon will ask for your financial information.
Once registered, you are returned to an empty Developer Console. Scroll down and click Add a New App.

When asked to choose a platform, choose Android and click Next. You then fill out general information on your app, along with support contact information. When finished, click Save to move on.

Now you have a listing page for your app. Similar to Google Play, there are several steps to accomplish before the Submit app button will become active.

First, select Availability & Pricing. Choose Standard app, all countries, free app, and note the date the app was available elsewhere, if applicable. Then click Save.

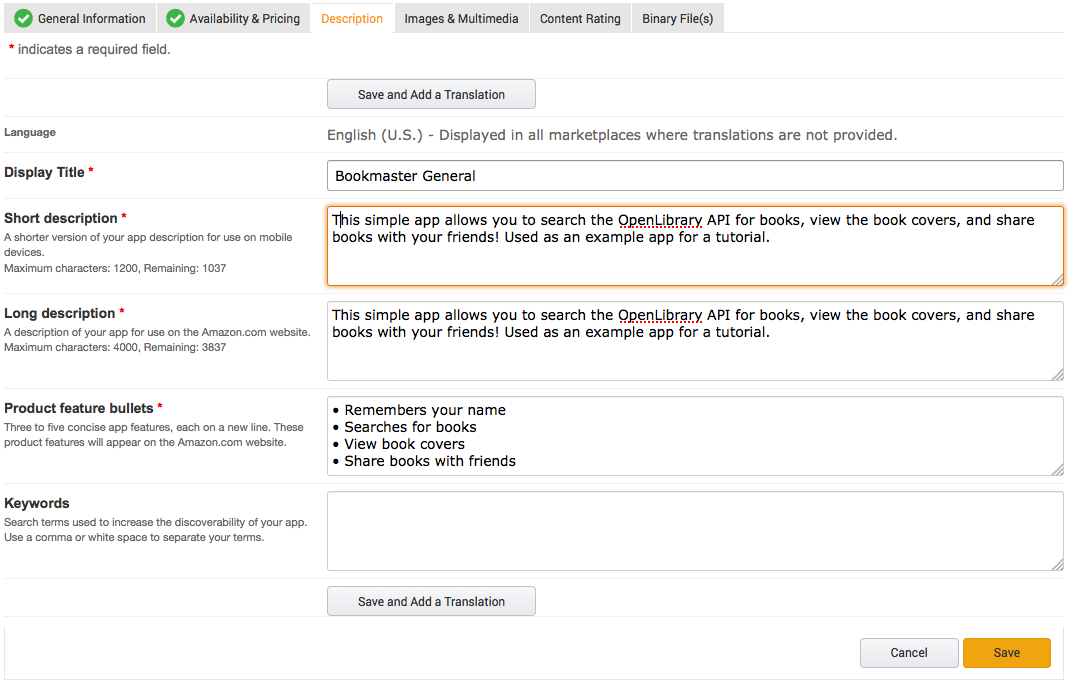
Next, click the Description tab, fill out the required app description info, and click Save.

The contents for Images & Multimedia are mostly already prepared from your Google Play listing, except for a smaller version of your app icon. The app screenshot dimensions are more specific here, so you may have to do some resizing. You also need three app screenshots here instead of the two required by Google Play.
Upload those images and click Save.
The Content Rating tab has a questionnaire similar to the one on Google Play. Supply your answers about any potentially objectionable content and click Save.
Upload your signed APK under the Binary File(s). When the upload finishes, you may get a warning that some older Amazon devices aren’t supported by your app. Click Edit device support to the right of Amazon Fire phones and tablets:

De-select the unsupported devices with warning labels and click OK.

Wrap up by checking the box next to Export Compliance, then click Save.
You’re ready to submit, so scroll down your store listing and click Submit App.
If your submission is successful, your store listing will look like this:

Several hours later, pending Amazon approval, your app will be live! Here is the Bookmaster General listing:

Note that Google Play also has Alpha and Beta channels built in, so you have several good options for pre-release distribution.
This app streaming is only available on a few launch partners at the moment, but be aware that the trend is coming soon.
I hope this Android app distribution tutorial helps you get your apps into the hands of real users! If you have any questions or comments, please join the forum discussion below.
There are several ways to distribute your Android app. This Android app distribution tutorial will cover two of the most common channels: the Google Play Store, where over 1.8 million Android apps are available, and the Amazon Appstore, which has over 300,000.
In this step-by-step tutorial, you’ll see how to take your finished Android app and release it to the Google Play Store and other stores. Let’s get shipping! :]
Getting Started
To publish an app, you first need … a finished app, of course :] For this tutorial, you’ll use a simple app that allows users to search for books, see book covers, and share books with friends.Download and unzip this archive and open the project in Android Studio.
Note: If you have a finished Android app of
your own, you can use it instead of the sample app, and work alongside
this tutorial to put it in the store.
Before going any further, you must set a new package name across the
app. The package name needs to be unique and remain unchanged in Google
Play. A common format is the reverse-domain name, like this:com.your_domain_name.app_name |
You will see a drop-down menu with several project viewing options. Uncheck Compact Empty Middle Packages if it is not already unchecked:

Now you can refactor the parts of the package name separately. Right-click on the package named example, select Refactor\Rename, and change it to your name or domain name. Then do the same for the package omgandroid. Your project should now look like this (with your own names instead of mine):
Next, open build.gradle (the one labeled Module: OMGAndroid, NOT the one for whole project), and find
defaultConfig. Add a applicationId parameter with your new package name:defaultConfig { applicationId 'com.colemanfrancis.bookmastergeneral' minSdkVersion 14 targetSdkVersion 23 } |
manifest tag at the top of the file, and locate the package attribute within it. Update it with your new package name:<manifest xmlns:android="http://schemas.android.com/apk/res/android" package="com.colemanfrancis.bookmastergeneral" android:versionCode="1" android:versionName="1.0"> |
Creating a Signed APK
When developing on the Android operating system, you use the Android application package (APK) format to distribute apps.Android requires that APKs are digitally signed with a certificate before they can be installed. The certificate is used to identify the author of the app. More information about app signing can be found here.
A signed APK can be generated manually from command line or in Android Studio.
In Android Studio, select Build\Generate Signed APK….
Your app only has one module, so select Next.

With your app module chosen, you need to tell Android Studio how to sign the APK. You’ll use a key store, which will stay private to you. Android Studio will guide you through creating a new key store; start by selecting Create new….

Choose a filename and location on your system, set and confirm a secure password, and fill in the rest of the information about yourself:

Click OK, and Android Studio will create your key store. You’ll need that file, with its password info, to make any updates to your app, so don’t lose it!
With your new key store, Android Studio returns you to the dialog box you saw before. Now the key store information is pre-filled, so just click Next.

Choose a destination folder for your signed APK, specify your Build Type as release, and click Finish.

When the packaging process is complete, Android Studio will notify you that your APK is ready, and let you open it in Finder:
With your APK in hand, it’s time to head to the store.
The Google Play Developer Console
To submit an app to Google Play, you first need a Google Account. Create one here (or sign in, if you already have an account) before going further.When you are signed into your Google Account, navigate to the Google Play Developer Console. You should see a screen like this:

Agree to the Google Play Developer distribution agreement, pay the one-time $25 Google Developer Registration Fee, then complete your Developer Profile on this screen:

With your developer account now registered, your developer console has more options. Click Publish an Android App on Google Play to continue.

Since this is your first application, you’re given a dialog box to specify the app name and a choice on how to begin. Type in your app name and choose Upload APK.

This creates a draft store listing for your app, currently containing nothing except the app title. To begin, click Upload your first APK to Production.

Choose the APK file you created earlier, and upload it. When the upload is complete, you will see the app listing updated like this:

Notice that the check mark next to APK is green, indicating that your APK is ready!
Time to move on to the remaining check marks…
Completing the Store Listing
Bookmaster General is a pretty simple app, so the rest of the process will be easy. Click on the Store Listing check mark in the menu on the left page and fill in the Short Description and Full Description fields with information about the app:
Note: For your own app, you will want to create as engaging a
description as possible, so start thinking about this early in the
development process!
Next, upload at least two screenshots of the app. If you have the app
on an Android device, you can simply take screenshots straight from the
device.If you prefer to use an emulator for the screenshots, you can easily make these in Android Studio. Build and run the app, then navigate to the part of the app where you’d like the screenshot.
With the Android Monitor tab opened in Android Studio, click the camera icon on the far left:

Android Studio will present you with the captured image from the emulator. Click Save and select the file location on your system.
Drag these images onto your store listing where you see the following prompt:
In addition to screenshots, you need to upload a 512×512 high-resolution version of the app icon and a 1024×500 “feature graphic” to display at the top of the page. For our sample app, use these resources:
Sample App Icon
Sample Feature Graphic
Complete the store listing by specifying an Application Type, Category, Content rating, and Contact Email. Other fields are optional.
Scroll back to the top of the store listing and click Save draft. Since the listing is now complete, the Store Listing check mark is now green. We’re making progress!
Click on the Content Rating check mark to see a description of the upcoming content rating questionnaire.

This questionnaire asks a straightforward series of questions about the content of the app. For those using our sample app, Bookmaster General is in the Reference, News, or Educational category; answer No to all the content questions. If you’re using your own app, give the appropriate answers.
Once you are finished, click Save questionnaire, then Calculate rating. You will see the ratings for the various locales where your app may be on sale:

Scroll to the bottom of the list and click Apply rating. The Content Rating check mark is now green.
Select the Pricing & Distribution check mark for the final step: setting the price of your app, and in which countries it will be available. For this example, the app will be free and available universally.
The Free pricing option is selected by default, so keep that choice. Check the box next to SELECT ALL COUNTRIES.
Scroll down past the list of countries, and you will find several more distribution options. Check the boxes by Content guidelines and US export laws to indicate your app’s compliance with relevant rules, then scroll to the top of the page and click Save draft.
With that, the final check box is green, and the Publish app button in the top-right of the console is now active! When you’re satisfied with your app and store listing, go ahead and click it.
Your app listing status now updates to Pending Publication, like this:
It generally takes at least a few hours for your app to be available in Google Play, so go grab some pizza. Eventually you’ll see a listing like this one:

Congratulations on your first app in Google Play!
Other Distribution Channels (Optional)
While Google Play is the main channel for distribution, you are free to distribute your APK through other means. Consider this section as a reference in case you want to try one of them.Unknown Sources
There is a big caveat to using any method other than Google Play for distributing your app: the users must have the Unknown sources setting enabled on their Android device to allow an APK not from Google Play. Some carriers do not allow this setting to be turned on at all. More information is available here.This option is usually available in the Settings app under Security:
Note that, on some devices, there is a rather foreboding message to warn the user of malicious APKs when the user turns on Unknown sources:
Just be aware that some users are not going to want to live dangerously.
Amazon Appstore
The Amazon Appstore is powered by Amazon, registration as a developer is free, and the store is non-exclusive, so you can submit your app to both Google Play and the Amazon Appstore.To get started here, navigate to the Amazon developer portal. Create a new Amazon account or sign in with an existing one.
When you first join the developer program, you are asked to verify address and company information for use in your app listings. You also have a developer agreement to accept, and Amazon asks you if you plan to charge money for your apps. If you are publishing your apps for free, mark that choice and complete your registration. If you do plan to monetize your app, Amazon will ask for your financial information.
Once registered, you are returned to an empty Developer Console. Scroll down and click Add a New App.
When asked to choose a platform, choose Android and click Next. You then fill out general information on your app, along with support contact information. When finished, click Save to move on.

Now you have a listing page for your app. Similar to Google Play, there are several steps to accomplish before the Submit app button will become active.

First, select Availability & Pricing. Choose Standard app, all countries, free app, and note the date the app was available elsewhere, if applicable. Then click Save.

Next, click the Description tab, fill out the required app description info, and click Save.
The contents for Images & Multimedia are mostly already prepared from your Google Play listing, except for a smaller version of your app icon. The app screenshot dimensions are more specific here, so you may have to do some resizing. You also need three app screenshots here instead of the two required by Google Play.
Upload those images and click Save.
The Content Rating tab has a questionnaire similar to the one on Google Play. Supply your answers about any potentially objectionable content and click Save.
Upload your signed APK under the Binary File(s). When the upload finishes, you may get a warning that some older Amazon devices aren’t supported by your app. Click Edit device support to the right of Amazon Fire phones and tablets:

De-select the unsupported devices with warning labels and click OK.

Wrap up by checking the box next to Export Compliance, then click Save.
You’re ready to submit, so scroll down your store listing and click Submit App.
If your submission is successful, your store listing will look like this:

Several hours later, pending Amazon approval, your app will be live! Here is the Bookmaster General listing:

HockeyApp and Crashlytics
While not app stores, HockeyApp (owned by Microsoft) and Crashlytics (owned by Twitter) are two leading platforms for beta testing. You can easily sign up beta testers and other team members, manage versions, and track app crashes. Each supports iOS apps, which could make beta testing simpler if you are developing for both platforms.Note that Google Play also has Alpha and Beta channels built in, so you have several good options for pre-release distribution.
Google Play Private Channel
If you are already maintaining Google Apps for your organization (Gmail, Google Calendar, Drive, etc), you can create a private channel of Google Play for your employees. Then when you publish an Android app, you can make it available only on this private channel instead of to the whole public. See Google Support for more info.Google App Streaming
In a new service, Google is beginning to run versions of mobile apps on virtual machines in Google’s cloud. This means that users may be able to “stream” your app’s native content without needing to download your app.This app streaming is only available on a few launch partners at the moment, but be aware that the trend is coming soon.
Hosting on Your Own Website or Via Email
As long as users have Unknown sources enabled, you are free to send them your APK file however you like. You can even simply host the file on your website or send it over email! For instance, even a service like HockeyApp or Crashlytics would be too much for an extremely early demo meant for a few coworkers, so you can simply email them the APK.Where to Go From Here?
The Google Play Developer Console has several other features, such as teammate invitations and Google Apps keys (necessary for apps that use Google Maps and similar services). You can read about these features and more on the Android Developer page and the Google Play Developer Help Center.I hope this Android app distribution tutorial helps you get your apps into the hands of real users! If you have any questions or comments, please join the forum discussion below.


0 comments:
Post a Comment
Note: only a member of this blog may post a comment.