 From fitness apps such as Runkeeper to games such as Pokemon Go,
location services are an
From fitness apps such as Runkeeper to games such as Pokemon Go,
location services are an increasingly important part of modern apps.
In this Google Maps API tutorial, you will create an app named City Guide. The app allows a user to search for a location, use Google Maps to show the address of the location and listen for the user’s location changes.
You will learn how to use the Google Maps Android API, the Google Location Services API and the Google Places API for Android to do the following:
- Show a user’s current location
- Display and customize markers on a map
- Retrieve the address of a location given the coordinates
- Listen for location updates
- Search for places
Note: This Google Maps API tutorial assumes
you are already familiar with the basics of Android development. If you
are completely new to Android development, read through our Android Tutorial for Beginners to familiarize yourself with the basics.
Getting Started
Open Android Studio and select Start a new Android Studio project from the Quick Start menu:
In the Create New Project dialog, on the New Project view, enter the name of the app as City Guide, select your prefered folder location for the project files and click Next.

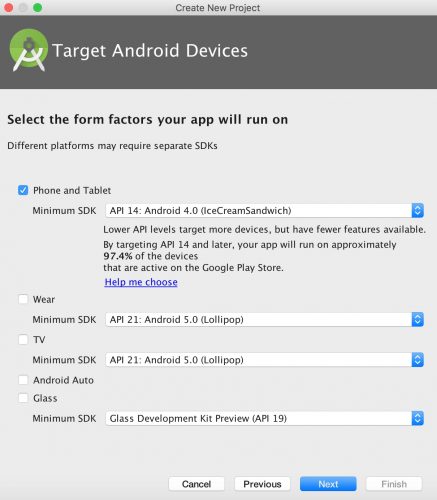
On the Target Android Devices view, check the Phone and Tablet box and select the minimum SDK you want the app to support. Specify API 14 from the Minimum SDK drop down and click Next.
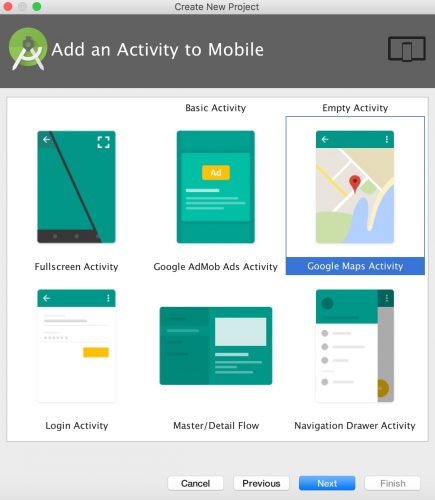
On the Add an Activity to Mobile view, select the Google Maps Activity and click Next.
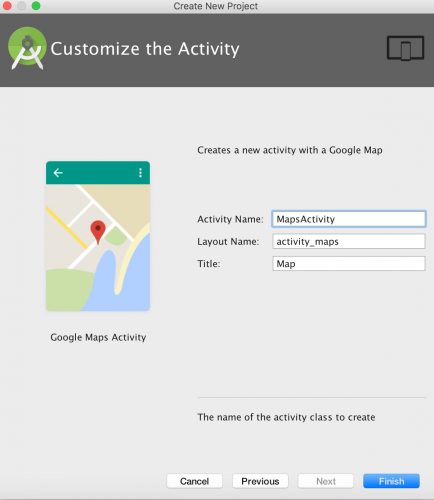
On the Customize the Activity view, click Finish to complete the project creation process.
Android Studio will start Gradle and build your project. This may take a few seconds.
Open MapsActivity.java. It should look like this:
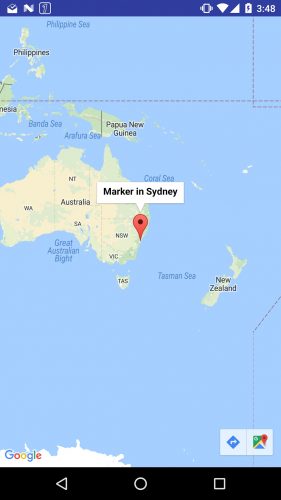
package com.raywenderlich.cityguide; import android.support.v4.app.FragmentActivity; import android.os.Bundle; import com.google.android.gms.maps.CameraUpdateFactory; import com.google.android.gms.maps.GoogleMap; import com.google.android.gms.maps.OnMapReadyCallback; import com.google.android.gms.maps.SupportMapFragment; import com.google.android.gms.maps.model.LatLng; import com.google.android.gms.maps.model.MarkerOptions; // 1 public class MapsActivity extends FragmentActivity implements OnMapReadyCallback { private GoogleMap mMap; // 2 @Override protected void onCreate(Bundle savedInstanceState) { super.onCreate(savedInstanceState); setContentView(R.layout.activity_maps); // Obtain the SupportMapFragment and get notified when the map is ready to be used. SupportMapFragment mapFragment = (SupportMapFragment) getSupportFragmentManager() .findFragmentById(R.id.map); mapFragment.getMapAsync(this); } // 3 @Override public void onMapReady(GoogleMap googleMap) { mMap = googleMap; // Add a marker in Sydney and move the camera LatLng sydney = new LatLng(-34, 151); mMap.addMarker(new MarkerOptions().position(sydney).title("Marker in Sydney")); mMap.moveCamera(CameraUpdateFactory.newLatLng(sydney)); } } |
- MapsActivity currently implements the OnMapReadyCallback interface and extends FragmentActivity.
- The class overrides FragmentActivity’s onCreate() method
- You also override OnMapReadyCallback’s onMapReady() method. This method is called when the map is ready to be used. The code declared in this method creates a marker with coordinates near Sydney, Australia and adds the marker to the map.
- A declaration of the ACCESS_FINE_LOCATION permission. This is required to access the user’s precise location.
- The com.google.android.geo.API_KEY meta-data. This is used to specify the API key.
compile 'com.google.android.gms:play-services:VERSION_HERE'
|
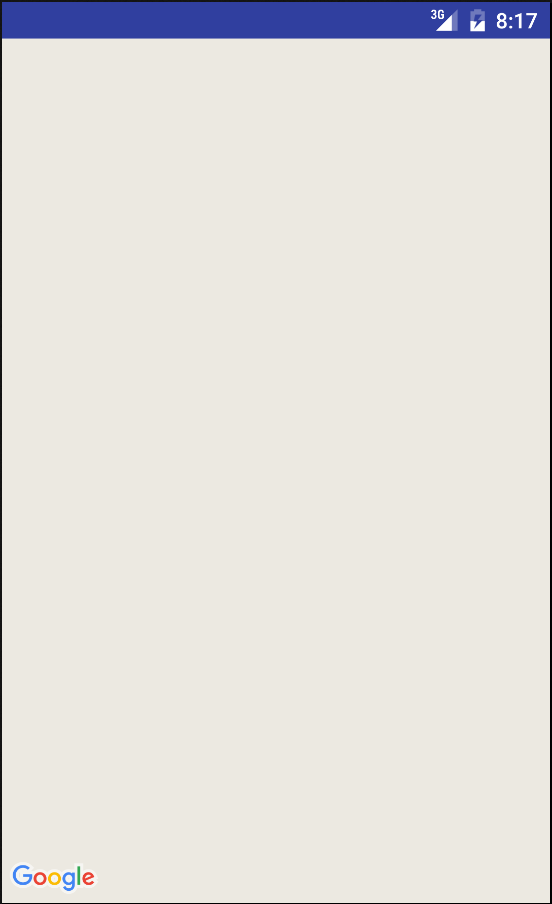
All you have is a blank screen with no map; you haven’t yet set up the API key for the Google Map. You’ll do that next.
Note: If you’re using an emulator, the emulator’s installed
version will have to satisfy the version of Google Play Services
required in your build.gradle file. If you see a message that
you need to update the emulator’s Google Play Services version, you can
either download the latest Google APIs using your Android Studio SDK
Manager and install on your Virtual Device, or lower the version in your
gradle dependency.
Using the Google Maps APIs
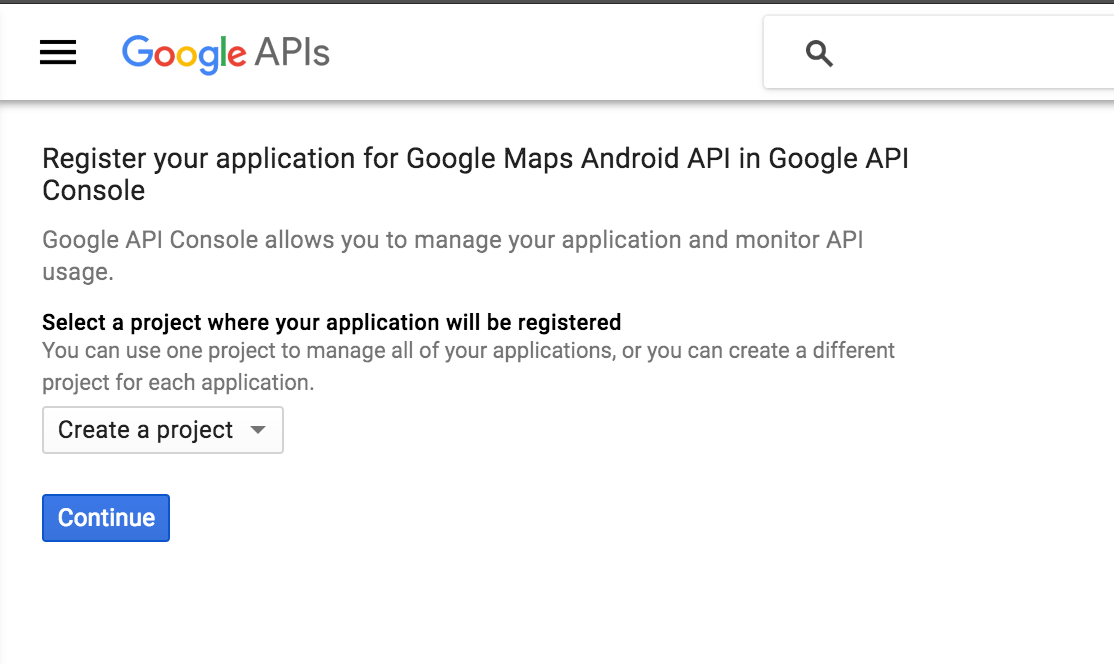
To use any of the Google Maps APIs, you need to create an API key and enable any required APIs from the developer console. If you don’t already have a Google account, create one now — it’s free!Creating API Keys
Open res/values/google_maps_api.xml. You will see the following:
Now copy and paste the link shown above into your browser.
On the Enable an API page, select Create a project and click Continue.
On the next screen, click the Create API key button to continue.
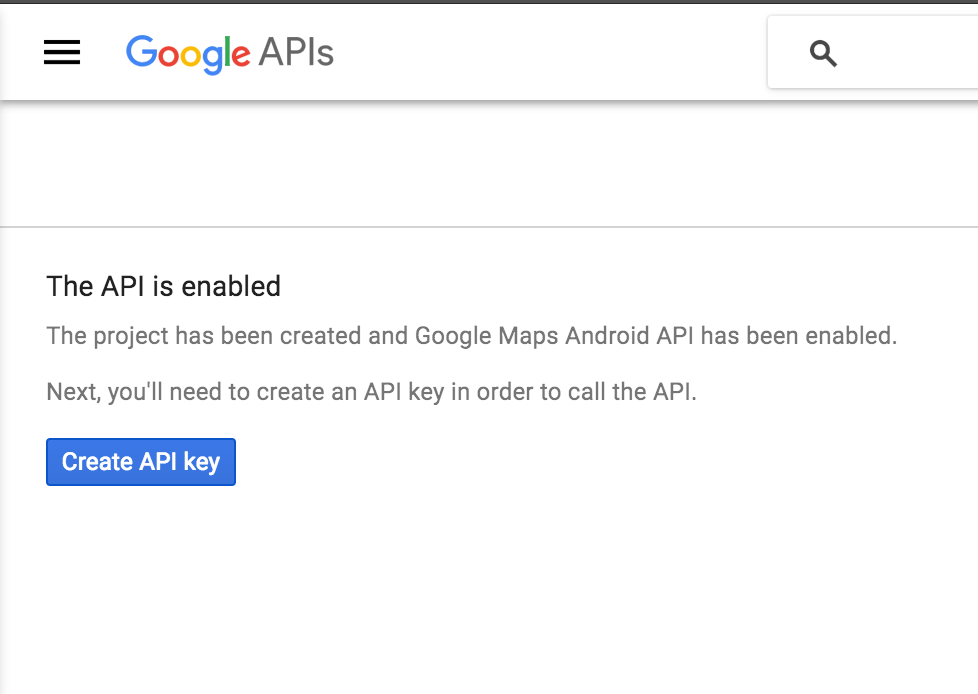
When that’s done, copy the API key shown in the API key created dialog and click Close.

Head back to google_maps_api.xml, replace the value of
google_maps_key key with the copied API key. Build and run again. You should see a map with a red marker on the screen.

Go back to the developer console and enable the Google Places API for Android. You will be using this later on to search for a place.
Setting up Play Services Connection
Before adding any Java code, you’ll need to configure Android Studio to automatically insertimport statements to save you from having to add each one manually.Go to Android Studio > Preferences > Editor > General > Auto Import, select the Add unambiguous imports on the fly and the Show import popup checkboxes, and click OK.

Open MapsActivity.java and have MapsActivity implement the following interfaces:
public class MapsActivity extends FragmentActivity implements OnMapReadyCallback, GoogleApiClient.ConnectionCallbacks, GoogleApiClient.OnConnectionFailedListener, GoogleMap.OnMarkerClickListener, LocationListener |
LocationListener is ambiguous, so tell Android Studio to import it from Google Mobile Services:import com.google.android.gms.location.LocationListener; |
- GoogleApiClient.ConnectionCallbacks provides callbacks that are triggered when the client is connected (
onConnected()) or temporarily disconnected (onConnectionSuspended()) from the service. - GoogleApiClient.OnConnectionFailedListener provides a callback method (
onConnectionFailed()) that is triggered when an attempt to connect the client to the service results in a failure. - GoogleMap.OnMarkerClickListener defines the
onMarkerClick()which is called when a marker is clicked or tapped. - LocationListener defines the
onLocationChanged()which is called when a user’s location changes. This method is only called if theLocationListenerhas been registered.
- Place the cursor anywhere on the class declaration and click on the red light bulb icon that appears above the class declaration.
- Select Implement methods from the options that appear.
- On the Select Methods to implement dialog, click OK.


To connect to any Google API provided by the Google Play Services library, you need to create an instance of the GoogleApiClient first.
Add the following field in MapsActivity.java:
private GoogleApiClient mGoogleApiClient; |
// 1 if (mGoogleApiClient == null) { mGoogleApiClient = new GoogleApiClient.Builder(this) .addConnectionCallbacks(this) .addOnConnectionFailedListener(this) .addApi(LocationServices.API) .build(); } |
@Override protected void onStart() { super.onStart(); // 2 mGoogleApiClient.connect(); } @Override protected void onStop() { super.onStop(); // 3 if( mGoogleApiClient != null && mGoogleApiClient.isConnected() ) { mGoogleApiClient.disconnect(); } } |
- Instantiates the
mGoogleApiClientfield if it’s null. - Initiates a background connection of the client to Google Play services.
- Closes the connection to Google Play services if the client is not null and is connected.
mMap.getUiSettings().setZoomControlsEnabled(true); mMap.setOnMarkerClickListener(this); |
MapsActivity as the callback triggered when the user clicks a marker on this map.Now click the marker on the map near Sydney, and you’ll see the title text appear:
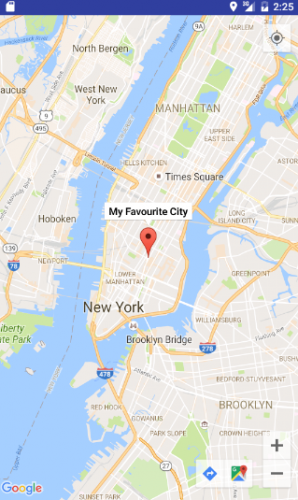
Enter a different set of latitude and longitude values and you’ll see the marker move to your chosen location.
Add the following code to set a marker at New York City with the title “My Favorite City”:
LatLng myPlace = new LatLng(40.73, -73.99); // this is New York mMap.addMarker(new MarkerOptions().position(myPlace).title("My Favorite City")); mMap.moveCamera(CameraUpdateFactory.newLatLng(myPlace)); |
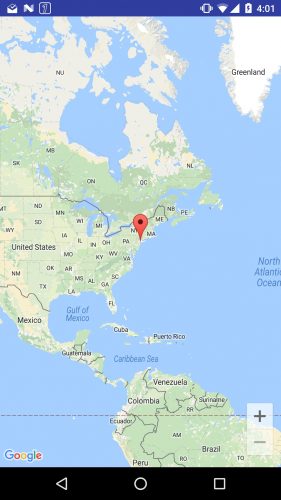
Notice the map automatically centered the marker on the screen;
moveCamera() does this for you. However, the zoom level of the map isn’t right, as it’s fully zoomed out. Modify
moveCamera() as shown below:mMap.moveCamera(CameraUpdateFactory.newLatLngZoom(myPlace, 12)); |
Build and run to view your progress so far.
User Permissions
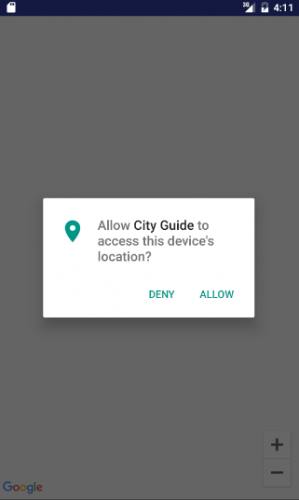
Your app needs theACCESS_FINE_LOCATION permission for getting the user’s location details; you’ve already included this in AndroidManifest.xml. Starting with Android 6.0, user permissions are handled a little differently than before. You don’t request permission during the installation of your app; rather, you request them at run time when the permission is actually required.
Permissions are classified into two categories: normal and dangerous categories. Permissions that belong to the dangerous category require run time permission from the user. Permissions that request access to the user’s private information such as the user’s CONTACTS, CALENDAR, LOCATION etc. are categorised as dangerous permissions.
Open MapsActivity.java and add the following field:
private static final int LOCATION_PERMISSION_REQUEST_CODE = 1; |
setUpMap() as follows.private void setUpMap() { if (ActivityCompat.checkSelfPermission(this, android.Manifest.permission.ACCESS_FINE_LOCATION) != PackageManager.PERMISSION_GRANTED) { ActivityCompat.requestPermissions(this, new String[] {android.Manifest.permission.ACCESS_FINE_LOCATION}, LOCATION_PERMISSION_REQUEST_CODE); return; } } |
Call setUpMap() inside the onConnected() method as below:
@Override public void onConnected(@Nullable Bundle bundle) { setUpMap(); } |
Note: A thorough discussion of user permissions is beyond the scope of this tutorial, but check out this document on requesting permissions at run time.
Getting Current Location
One of the most common uses for location services is finding the user’s current location. You do this by requesting the last known location of the user’s device from the Google Play services location APIs.In MapsActivity.java, add the following new field:
private Location mLastLocation; |
// 1 mMap.setMyLocationEnabled(true); // 2 LocationAvailability locationAvailability = LocationServices.FusedLocationApi.getLocationAvailability(mGoogleApiClient); if (null != locationAvailability && locationAvailability.isLocationAvailable()) { // 3 mLastLocation = LocationServices.FusedLocationApi.getLastLocation(mGoogleApiClient); // 4 if (mLastLocation != null) { LatLng currentLocation = new LatLng(mLastLocation.getLatitude(), mLastLocation .getLongitude()); mMap.animateCamera(CameraUpdateFactory.newLatLngZoom(currentLocation, 12)); } } |
- setMyLocationEnabled enables the
my-locationlayer which draws a light blue dot on the user’s location. It also adds a button to the map that, when tapped, centers the map on the user’s location. - getLocationAvailability determines the availability of location data on the device.
- getLastLocation gives you the most recent location currently available
- If you were able to retrieve the the most recent location, then move the camera to the user’s current location.

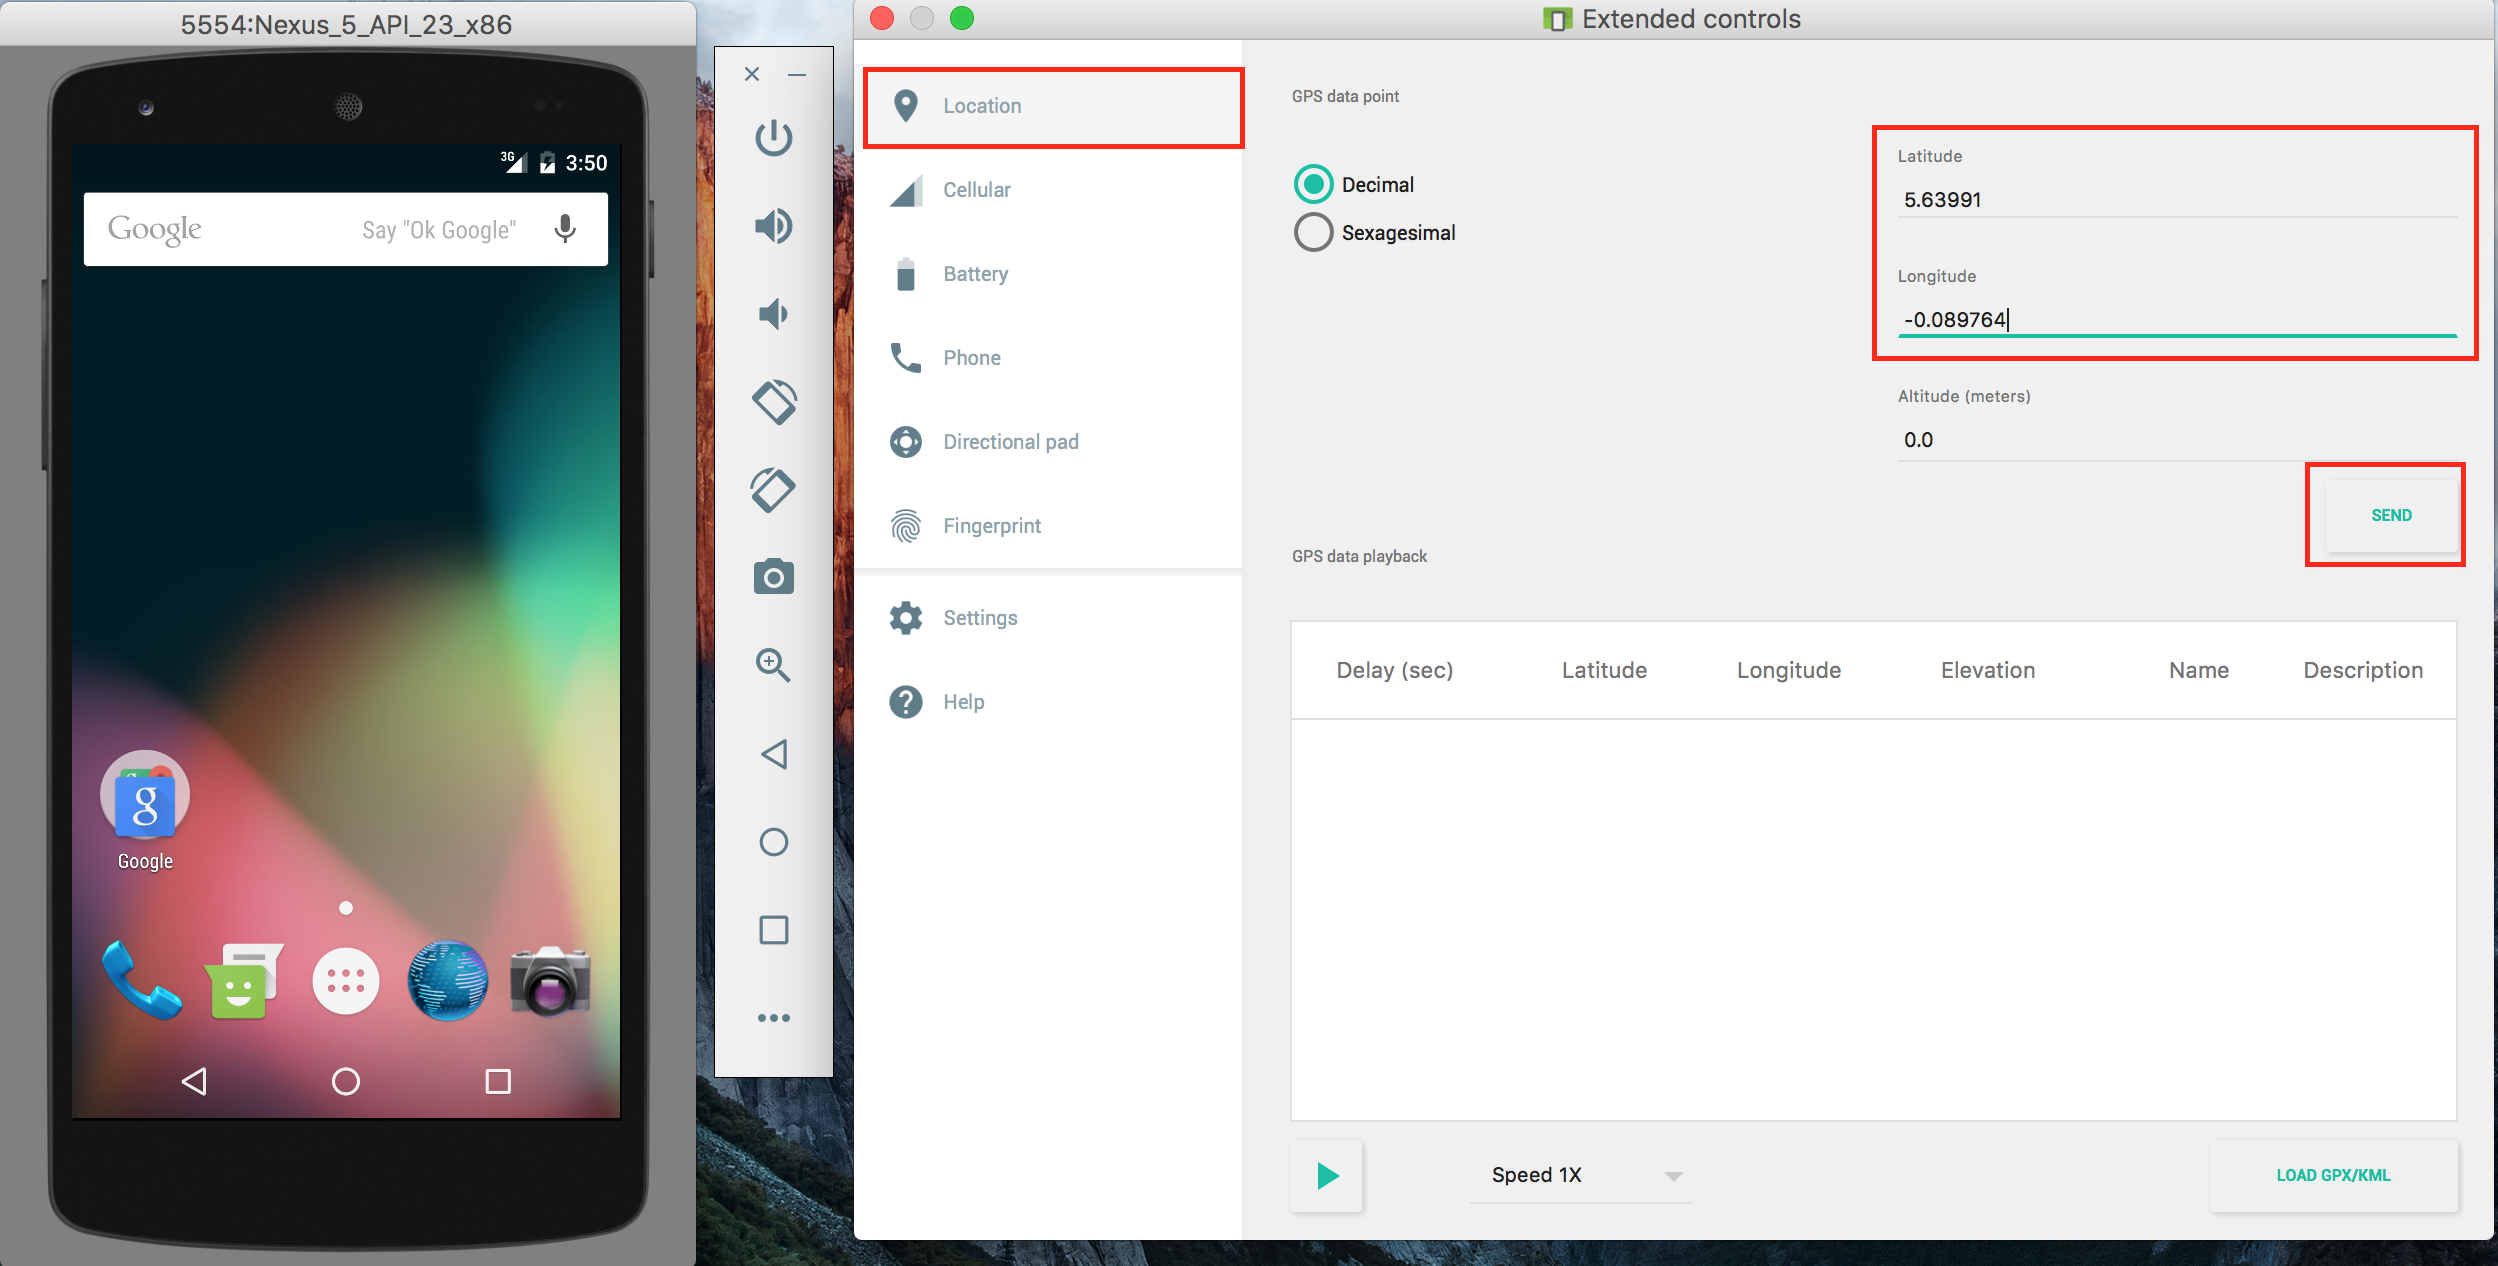
Emulator Testing
It’s best to use a real Android device to test a map application. If for some reason, you need to test from an emulator, you can do so by mocking location data in the emulator.One way to do this is by using the emulator’s extended controls. Here’s how you’d do that:
- Start the emulator. On the right hand panel, click the more icon (…) to access the Extended Controls.
- Select the Location item on the left hand side of the Extended Controls dialog.
- Enter the latitude and longitude values in the specified fields and click Send.

Markers
As you may have noticed from the last run, the blue dot on the user’s location is not very prominent. The Android Maps API lets you use a marker object, which is an icon that can be placed at a particular point on the map’s surface.In MapsActivity.java add the following code.
protected void placeMarkerOnMap(LatLng location) { // 1 MarkerOptions markerOptions = new MarkerOptions().position(location); // 2 mMap.addMarker(markerOptions); } |
- Create a MarkerOptions object and sets the user’s current location as the position for the marker
- Add the marker to the map
setUpMap() with the following:private void setUpMap() { if (ActivityCompat.checkSelfPermission(this, android.Manifest.permission.ACCESS_FINE_LOCATION) != PackageManager.PERMISSION_GRANTED) { ActivityCompat.requestPermissions(this, new String[] {android.Manifest.permission.ACCESS_FINE_LOCATION},LOCATION_PERMISSION_REQUEST_CODE); return; } mMap.setMyLocationEnabled(true); LocationAvailability locationAvailability = LocationServices.FusedLocationApi.getLocationAvailability(mGoogleApiClient); if (null != locationAvailability && locationAvailability.isLocationAvailable()) { mLastLocation = LocationServices.FusedLocationApi.getLastLocation(mGoogleApiClient); if (mLastLocation != null) { LatLng currentLocation = new LatLng(mLastLocation.getLatitude(), mLastLocation .getLongitude()); //add pin at user's location placeMarkerOnMap(currentLocation); mMap.animateCamera(CameraUpdateFactory.newLatLngZoom(currentLocation, 12)); } } } |
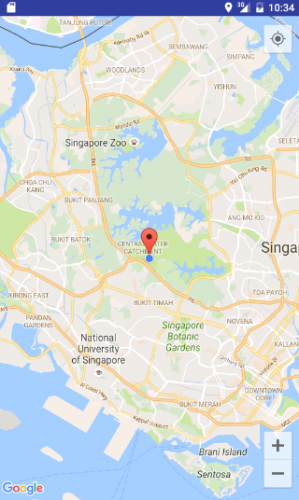
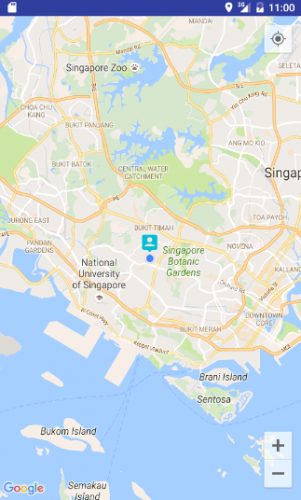
setUpMap() here is adding a call to placeMarkerOnMap() to show the marker.Build and run to view your progress so far. You should see a pin on the user’s location:
Don’t like the default Android pins? You can also create a marker with a custom icon as the pin. Go back to placeMarkerOnMap() and add the following line of code after the MarkerOptions instantiation:
markerOptions.icon(BitmapDescriptorFactory.fromBitmap(BitmapFactory.decodeResource (getResources(), R.mipmap.ic_user_location))); |

Build and run to view your progress so far. The marker on your location should now be using the ic_user_location icon in the project:
What if all you want is the default pin but in a different color? Try to figure this out by yourself, and then check the spoiler below if you need more help:
| Solution Inside | Show |
|---|---|
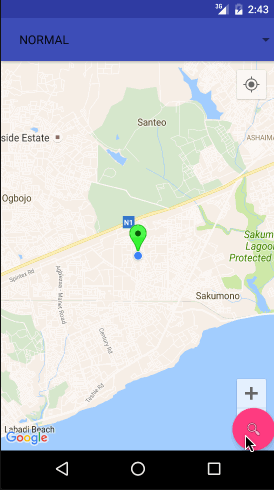
Changing the Map Type
Depending on the functionality of your app, the normal map view might not be detailed enough for you.The Android Maps API provides different map types to help you out:
MAP_TYPE_NORMAL, MAP_TYPE_SATELLITE, MAP_TYPE_TERRAIN, MAP_TYPE_HYBRIDAdd the following inside setUpMap() just below the
setMyLocationEnabled() call:mMap.setMapType(GoogleMap.MAP_TYPE_TERRAIN); |
Here’s what the other types look like:
GoogleMap.MAP_TYPE_SATELLITE displays a satellite view of an area with no labels.

GoogleMap.MAP_TYPE_HYBRID displays a combination of the satellite and normal mode
GoogleMap.MAP_TYPE_NORMAL displays a typical road map with labels. This is default type.

Implementing Geocoding
Now that you have the user’s location, it would be nice if you could show the address of that location when the user clicks on the marker. Google has a class that does exactly that:Geocoder. This takes the coordinates of a location and returns a readable address and vice versa.Open MapsActivity. Add the following method:
private String getAddress( LatLng latLng ) { // 1 Geocoder geocoder = new Geocoder( this ); String addressText = ""; List<Address> addresses = null; Address address = null; try { // 2 addresses = geocoder.getFromLocation( latLng.latitude, latLng.longitude, 1 ); // 3 if (null != addresses && !addresses.isEmpty()) { address = addresses.get(0); for (int i = 0; i < address.getMaxAddressLineIndex(); i++) { addressText += (i == 0)?address.getAddressLine(i):("\n" + address.getAddressLine(i)); } } } catch (IOException e ) { } return addressText; } |
Address is ambiguous, so specify the following import to resolve the issue:import android.location.Address; |
- Creates a Geocoder object to turn a latitude and longitude coordinate into an address and vice versa.
- Asks the geocoder to get the address from the location passed to the method.
- If the response contains any address, then append it to a string and return.
placeMarkerOnMap() with the following.protected void placeMarkerOnMap(LatLng location) { MarkerOptions markerOptions = new MarkerOptions().position(location); String titleStr = getAddress(location); // add these two lines markerOptions.title(titleStr); mMap.addMarker(markerOptions); } |
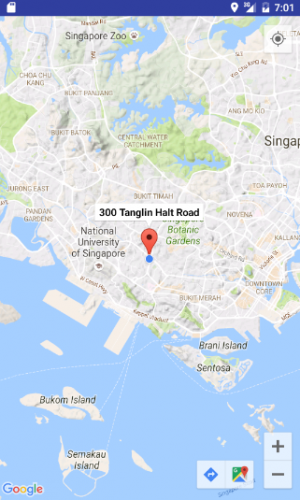
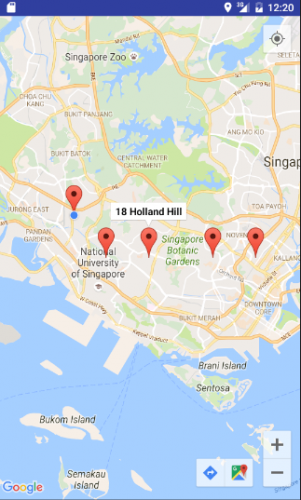
Build and run to view your progress so far. Click on the marker to see the address:
Click anywhere on the map to dismiss the address.
Notice that when you move locations, the blue dot moves with you, but the marker remains at it’s first location. If you’re using a physical device, try moving around to see this. If you are on emulator, change your coordinates to another location in your emulator control.
The marker doesn’t move because your code does not know that the location has changed. The blue dot is controlled by the Google API, not your code. If you want the marker to follow the blue dot always, you need to receive location updates as a call-back in your code.
Receiving Location Updates
Knowing your user’s location at all times can help you provide a better experience. This section of the tutorial shows you how to continuously receive updates of your user’s location.To do this, you first have to create a location request.
Open MapsActivity. Now add the following fields:
// 1 private LocationRequest mLocationRequest; private boolean mLocationUpdateState; // 2 private static final int REQUEST_CHECK_SETTINGS = 2; |
- Declare a LocationRequest member variable and a location updated state variable.
REQUEST_CHECK_SETTINGSis used as the request code passed toonActivityResult.
protected void startLocationUpdates() { //1 if (ActivityCompat.checkSelfPermission(this, android.Manifest.permission.ACCESS_FINE_LOCATION) != PackageManager.PERMISSION_GRANTED){ ActivityCompat.requestPermissions(this, new String[]{android.Manifest.permission.ACCESS_FINE_LOCATION}, LOCATION_PERMISSION_REQUEST_CODE); return; } //2 LocationServices.FusedLocationApi.requestLocationUpdates(mGoogleApiClient, mLocationRequest, this); } |
- In startLocationUpdates(), if the ACCESS_FINE_LOCATION permission has not been granted, request it now and return.
- If there is permission, request for location updates.
// 1 protected void createLocationRequest() { mLocationRequest = new LocationRequest(); // 2 mLocationRequest.setInterval(10000); // 3 mLocationRequest.setFastestInterval(5000); mLocationRequest.setPriority(LocationRequest.PRIORITY_HIGH_ACCURACY); LocationSettingsRequest.Builder builder = new LocationSettingsRequest.Builder() .addLocationRequest(mLocationRequest); PendingResult<LocationSettingsResult> result = LocationServices.SettingsApi.checkLocationSettings(mGoogleApiClient, builder.build()); result.setResultCallback(new ResultCallback<LocationSettingsResult>() { @Override public void onResult(@NonNull LocationSettingsResult result) { final Status status = result.getStatus(); switch (status.getStatusCode()) { // 4 case LocationSettingsStatusCodes.SUCCESS: mLocationUpdateState = true; startLocationUpdates(); break; // 5 case LocationSettingsStatusCodes.RESOLUTION_REQUIRED: try { status.startResolutionForResult(MapsActivity.this, REQUEST_CHECK_SETTINGS); } catch (IntentSender.SendIntentException e) { } break; // 6 case LocationSettingsStatusCodes.SETTINGS_CHANGE_UNAVAILABLE: break; } } }); } |
ResultCallback import is ambiguous, so add the following import statement:import com.google.android.gms.common.api.ResultCallback; |
createLocationRequest():- You create an instance of LocationRequest, add it to an instance of LocationSettingsRequest.Builder and retrieve and handle any changes to be made based on the current state of the user’s location settings.
- setInterval() specifies the rate at which your app will like to receive updates.
- setFastestInterval() specifies the fastest rate at which the app can handle updates. Setting the
fastestIntervalrate places a limit on how fast updates will be sent to your app.
Before you start requesting for location updates, you need to check the state of the user’s location settings. - A SUCCESS status means all is well and you can go ahead and initiate a location request.
- A RESOLUTION_REQUIRED status means the location settings have some issues which can be fixed. This could be as a result of the user’s location settings turned off. You fix this by showing the user a dialog as shown below:
- A SETTINGS_CHANGE_UNAVAILABLE status means the location settings have some issues that you can’t fix. This could be as a result of the user choosing NEVER on the dialog above.

// 1 @Override protected void onActivityResult(int requestCode, int resultCode, Intent data) { super.onActivityResult(requestCode, resultCode, data); if (requestCode == REQUEST_CHECK_SETTINGS) { if (resultCode == RESULT_OK) { mLocationUpdateState = true; startLocationUpdates(); } } } // 2 @Override protected void onPause() { super.onPause(); LocationServices.FusedLocationApi.removeLocationUpdates(mGoogleApiClient, this); } // 3 @Override public void onResume() { super.onResume(); if (mGoogleApiClient.isConnected() && !mLocationUpdateState) { startLocationUpdates(); } } |
- Override FragmentActivity’s onActivityResult() method and start the update request if it has a RESULT_OK result for a REQUEST_CHECK_SETTINGS request.
- Override onPause() to stop location update request
- Override onResume() to restart the location update request.
createLocationRequest() to the bottom of onCreate():createLocationRequest(); |
if (mLocationUpdateState) { startLocationUpdates(); } |
Next add these lines of code to onLocationChanged():
mLastLocation = location; if (null != mLastLocation) { placeMarkerOnMap(new LatLng(mLastLocation.getLatitude(), mLastLocation.getLongitude())); } |
Your app is now set to receive location updates. When you change your location, the map will update with a new marker showing your new location. Note that the markers are still clickable to get the address as before.
Build and run. Play around with the app to view the changes:
Place Search
Since this app is supposed to be a guide, a user should be able to search for places of interest to them, right?That’s where the Google Places API comes in; it provides your app the functionality to search for millions of institutions and places of interest. It’s Android Library provides a number of cool functionalities, one of them being the Place Picker, which is a UI widget that lets you provide a place search functionality with very few lines of code. Too good to be true? Try it!
Once again, open MapsActivity.
Add this field:
private static final int PLACE_PICKER_REQUEST = 3; |
private void loadPlacePicker() { PlacePicker.IntentBuilder builder = new PlacePicker.IntentBuilder(); try { startActivityForResult(builder.build(MapsActivity.this), PLACE_PICKER_REQUEST); } catch(GooglePlayServicesRepairableException | GooglePlayServicesNotAvailableException e) { e.printStackTrace(); } } |
PlacePicker intent.Now add the following lines of code to onActivityResult():
if (requestCode == PLACE_PICKER_REQUEST) { if (resultCode == RESULT_OK) { Place place = PlacePicker.getPlace(this, data); String addressText = place.getName().toString(); addressText += "\n" + place.getAddress().toString(); placeMarkerOnMap(place.getLatLng()); } } |
RESULT_OK result for a PLACE_PICKER_REQUEST request, and then place a marker on that position on the map. You are almost ready to try out the place search — you just need to call loadPlacePicker() inside the code.
You’ll create a floating action button (FAB) at the bottom-right of the map to trigger this method. FAB requires
CoordinatorLayout which is part of the design support library.First open build.gradle for the app and add the Android support design library as a dependency:
dependencies {
  ...
  compile 'com.android.support:design:24.1.1'
}
|
Note: As usual, if you are using a newer Android SDK version,
you may need to update the version of this dependency as well so they
match.
Then replace the contents of res > layout > activity_maps.xml with the following lines of code:<?xml version="1.0" encoding="utf-8"?> <android.support.design.widget.CoordinatorLayout xmlns:android="http://schemas.android.com/apk/res/android" xmlns:app="http://schemas.android.com/apk/res-auto" xmlns:tools="http://schemas.android.com/tools" android:layout_width="match_parent" android:layout_height="match_parent" android:fitsSystemWindows="true"> <fragment android:id="@+id/map" class="com.google.android.gms.maps.SupportMapFragment" android:layout_width="match_parent" android:layout_height="match_parent"/> <android.support.design.widget.FloatingActionButton android:id="@+id/fab" android:layout_width="wrap_content" android:layout_height="wrap_content" android:layout_gravity="bottom|end" android:src="@android:drawable/ic_menu_search"/> </android.support.design.widget.CoordinatorLayout> |
In MapsActivity, add the following lines of code to onCreate():
FloatingActionButton fab = (FloatingActionButton) findViewById(R.id.fab); fab.setOnClickListener(new View.OnClickListener() { @Override public void onClick(View view) { loadPlacePicker(); } }); |
Where to Go From Here?
You can download the final project from this tutorial here.This Google Maps API tutorial only brushed the surface of what you can do with the Google Maps APIs. The official Google documentation has much more about web services and and the Android API here.
You can also check out the developer page on other ways to customize the marker. User permission checks for run-time permissions need a better implementation than what you’ve done in this Google Maps API tutorial; the docs also have some great information about more advanced permission granting here.
Check out the developer pages for extensive reading on the Google Places API for Android, receiving location updates and mocking location data via the emulator’s extended controls.
If you have any questions or comments, please feel free to join the forum discussion below!


0 comments:
Post a Comment
Note: only a member of this blog may post a comment.