 When creating native apps for Android, you will normally use the Java
programming language for
When creating native apps for Android, you will normally use the Java
programming language foryour logic. Whilst Java is a battle hardened language, it isn’t without its issues.
When you run a Java application, the app is compiled into a set of instructions called Bytecode and runs in a virtual machine. Over the past several years, a number of new programming languages have been introduced to also run on the Java virtual machine. Whilst the resulting app looks the same for the virtual machine, the idea is the language features can help developers write simpler code and fix some of Javas issues.
JetBrains, known for IntelliJ IDEA (Android Studio is based on IntelliJ), has introduced the Kotlin language.
Kotlin is a statically-typed programming language that runs on the JVM. It can also be compiled to JavaScript source code. Kotlin has some amazingly cool features!
In this Kotlin for Android tutorial, you’ll learn:
- How to setup your Kotlin environment.
- How to work with both Java and Kotlin in the same project.
- What makes Kotlin so exciting as a new language.
Note: This tutorial assumes you’re
experienced in Android development with Java. If you’re new to the
Android world, have big questions about the starter project or are not
familiar with Android Studio, please have a look at our Android tutorials.
Why Kotlin For Android?
Since Android took the world by storm, developers have had no alternatives to Java app development. Although its usage is widespread, Java comes with a lot of historical baggage.Java 8 solved some language issues and corrected even more with Java 10. In order to get much of a benefit from the corrections made in these two releases, you have to set the minimum SDK to Android 24 just to use Java 8, which isn’t an option for many developers. For almost everybody, Java 10 isn’t even on the radar.
Kotlin aims to fill that gap of a missing modern language for the Android platform. There are a few core tenets that Kotlin lives by; it strives to be:
- Concise to reduce the amount of boilerplate code you need to write.
- Expressive to make your code more readable and understandable.
- Safe to avoid entire classes of errors such as null pointer exceptions.
- Versatile for building server-side applications, Android apps or frontend code running in the browser.
- Interoperable to leverage existing frameworks and libraries of the JVM with 100 percent Java interoperability.
Getting Started
Download the starter project. Extract and open the starter project in Android Studio.You’ll be working with this simple app that allows users to search for books, see book covers, and share books with friends to explore Kotlin.
It contains three source code files; take a moment to get familiar with them:
- MainActivity.java: an
Activitythat displays the screen for searching and displaying a list of books. - DetailActivity.java: an
Activitythat displays the book cover for the ID passed to it. - JSONAdapter.java: a custom
BaseAdapterthat transforms a JSON object into a list view item.

Setting up Your Environment
By default, Android Studio has no idea what to do with Kotlin, so the first step is to install the Kotlin plugin and configure Kotlin in your project.Installing the Kotlin Plugin
Go to Android Studio\Preferences and select the Plugins entry.
On the Plugins screen, click on Install JetBrains plugin…
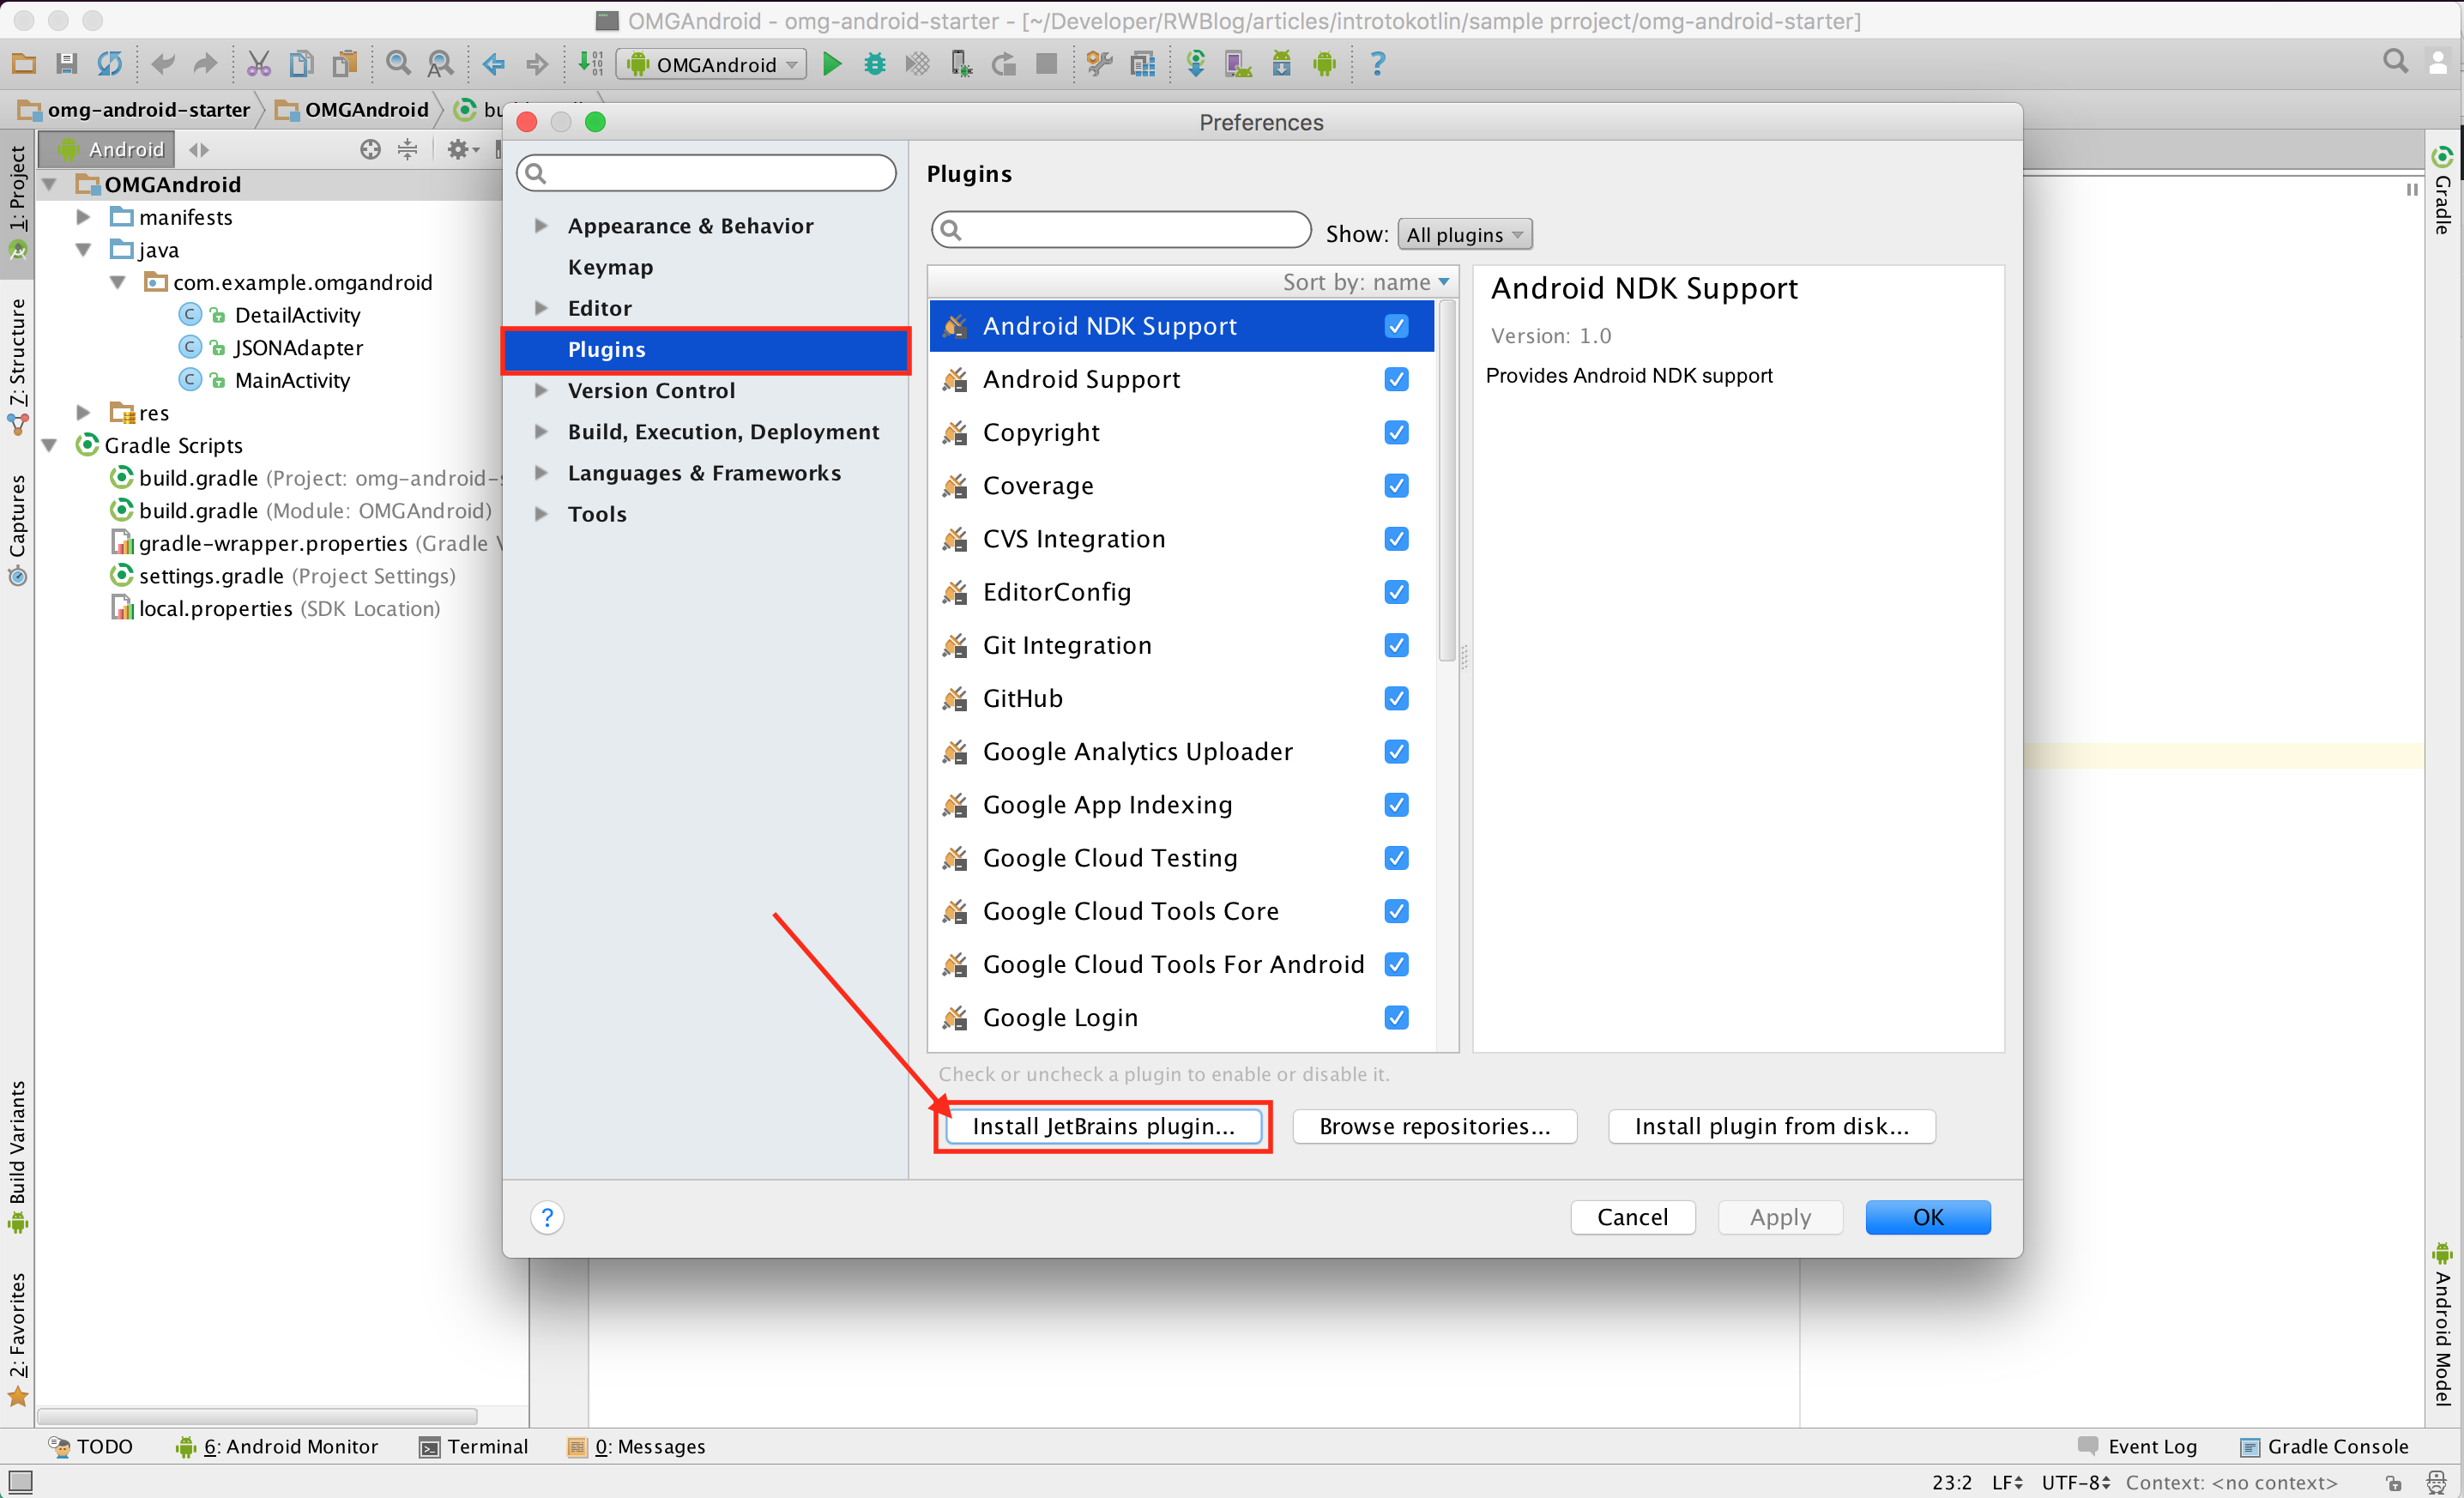
Search for and select Kotlin from the list and click Install.

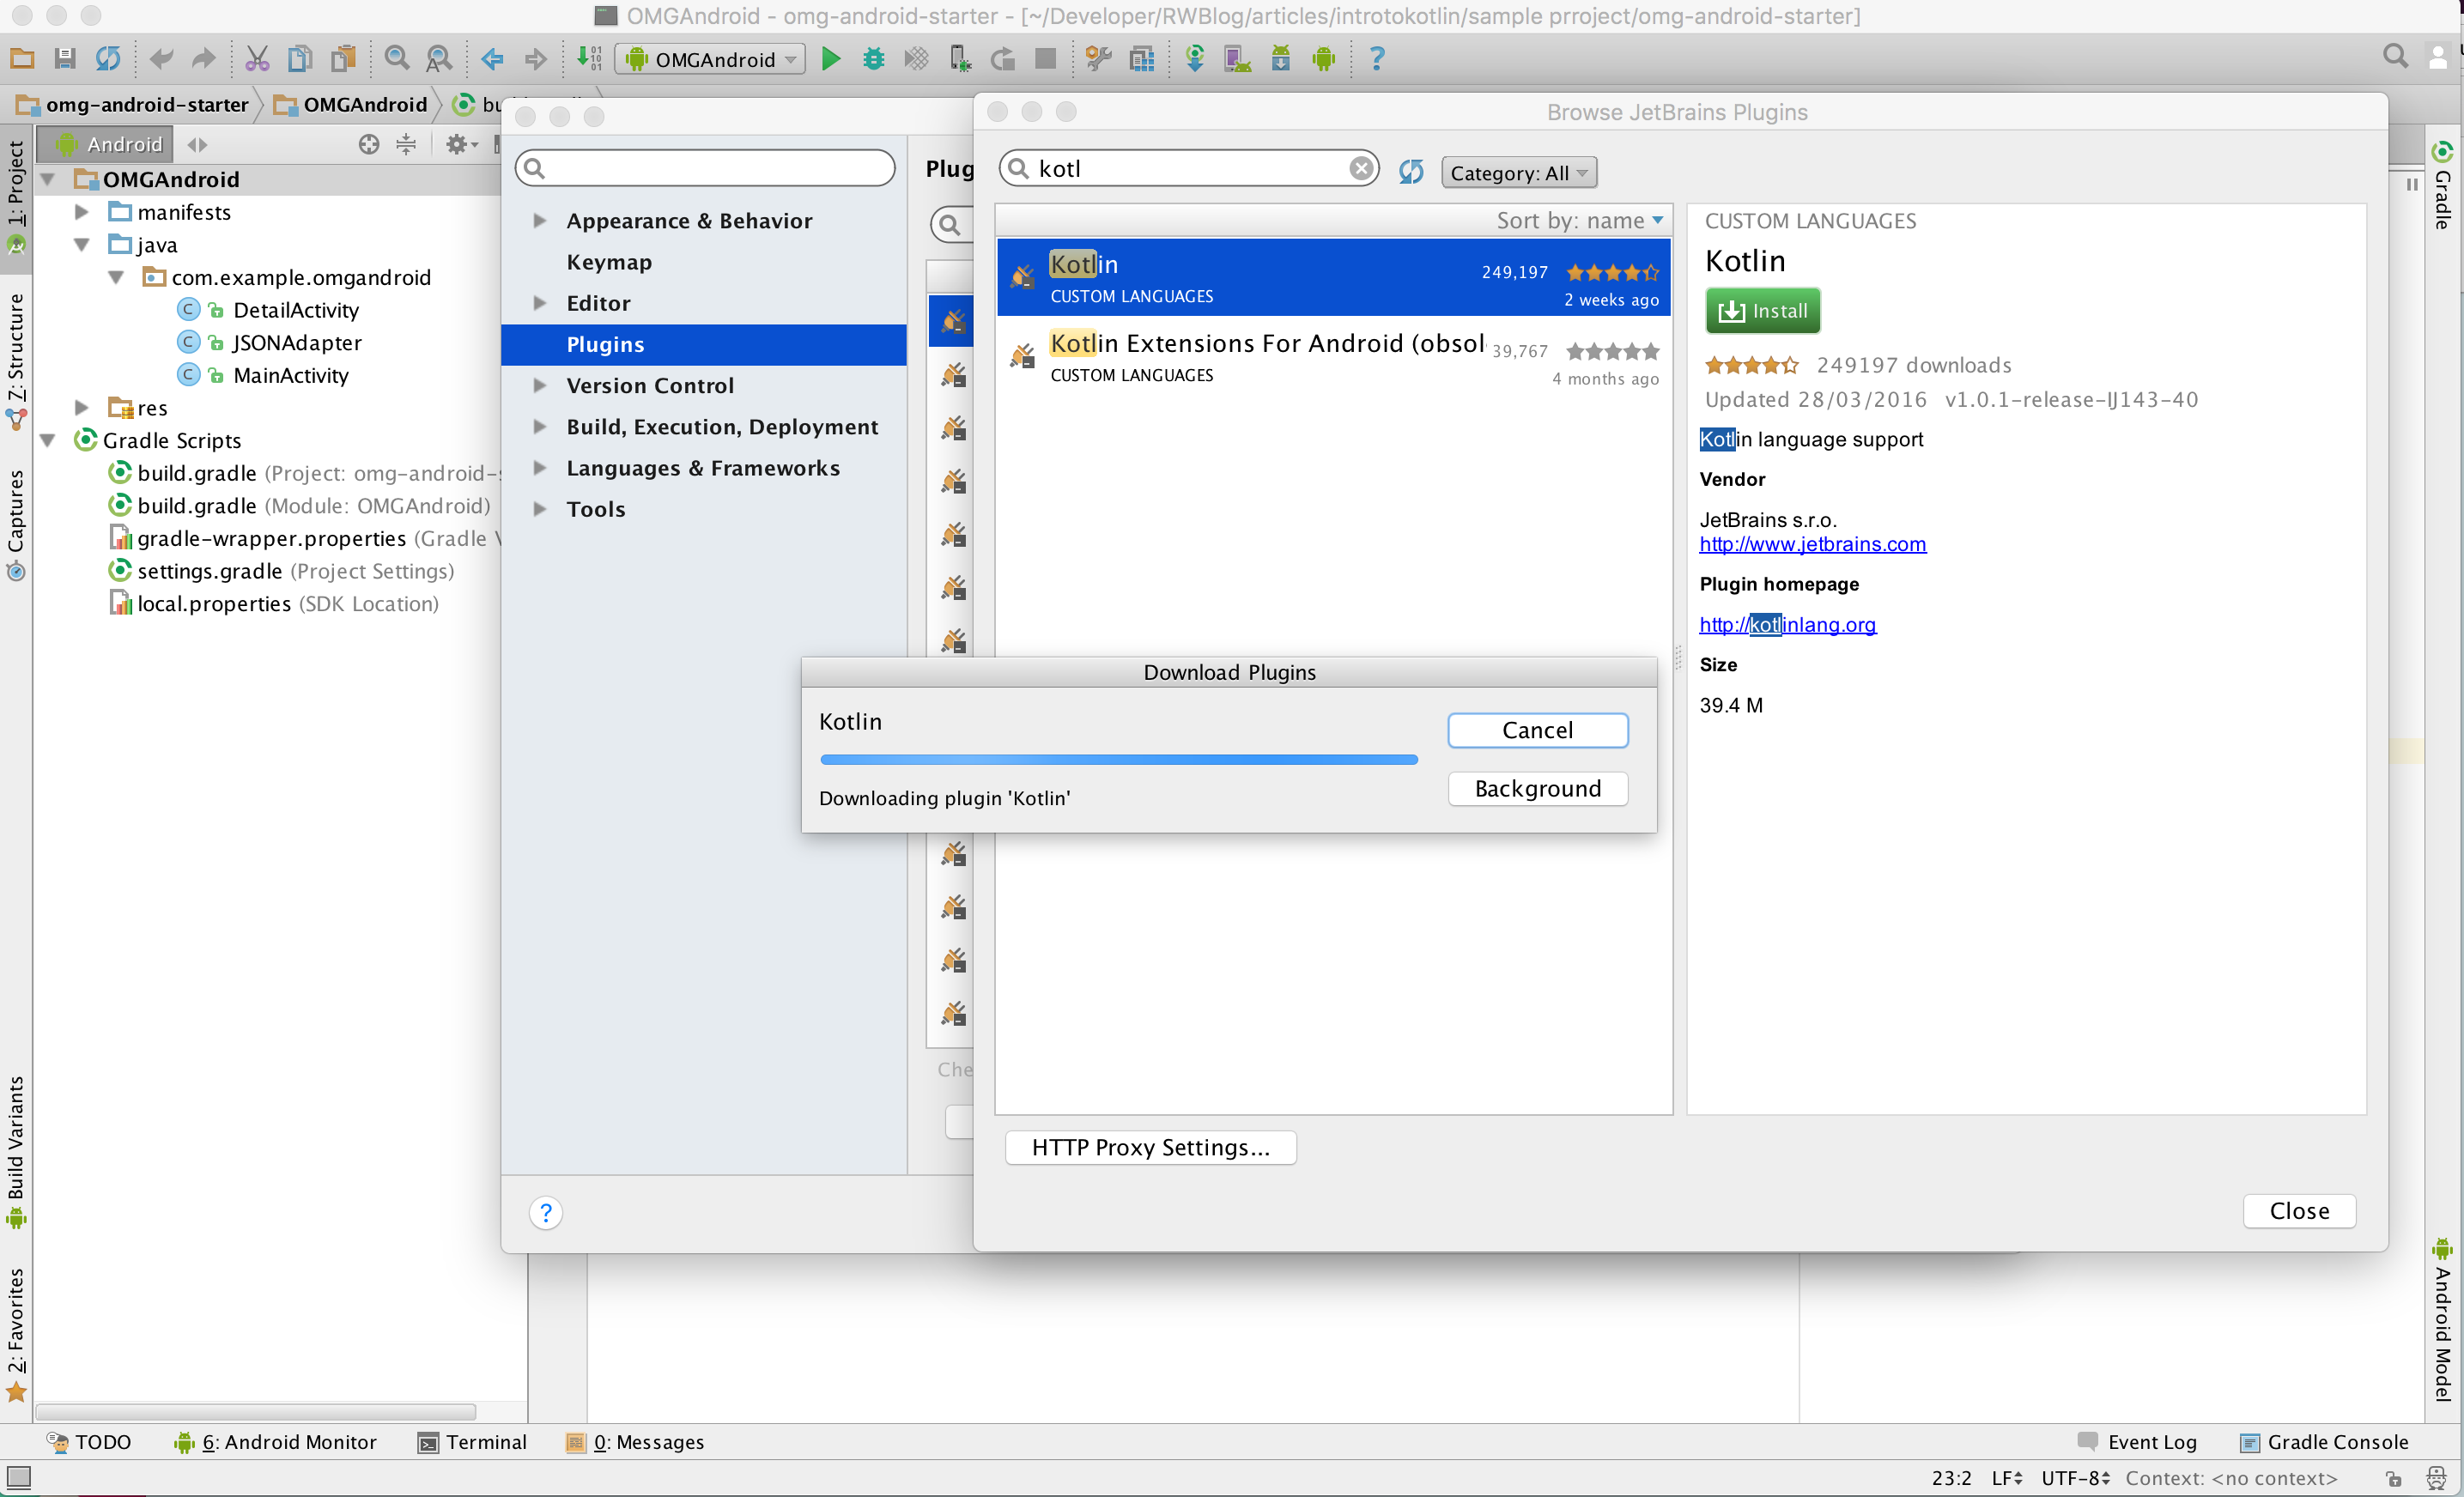
When you’re finished with downloading and installing, the next step is following the prompts to restart the IDE.

Configure Kotlin in Project
Now the IDE knows what to do with Kotlin, but your project app doesn’t, so your next move is to modify the project’s build configuration.Go to Tools\Kotlin\Configure Kotlin in Project.

Select Android with Gradle from the Choose Configurator popup that appears.

On the Configure Kotlin in Project popup, select the plugin version you want to use (at the time of writing this tutorial, the current version is 1.0.3) and click OK.

This action will make a number of changes to your build.gradle files.
build.gradle (Project: omg-android-starter):
buildscript { ext.kotlin_version = '1.0.3' // 1 repositories { jcenter() } dependencies { classpath 'com.android.tools.build:gradle:2.1.3' classpath "org.jetbrains.kotlin:kotlin-gradle-plugin:$kotlin_version" // 2 // NOTE: Do not place your application dependencies here; they belong // in the individual module build.gradle files } } allprojects { repositories { jcenter() } } |
apply plugin: 'com.android.application' apply plugin: 'kotlin-android' // 3 android { compileSdkVersion 23 buildToolsVersion "24.0.2" defaultConfig { minSdkVersion 14 targetSdkVersion 23 } sourceSets { main.java.srcDirs += 'src/main/kotlin' // 4 } } dependencies { compile 'com.android.support:appcompat-v7:23.2.0' compile 'com.loopj.android:android-async-http:1.4.4' compile 'com.squareup.picasso:picasso:2.1.1' compile "org.jetbrains.kotlin:kotlin-stdlib:$kotlin_version" // 5 } repositories { mavenCentral() } |
- Declares the version of Kotlin configured in the project
- Declares a classpath dependency artifact that contains the Kotlin Gradle plugin with the version declared earlier
- Specifies the use of the Kotlin Android plugin via
apply plugin command - Defines that source files found in src/main/kotlin will be compiled. Strictly speaking, gradle will compile source Kotlin files found in src/main/java, but it’s nice to put to put Kotlin files in a Kotlin directory.
- Added the Kotlin Standard Library as a compile time dependency to the project
Nothing changed visually but you’ve put all the plumbing in place to support Kotlin in your Android project.

Working with Java and Kotlin in the Same Project
One of the most amazing qualities of Kotlin is how it can coexist with Java on a project. Java code can be called from Kotlin and vice versa.From this point of the tutorial forward, you’ll be translating the DetailActivity class in Kotlin.
Single click the
com.example.omgandroid package in the Project panel on the left-hand side. With the package selected, go to File\New\Kotlin File/Class to create a new Kotlin class. (Without the package selected, you won’t see the Kotlin file option).
On the New Kotlin File/Class popup, select Class in the Kind field and enter DetailActivityKotlin as the class name. Click OK.

Your new class should look like this:
    package com.example.omgandroid

    class DetailActivityKotlin {
    }
|
- As you may have noticed in the above code, classes in Kotlin are declared using the keyword
class— just like in Java. - The default visibility modifier in Kotlin is
public. - Classes and methods are final by default. You can declare them
openif you want extensibility.
First place the following import statements at the top of the file:
import android.app.Activity import android.os.Bundle |
class Main2Activity : Activity() {

}
|
Now override Activity‘s onCreate() method. It will look something like this.
import android.app.Activity
import android.os.Bundle

class DetailActivityKotlin: Activity() {

  override fun onCreate(savedInstanceState: Bundle?) {
    super.onCreate(savedInstanceState)
  }
}
|
Note: You can use Android Studio’s code generation functionality to generate the onCreate method signature with control + O. Press control + O to see a popup with all overridable methods for the class you’re in.

Open MainActivity.java and replace the 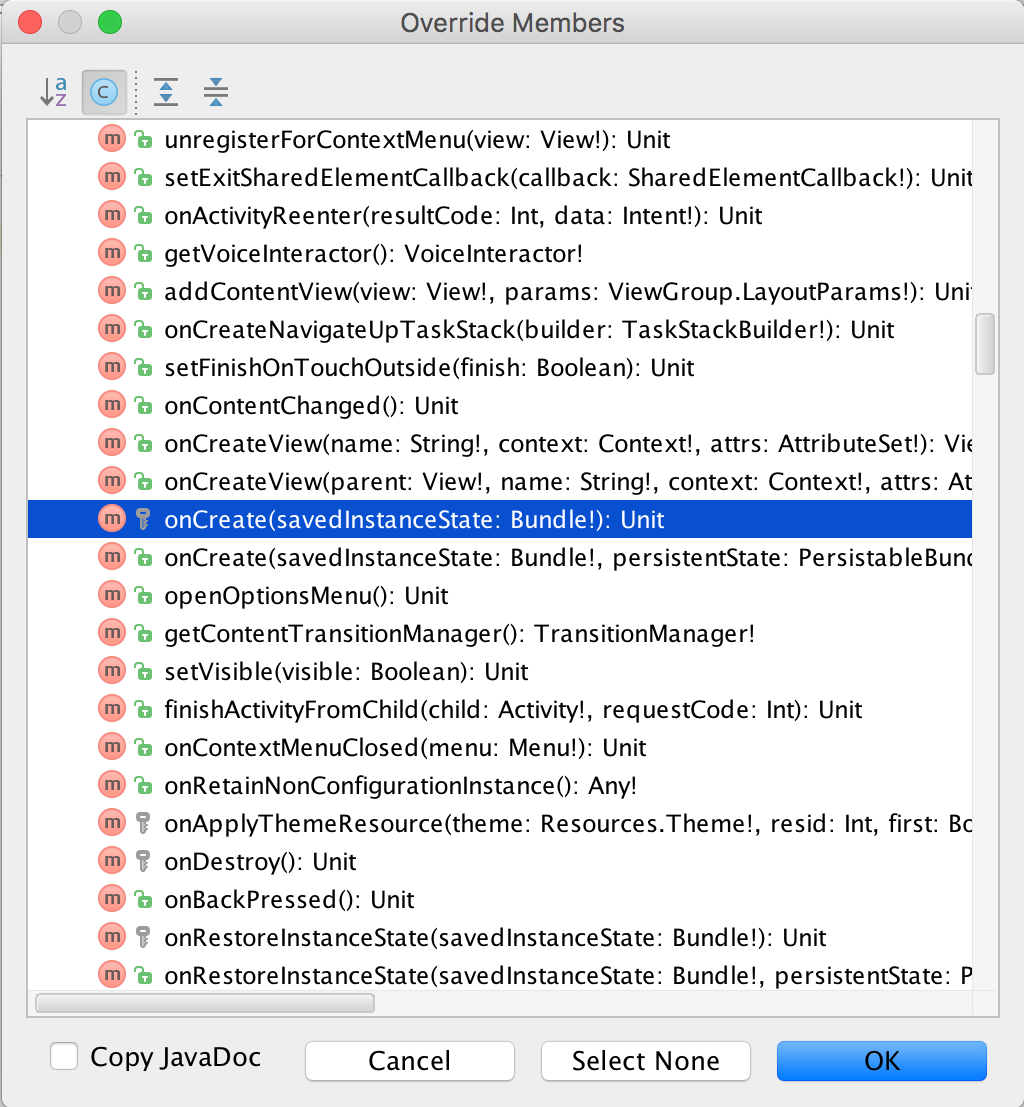
DetailActivity reference in onItemClick() with DetailActivityKotlin.Your intent creation line should change from:
Intent detailIntent = new Intent(this, DetailActivity.class); |
Intent detailIntent = new Intent(this, DetailActivityKotlin.class); |
<activity android:name=".DetailActivityKotlin" android:label="@string/activity_details_kotlin" android:parentActivityName=".MainActivity"> <meta-data android:name="android.support.PARENT_ACTIVITY" android:value=".MainActivity"/> </activity> |

How Cool is Kotlin?
Before you dive deeper into Kotlin’s features, go back to DetailActivityKotlin.kt and replace the contents of the file with the following:package com.example.omgandroid
import android.app.Activity
import android.content.Intent
import android.os.Bundle
import android.view.Menu
import android.widget.ImageView
import android.widget.ShareActionProvider
import com.squareup.picasso.Picasso
class DetailActivityKotlin: Activity() {
private val IMAGE_URL_BASE = "http://covers.openlibrary.org/b/id/"
internal var mImageURL = ""
internal var mShareActionProvider: ShareActionProvider? = null
override fun onCreate(savedInstanceState: Bundle?) {
super.onCreate(savedInstanceState)
setContentView(R.layout.activity_detail)
actionBar?.setDisplayHomeAsUpEnabled(true)
val imageView = findViewById(R.id.img_cover) as ImageView
val coverId = this.intent.extras.getString("coverID")
val len = coverId?.length ?: 0
if (len > 0) {
mImageURL = IMAGE_URL_BASE + coverId + "-L.jpg"
Picasso.with(this).load(mImageURL).placeholder(R.drawable.img_books_loading).into(imageView)
}
}
private fun setShareIntent() {
val shareIntent = Intent(Intent.ACTION_SEND)
shareIntent.type = "text/plain"
shareIntent.putExtra(Intent.EXTRA_SUBJECT, "Book Recommendation!")
shareIntent.putExtra(Intent.EXTRA_TEXT, mImageURL)
mShareActionProvider?.setShareIntent(shareIntent)
}
override fun onCreateOptionsMenu(menu: Menu): Boolean {
menuInflater.inflate(R.menu.main, menu)
val shareItem = menu.findItem(R.id.menu_item_share)
mShareActionProvider = shareItem!!.actionProvider as ShareActionProvider
setShareIntent()
return true
}
}
|
Build and run, select a book and see if you get a cover this time. Oh, look, you do!

Null Safety
One of the leading points of frustration with most programming languages, including Java, is accessing a member of a null reference. A null reference occurs when you declare an object variable but haven’t given it a value. When the program runs and tries to access that variable it doesn’t know where to look for it memory because it doesn’t exist.The most common result of this is your application come to an abrupt halt and crashes! You might be familiar with Java’s “almighty” NullPointerException. Apologies in advance for any flashbacks! :]

One of Kotlin’s greatest features is that its type system aims to eliminate the NullPointerException (a goal known as void safety).
In Kotlin, the only possible causes of a NullPointerException are:
- External Java code did it
- An explicit call to throw NullPointerException()
- Usage of the
!!operator (which will be explained shortly) - Some data inconsistency in regards to initialization
Nullable Types and Non-Null Types
Kotlin has nullable and non-null types. If you don’t declare a variable as nullable, then you cannot assign it a null value. This is enforced by the compiler meaning it’s much harder to unintentionally crash your app.In contrast to Java, all variables must be initialized at the point of declaration.
To declare a variable as nullable, you have to append a ? to its type at the point of declaration as you see in this mShareActionProvider declaration:
internal var mShareActionProvider: ShareActionProvider? = null |
Safe Calls
To access a property or method on a nullable variable in Java, you would first do a null check. You can see this inDetailActivity.java:if (mShareActionProvider != null) { mShareActionProvider.setShareIntent(shareIntent) } |
mShareActionProvider?.setShareIntent(shareIntent) |
setShareIntent is only called when the mShareActionProvider property is not null.The !! Operator
As stated earlier, this is one of possible causes of the dreaded NullPointerException. If you’re absolutely sure the object is not null, feel free to use the (!!) operator to dereference your object.You can see an example of this in
setShareIntent():mShareActionProvider = shareItem!!.actionProvider as ShareActionProvider |
The Elvis Operator
The Elvis Operator (?:) looks like the ternaryif operator in Java but works differently. You can see an example of this when trying to get the length of the cover ID:val len = coverId?.length ?: 0 |
Just like an
if-else statement, Elvis only evaluates the expression on the right if the one on the left side is null.Type Inference
Kotlin also supports type inference, meaning the compiler can assume its type from the initializer when a variable is declared and initialized. For example, the types of theIMAGE_URL_BASE and mImageURL variables are inferred from their initializers.private val IMAGE_URL_BASE = "http://covers.openlibrary.org/b/id/" internal var mImageURL = "" |
String), and any subsequent values assigned to the variable must also be of that type (String).The Coolest of Them All
Already thinking of rewriting your Java project in Kotlin? Don’t stress — the Kotlin plugin has you covered.Since Kotlin is a programming language made by developers for developers, it’s designed to make your life as easy as possible. The Kotlin plugin even has a handy tool that allows you to convert a Java source file to Kotlin.
Take this sanity-saving feature for a test drive by converting the DetailActivity.java file to Kolin.
Open the DetailActivity.java class and go to Code\Convert Java File to Kotlin File.

Click OK on the Convert Java to Kotlin screen. This will replace the Java file with a Kotlin one!

That’s it. You’ve converted a Java class into a Kotlin class. :]

Where To Go From Here?
Congratulations! You just learned about the Kotlin programming language and some of it’s amazing features, re-coded a Java Activity in Kotlin, and used the Kotlin plugin to convert a Java source file into a Kotlin source file.Download the final project for this tutorial here.
I suggest reading up further on Null Safety in Kotlin in the documentation.
You can also use the Kotlin online compiler to try out code samples and improve your knowledge of the language.
You’ve only scratched the surface of the amazing possibilities with Kotlin. If you’re excited by what you’ve read here, you can checkout topics such as Data Classes, Extensions, Lambdas, or String Templates if you need to satisfy your appetite for knowledge.
I hope you enjoyed this Kotlin for Android tutorial, and if you have any questions or comments, please join the forum discussion below!


0 comments:
Post a Comment
Note: only a member of this blog may post a comment.