 Couchbase Mobile
is a distributed database that runs on mobile devices and on app
servers. Having a
Couchbase Mobile
is a distributed database that runs on mobile devices and on app
servers. Having a mobile database under your app results in speedy interactions with your application — even without network connectivity. When connectivity is restored, the full master-master replication automatically synchronizes the data.
Why would you choose Couchbase over the built-in SQLite support or a cloud-based data service?
- Easy migration: Since Couchbase is built on NoSQL, you can seamlessly change data as your application grows — without requiring elaborate upgrade scripts.
- Simple data mapping: Couchbase lets you store data in a format that closely resembles how your app uses the data.
- Built-in synchronization: If you have ever needed to build your own syncing solution, you know how complicated it can be. Couchbase’s Sync Gateway does all of the hard work for you.
- Offline support: Couchbase lets you develop your app without thinking about a network connection. You simply write to the local database and let Couchbase handle the rest.
When you’re done, you’ll have learned the following:
- How to use prebuilt Couchbase Lite databases.
- How to model and query data including attachments.
- How to craft data.
- How to sync data and manage network availability.
- How to deploy your app to multiple emulators.
Note: You should have a working knowledge of Android
development before working through this Couchbase tutorial. If you need a
refresher, take a look at some of our introductory Android tutorials!
Getting Started
Download the QuizzDroid starter project and open it in Android Studio. It already contains the Couchbase Lite Android SDK as a dependency and has two activities:- HomeActivity will display the list of questions.
- QuestionActivity will contain the image, possible choices to select from and all answers from other users.

You’re now ready to start bringing the activities to life.
Couchbase Mobile is divided into three components:
- Couchbase Lite: An embedded NoSQL database that runs on the device, within your application.
- Sync Gateway: An Internet-facing synchronization server that securely syncs data between device and cloud.
- Couchbase Server: A highly scalable cloud-based NoSQL server used as a storage engine by Sync Gateway.
Using the Prebuilt Database
Since Couchbase Lite runs right on the device, you can bundle a prebuilt database in your application. This is optional; most apps start with an empty database and add data entered by the user or synchronized through Sync Gateway.In this Couchbase tutorial, you will use a database containing a list of questions. Download the database and move the zip file to app/src/main/assets/ in the starter project:

The database starts in the assets folder, but Couchbase Lite reads from and persists to the data/data/com.raywenderlich.quizzdroid/files folder. In the next section you’ll add code to move the database to its final location.
Initializing the Database
Open DataManager.java. This is a singleton class providing access to the database instance throughout the application. Add the following to the constructor:Manager manager = null; try { // 1 manager = new Manager(new AndroidContext(context), Manager.DEFAULT_OPTIONS); // 2 database = manager.getExistingDatabase("quizzdroid"); } catch (IOException e) { e.printStackTrace(); } catch (CouchbaseLiteException e) { e.printStackTrace(); } // 3 if (database == null) { try { ZipUtils.unzip(context.getAssets().open("quizzdroid.cblite2.zip"), manager.getContext().getFilesDir()); // 4 database = manager.getDatabase("quizzdroid"); } catch (IOException e) { e.printStackTrace(); } catch (CouchbaseLiteException e) { e.printStackTrace(); } } |
- Instantiates the Couchbase Lite
Manager. A Manager is the top-level object managing a collection of Couchbase Lite Database instances. You must create a Manager instance before working with Couchbase Lite objects. TheManager.DEFAULT_OPTIONSparameter indicates default options, including read/write support. - Checks for an existing
Databasenamed “quizzdroid”. This line returnsnullif the database doesn’t exist, as would be the case on first launch. - If the database doesn’t exist, the
ZipUtils.unzipmethod unzips the zip database file into the files directory; otherwise, nothing further needs to be done. - The database is instantiated using the
getDatabasemethod.
onCreate in HomeActivity.java:DataManager manager = DataManager.getSharedInstance(getApplicationContext()); |
Database Listener
Now that the database is initialized, you should verify it is working properly. This is a perfect job for the Database Listener, which is a component that provides an HTTP entry point to the database. This component is optional and is often used for the following reasons:- Debugging: In development, it’s much faster to use the HTTP API to inspect the database than to set breakpoints and examine query results.
- Peer-to-peer: Other databases (often running on different devices) can persist data to the listener directly without the need for a server to act as the intermediary. This aspect of Couchbase Mobile isn’t covered in this Couchbase tutorial.
- Hybrid development: Used to access the database from JavaScript frameworks within a WebView.

Back in
DataManager.java, add the following below the existing code in the constructor method:View.setCompiler(new JavaScriptViewCompiler()); Database.setFilterCompiler(new JavaScriptReplicationFilterCompiler()); Credentials credentials = new Credentials(null, null); LiteListener liteListener = new LiteListener(manager, 5984, credentials); Thread thread = new Thread(liteListener); thread.start(); |
Credentials from the com.couchbase.lite.listener namespace.
This code creates a database listener on port 5984 and starts it on a background thread.
Build and run your app; you should see the same blank screen as before.
To access the database from a browser or a command-line utility such as
curl, you must enable port forwarding for that port using ADB. From the command line, run the following:adb forward tcp:5984 tcp:5984 |
You can also access the database using the following curl command:
$ curl -X GET 'http://localhost:5984/quizzdroid' { "disk_size":147960, "db_uuid":"53b66d23-8803-43f3-a4db-a49d51b09efe", "db_name":"quizzdroid", "update_seq":6, "instance_start_time":1468585759670000, "doc_count":6 } |
doc_count is 6, which confirms the prebuilt database was successfully loaded. Your next task is to display the six questions on the Home Screen.
The Home Screen
Couchbase Mobile is a schemaless database, which means there are no restrictions on the database schema. This lets you be quite flexible during development because you don’t need to run database migrations every time the schema changes. Nonetheless, the application code must know about the data structures underneath.Data Modeling
Below is the data model for this application: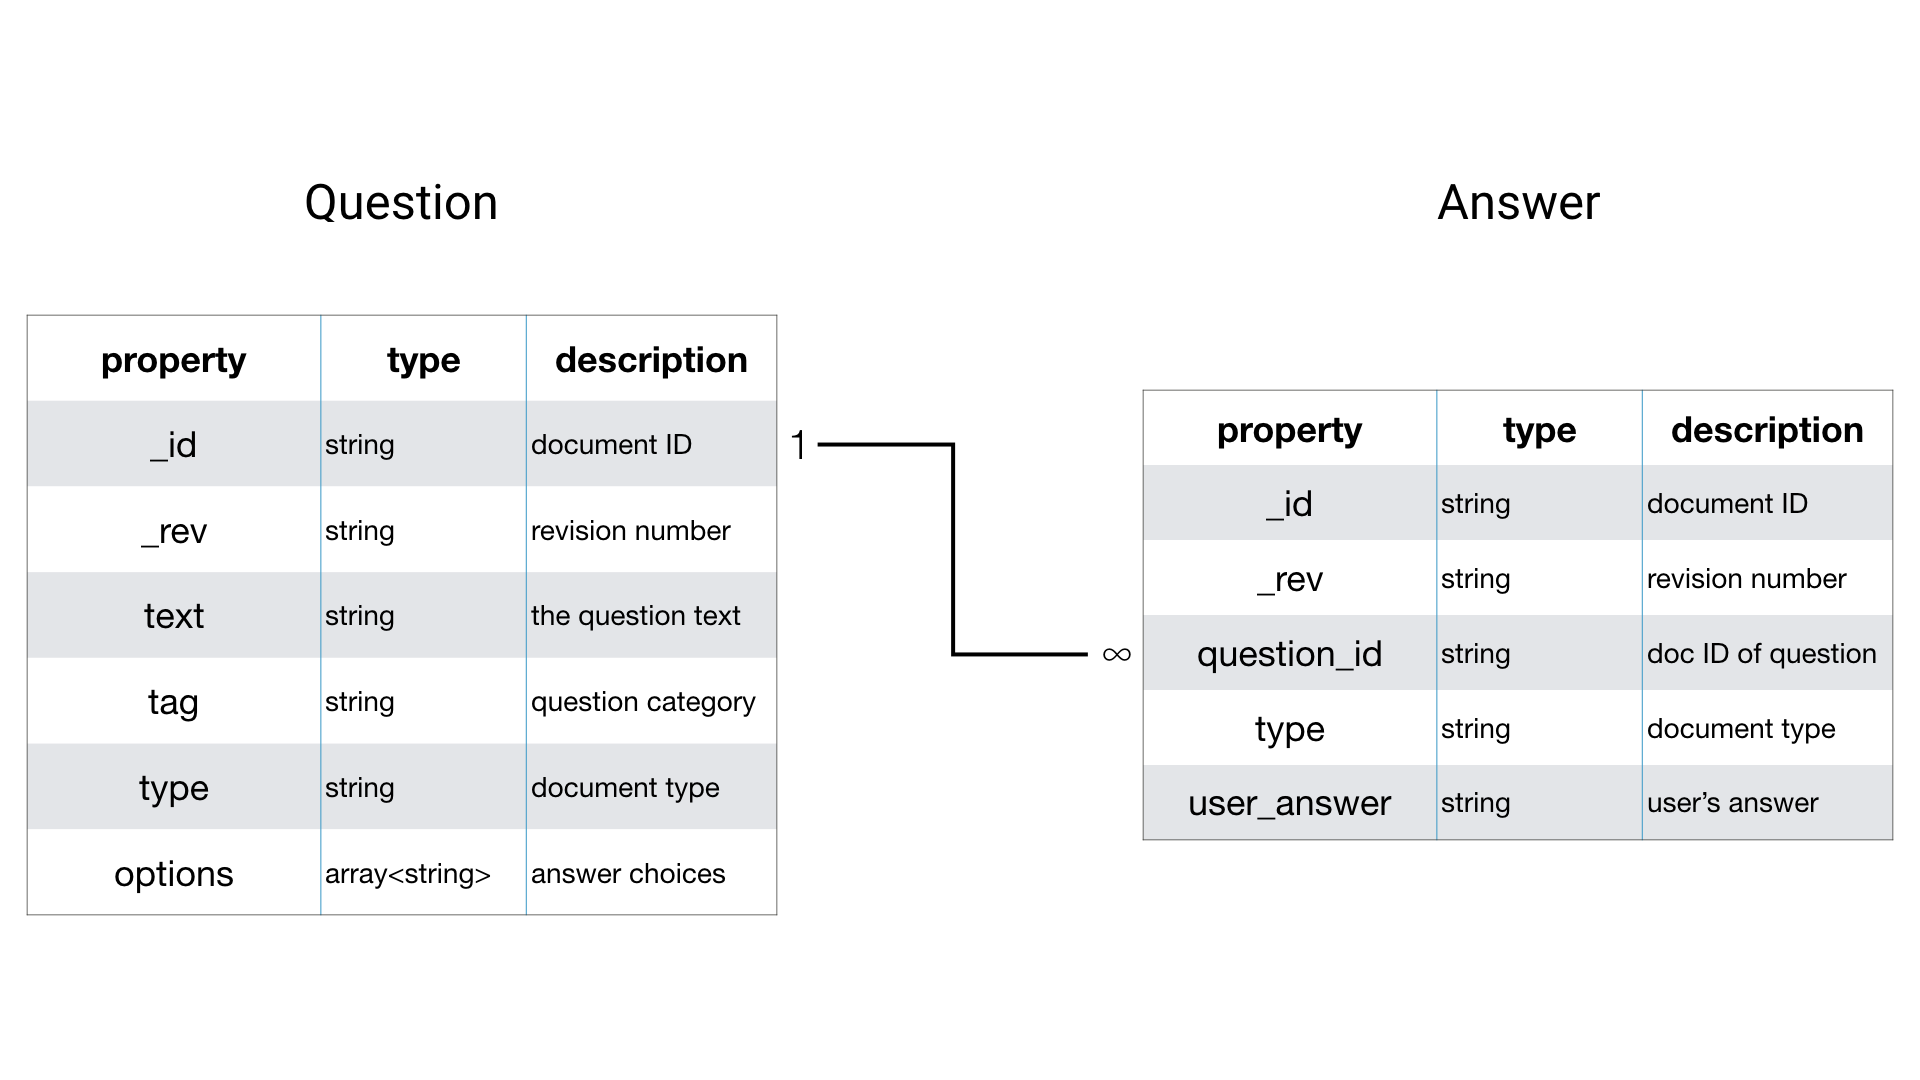
Data records are called documents, and there are two document types:
question and answer.
The underlying data format is JSON. You can think of a document as a
set of key-value pairs. There is a one-to-many relationship between the
question and answer documents. POJO Classes
In order to manage the Couchbase documents, you will create POJO (Plain Old Java Object) classes to map the Couchbase documents to Java objects.Open model/Question.java and add the following instance variables:
private String _id; private String _rev; private String text; private String tag; private String type; private List<String> options; @JsonIgnore private String _attachments; |
question document type. You will use the Jackson library to convert between POJOs and JSON.All the properties reserved for Couchbase Lite are prepended with
_, such as _id, _rev, and _attachments. The _attachments
property is only present if the document contains attachments. You will
load attachments through another API method, so it’s marked with the @JsonIgnore annotation, telling Jackson to ignore the variable.Use the Android Studio
CTRL+Enter shortcut to add getter and setter methods for each instance variable.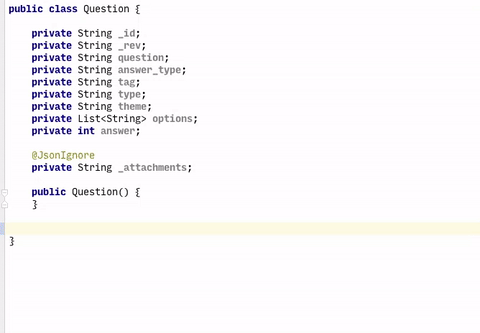
With the Question model in the application, you can now write a view to index question documents.
Indexing Data
The way to query data in Couchbase Lite is by registering a View and then running a Query on it with QueryOptions. The first thing to know about Couchbase Views is that they have nothing to do with the user interface views.A View in Couchbase is a persistent index of documents in a database, which can be queried to find data. The main component of a View is its
map function. It takes a document’s JSON as input, and emits any number of key-value pairs to be indexed. First, you will define the view to index the documents of type question. The diagram below shows the result of that map function.

Remember that a view index is a list of key-value pairs, sorted by key. The view’s logic is written in the native language of the platform you’re developing on.
Add the following static method to models/Question.java:
public static Query getQuestions(Database database) { // 1 View view = database.getView("app/questions"); if (view.getMap() == null) { // 2 view.setMap(new Mapper() { @Override // 3 public void map(Map<String, Object> document, Emitter emitter) { // 4 if (document.get("type").equals("question")) { emitter.emit(document.get("_id"), null); } } }, "1"); } Query query = view.createQuery(); return query; } |
- Request a database view named questions. This will create the view if it doesn’t exist.
- If the view does not already have a mapping, create one with a new
Mapperobject. The second parameter tosetMapis a version number. If your code for the map changes in the future, the version number should be incremented as well. - The Mapper object calls
mapfor each document in the database. - If the document type equals
question, then emit the key-value pair for the view.
Querying and Displaying Data
With the view now defined, you are ready to run aQuery on it. The result of a query is an instance of QueryEnumerator, which provides a list of QueryRow objects, each one describing a single row from the view’s index.Add the following code to the end of the
onCreate method in HomeActivity.java:// 1 QueryEnumerator questions = null; try { questions = Question.getQuestions(manager.database).run(); } catch (CouchbaseLiteException e) { e.printStackTrace(); } // 2 List<Question> data = new ArrayList<>(); for (QueryRow question : questions) { Document document = question.getDocument(); Question model = ModelHelper.modelForDocument(document, Question.class); data.add(model); } // 3 final HomeAdapter adapter = new HomeAdapter(data); mRecyclerView.setAdapter(adapter); |
- Runs the query and saves the result in a
questionsvariable. - Loops over the query rows and deserializes the
Questionmodel objects. - Connects the questions to the RecyclerView
ModelHelper.modelForDocument. Open ModelHelper.java, and take a look at modelForDocument. It uses the Jackson library to convert the properties in the question QueryRow object to the Question object.If you run the app, the screen will still be blank because the Recycler View isn’t drawing the rows. In adapter/HomeAdapter.java, add the following code to
onBindViewHolder:// 1 Question question = mQuestions.get(position); // 2 switch (question.getTag()) { case "science": holder.itemView.setBackgroundColor(Color.parseColor("#EC5766")); break; case "geography": holder.itemView.setBackgroundColor(Color.parseColor("#FFC857")); break; case "android": holder.itemView.setBackgroundColor(Color.parseColor("#63ADF2")); break; case "logic": holder.itemView.setBackgroundColor(Color.parseColor("#86CD82")); } // 3 holder.mQuestion.setText(question.getText()); holder.mTag.setText(question.getTag()); // 4 holder.itemView.setOnClickListener(new View.OnClickListener() { @Override public void onClick(View v) { if (mOnItemClickListener != null) { mOnItemClickListener.OnClick(v, position); } } }); |
- Retrieves the
questionobject for the requested row position. - Uses the category returned by
getTagto set the background colors. - Sets the content to display in the TextViews for the question text and category.
- Assigns an
onClicklistener to respond when the user taps a question.
Note: Check out the Recycler View tutorial if you need a refresher on using Recycler Views.
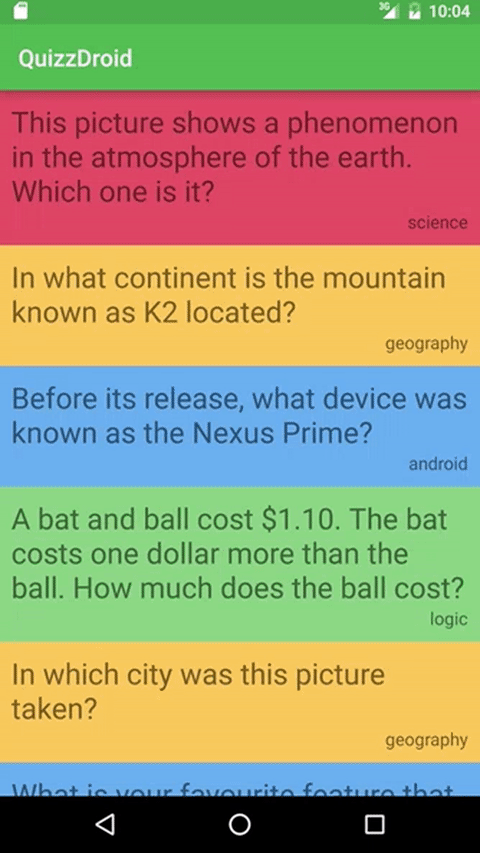
Build and run your app; you should now see six questions on the home screen.
Well done! In the next section, you’ll add a row click handler to open the Question activity.
Note: Run the same query using the Listener.
The result has the same questions you see in the app. This lets you
examine the details of each question document. The query link is http://localhost:5984/quizzdroid/_design/app/_view/questions?include_docs=true
Home Activity → Question Activity
Head back to HomeActivity.java and add the following code to the end ofonCreate:adapter.setOnItemClickListener(new HomeAdapter.OnItemClickListener() { @Override public void OnClick(View view, int position) { Intent intent = new Intent(getApplicationContext(), QuestionActivity.class); Question selected = adapter.getQuestions().get(position); intent.putExtra(EXTRA_INTENT_ID, selected.get_id()); startActivity(intent); } }); |
QuestionActivity.Build and run. Click on any row to open the question activity. The Question activity is blank, but the next section will take care of that.
The Question Screen
Your first task is to load the full question document from the database and use it to populate the Question activity.Loading the Question Data
Open QuestionActivity.java and paste the following at the end ofonCreate:// 1 Intent intent = getIntent(); String questionId = intent.getStringExtra(HomeActivity.EXTRA_INTENT_ID); // 2 DataManager manager = DataManager.getSharedInstance(getApplicationContext()); Document document = manager.database.getDocument(questionId); // 3 mQuestion = ModelHelper.modelForDocument(document, Question.class); mTextView.setText(mQuestion.getText()); |
- Retrieves the
questionIdof the selected question from the intent extra. - Uses the
managersingleton database to load the document with thequestionId. - Deserializes the document into
questionand sets the text property on thetextView

Multiple Choice in a GridView
The data modeling diagram lists theoptions property as an array of strings. Those are the possible choices shown to the user.Add the following method to QuestionActivity.java:
To display the choices, add the following to the end of
onCreate in QuestionActivity.java:mQuestionOptions = (GridView) findViewById(R.id.question_options); mQuestionOptions.setChoiceMode(AbsListView.CHOICE_MODE_SINGLE); mQuestionOptions.setNumColumns(2); mQuestionOptions.setSelector(R.drawable.selector_button); mQuestionOptions.setAdapter(new QuestionOptionsAdapter(mQuestion.getOptions(), null)); mQuestionOptions.setOnItemClickListener(new AdapterView.OnItemClickListener() { @Override public void onItemClick(AdapterView<?> parent, View view, int position, long id) { mSelectedOption = position; } }); |
In the above code segment, you create a GridView, assign it an adapter populated with
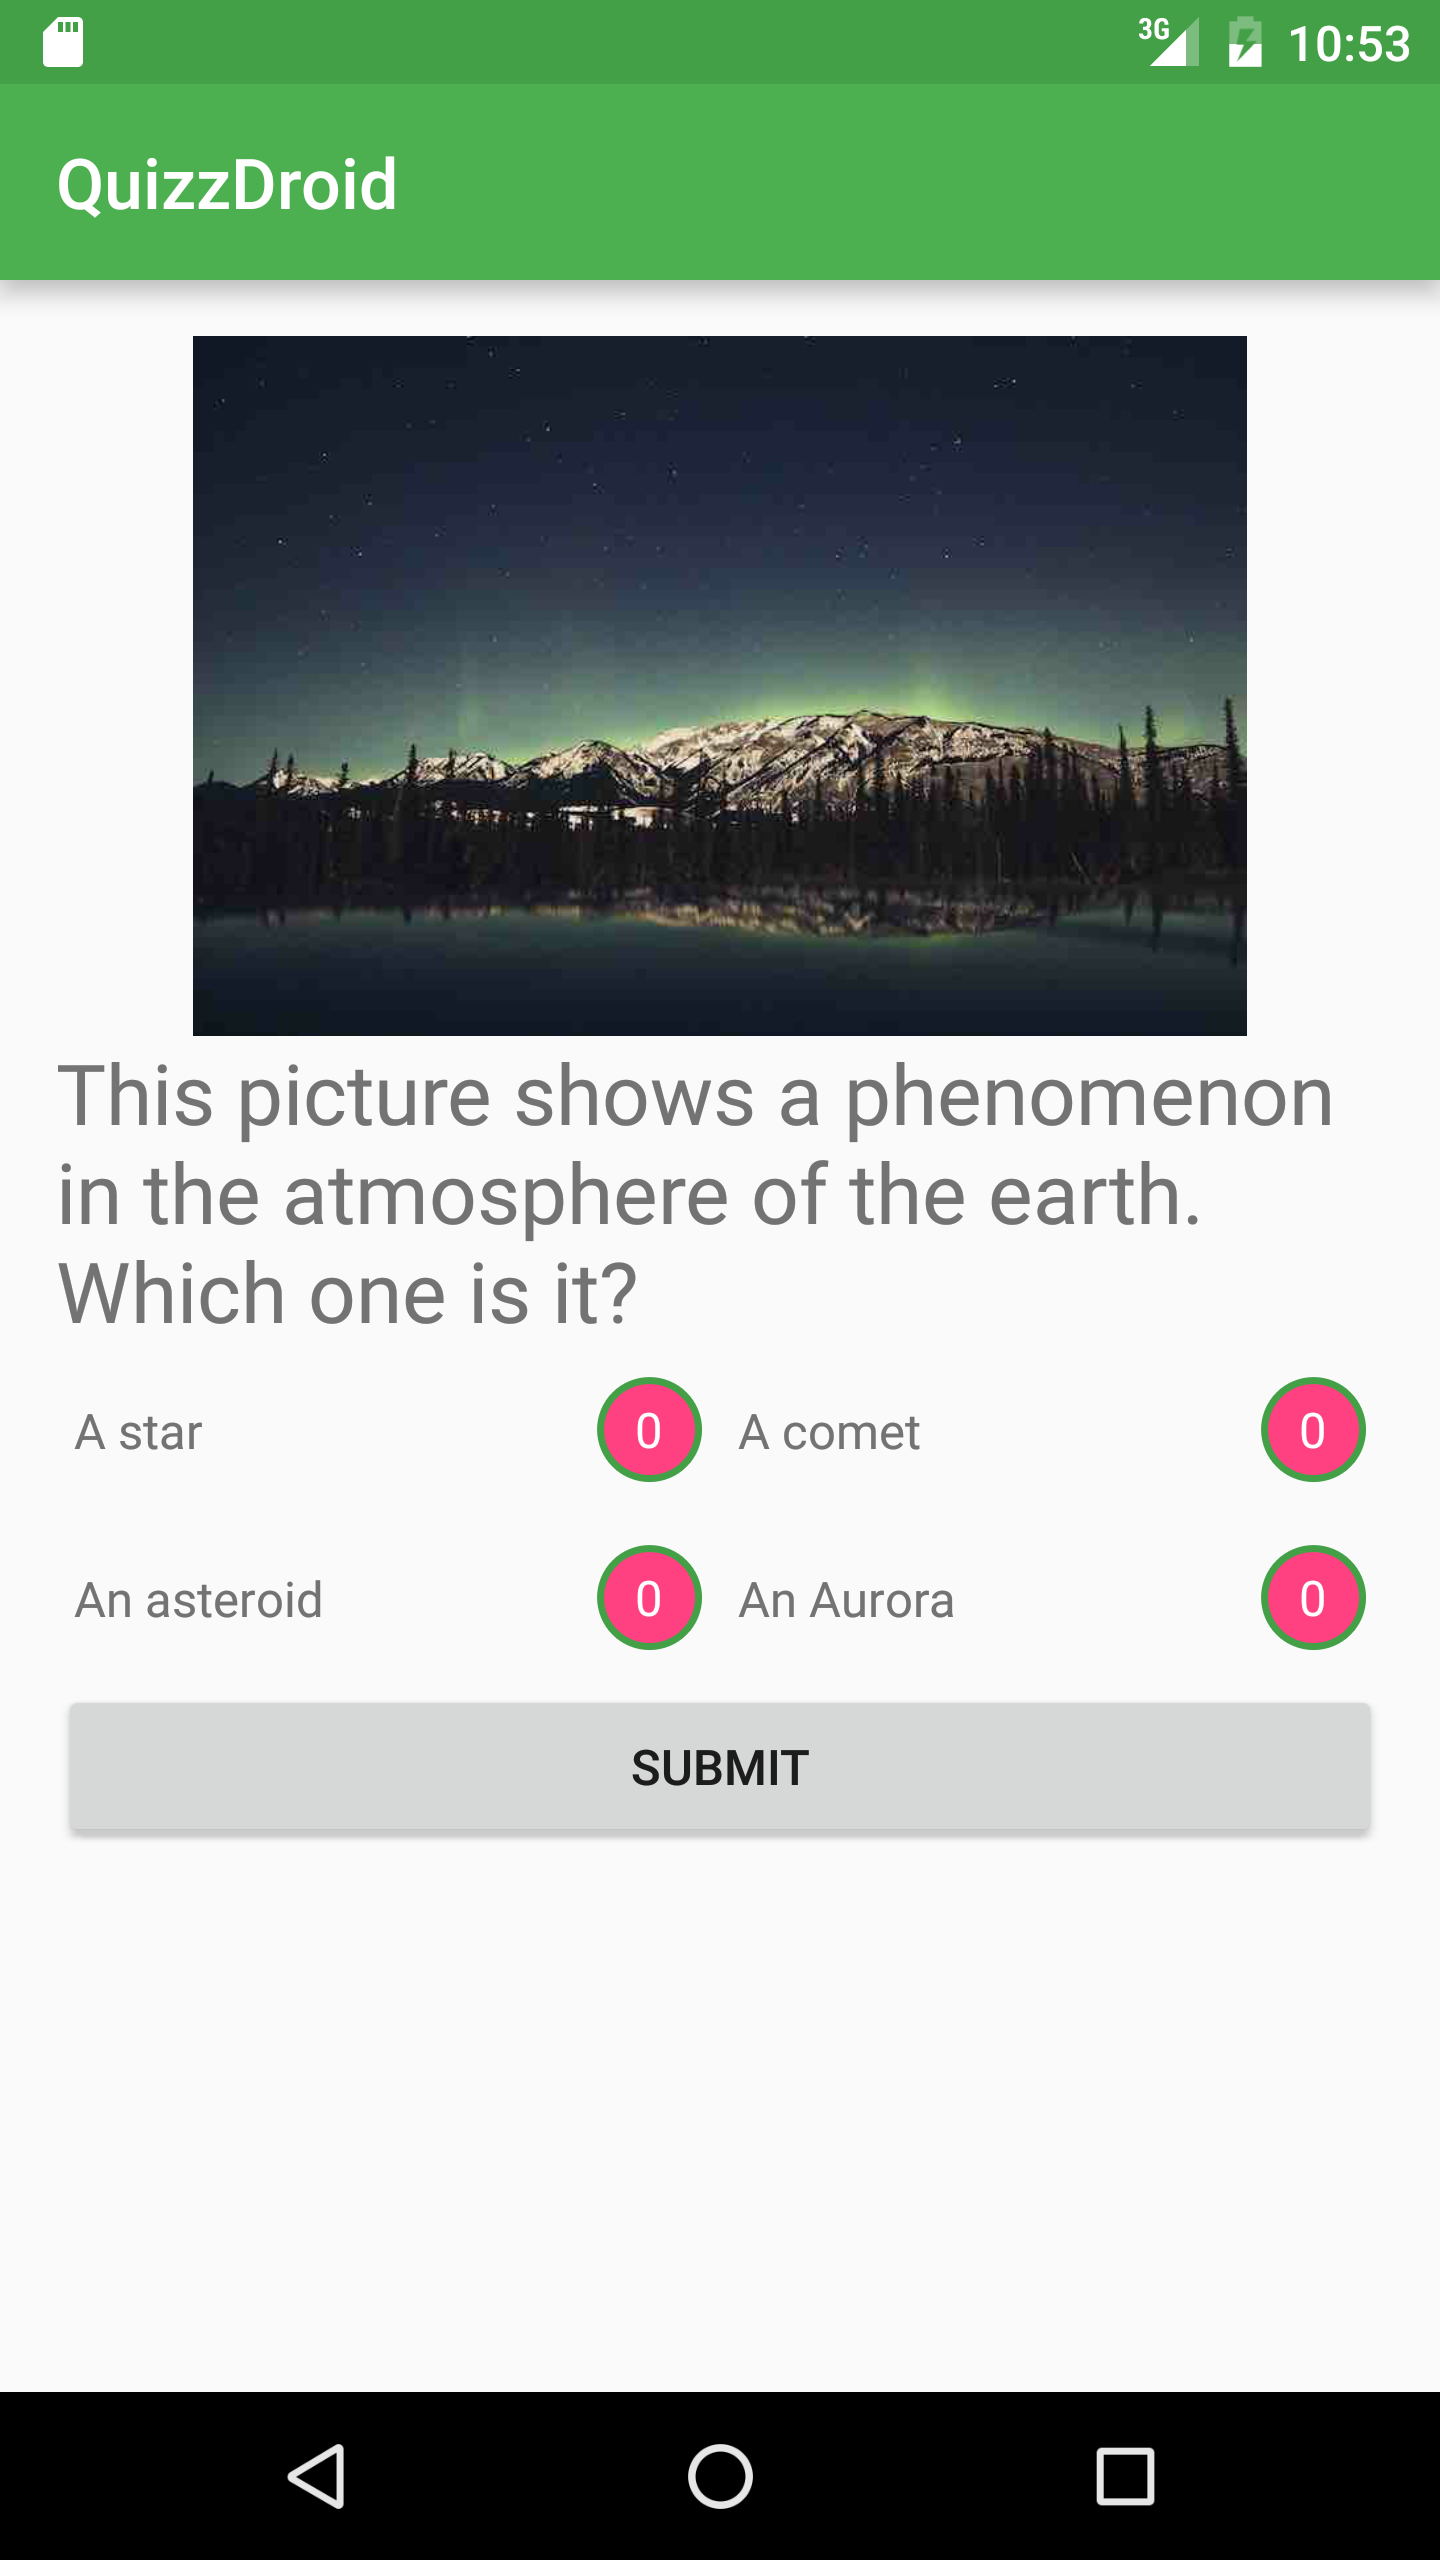
mQuestionOptions and then set up a click listener to store the user’s choice in mSelectedOption.Build and run. Open any question and click on the possible options:

In the next section you’ll add a Submit button to save your answer to a new document.
Writing Data
User answers will be stored in the database as Answer documents. First, you’ll create an Answer model class.Create a new file model/Answer.java and add to it the following instance variables:
private String _id; private String _rev; private String question_id; private String type; private String user_answer; |
CTRL+Enter shortcut in Android Studio.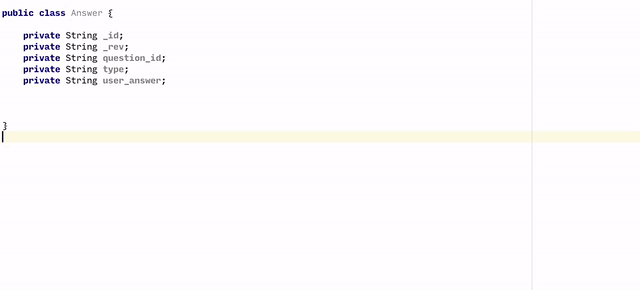
To create Answer instances, add the following constructor in mode/Answer.java:
public Answer(String question_id, String type, String user_answer) { this.question_id = question_id; this.type = type; this.user_answer = user_answer; } |
<Button android:id="@+id/submit_button" android:layout_width="match_parent" android:layout_height="wrap_content" android:onClick="onButtonClicked" android:text="Submit" /> |
Alt+Enter shortcut: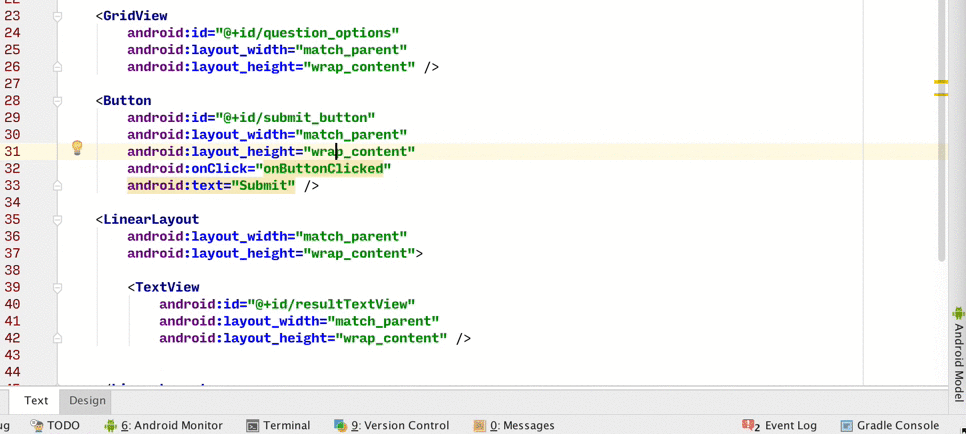
Add the following to the body of
onButtonClicked.Answer answer = new Answer(mQuestion.get_id(), "answer", mQuestion.getOptions().get(mSelectedOption)); ModelHelper.save(DataManager.getSharedInstance(getApplicationContext()).database, answer); |
ModelHelper.save.Build and run, select an answer and tap Submit.

Well done! You can now save answers to the database.
Note: There’s no visual cue to indicate the answer was saved, but you should see the
One more feature to add before you dive into synchronization is to
display the image. The generic term in Couchbase is Attachment.doc_count value increase at http://localhost:5984/quizzdroid
Using Attachments
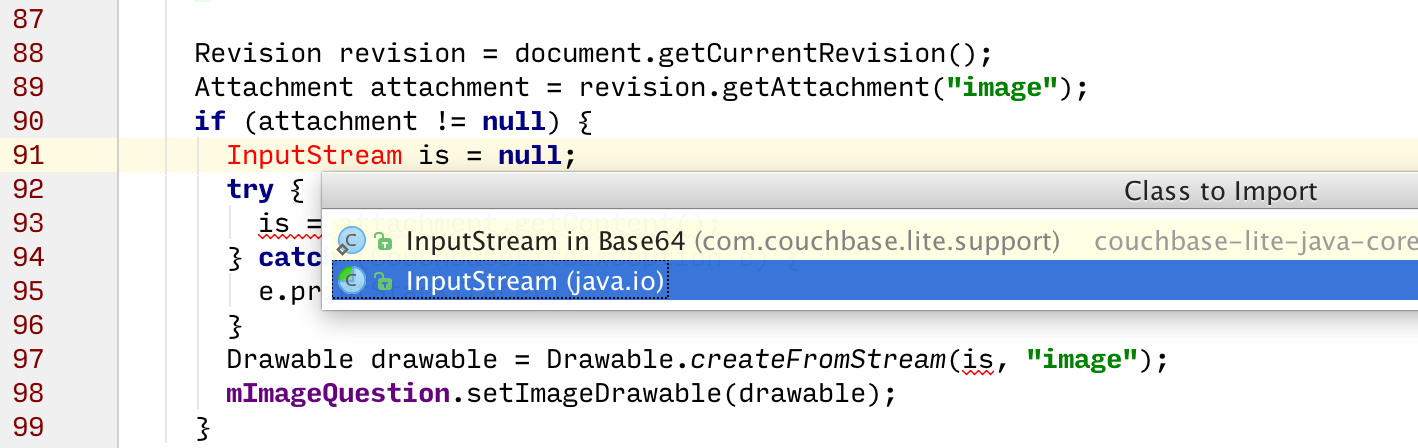
Add the following code to the end ofonCreate in QuestionActivity.java:Revision revision = document.getCurrentRevision(); Attachment attachment = revision.getAttachment("image"); if (attachment != null) { InputStream is = null; try { is = attachment.getContent(); } catch (CouchbaseLiteException e) { e.printStackTrace(); } Drawable drawable = Drawable.createFromStream(is, "image"); mImageQuestion.setImageDrawable(drawable); } |
InputStream. It then converts the stream into a Drawable and assigns it to the mImageQuestion ImageView shown above the question.
Note: Make sure to import 
Build and run your app; select a question and the image will appear:java.io.InputStream for the InputStream class, not the com.couchbase version.
Note: This Couchbase tutorial only covers how to read attachments. Refer to the Couchbase documentation to learn how to save attachments with a write operation.
Adding Synchronization
You will use Sync Gateway in what’s known as walrus mode, which is an in-memory, development-only mode. In production, you would install both Couchbase Server and Sync Gateway.Installing Sync Gateway
Download Sync Gateway community edition and unzip the file. The executable is located in the bin folder. If you unzipped the file to the Downloads folder, start it with this command:$ ~/Downloads/couchbase-sync-gateway/bin/sync_gateway -dbname="quizzdroid" |
Starting server on localhost:4984 ... in your terminal window.You can now head to http://localhost:4984 to check that it’s up and running:

Now that the Sync Gateway is running, you’ll add some code to replicate the database to the server.
Synchronization
Set up the push and pull replications by adding the following code to the end of the constructor in DataManager.java.// 1 URL syncGatewayURL = null; try { String SYNC_GATEWAY_URL = "http://localhost:4984/quizzdroid"; syncGatewayURL = new URL(SYNC_GATEWAY_URL); } catch (MalformedURLException e) { e.printStackTrace(); } // 2 mPush = database.createPushReplication(syncGatewayURL); mPush.setContinuous(true); mPush.start(); // 3 mPull = database.createPullReplication(syncGatewayURL); mPull.setContinuous(true); mPull.start(); |
- Instantiates a URL pointing to http://localhost:4984/quizzdroid, which is your local Sync Gateway instance.
- Starts a push replication in continuous mode, which is the operation that will send data from the local database to the server.
- Starts a pull replication in continuous mode, which is the operation that will retrieve data from the server and save it to the local database.
With the emulator running, run the following from the command line:
$ adb reverse tcp:4984 tcp:4984 |
Note: This command only works on devices
running Android 5.0+ (API 21). Instead of setting up the reverse proxy,
you can replace localhost in the previous code block with 10.0.2.2 for
Android stock emulators, 10.0.3.2 for Genymotion emulators or, if you’re
deploying to a device, the local IP address of your development
machine.
Build and run your app; you should see a new document appear on the Sync Gateway admin UI (http://localhost:4985/_admin/db/quizzdroid, note the different port number) every time you answer a question.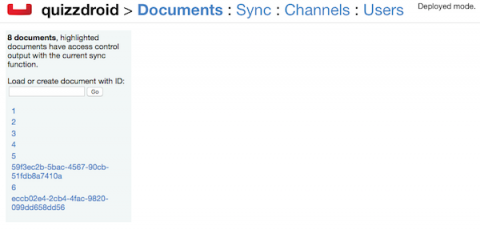
Note: Using Android Studio’s Instant Run
sometimes doesn’t set up the sync correctly; if you don’t see the
documents in the Sync Gateway admin, try quitting the app and then build
and run again.
So far so good, but what about displaying answers from other users? You’ll do exactly that in the next section.Aggregating Data
Data aggregation is a problem across many applications. Couchbase Lite lets you run those data queries using the full capabilities of map and reduce. To run aggregation queries on the rows emitted by the map function, you can use a reduce function to take several rows and aggregate them together in a single object.You’ll write a view to query the number of answers for each possible choice. You’ll define a map function which returns the number of answers for each question, group them by their value and count the number of rows in each group.
The requirements for this query are:
- Get all answers that belong to a given question
- Count the number of answers for each possible choice
Add the following class method to Answer.java:
public static Query getAnswersForQuestion(Database database, String questionId) { View view = database.getView("app/answers"); if (view.getMap() == null) { view.setMapReduce(new Mapper() { @Override public void map(Map<String, Object> document, Emitter emitter) { if (document.get("type").equals("answer")) { List<Object> keys = new ArrayList<>(); keys.add((String) document.get("question_id")); keys.add((String) document.get("user_answer")); emitter.emit(keys, null); } } }, new Reducer() { @Override public Object reduce(List<Object> keys, List<Object> values, boolean rereduce) { return values.size(); } }, "1"); } Query query = view.createQuery(); query.setGroupLevel(2); query.setStartKey(Arrays.asList(questionId)); query.setEndKey(Arrays.asList(questionId, new HashMap<String, Object>())); return query; } |
groupLevel
property, which defaults to 0. It takes the entire range of rows from
the query and coalesces together adjacent rows with the same key.Notice that
groupingLevel = 2 coalesces the rows by key. Keys that are arrays are called compound keys; a group level of 2 means the query will coalesce rows with the same question_id and user_answer.You can read more about
setStartKey() and setEndKey() in the Couchbase documentation for configuring queries.Run the Query
Time to run the query and use the results. Add the following method to QuestionActivity.java:private Map<String,Integer> getAnswerCounts(QueryEnumerator answers) { Map<String,Integer> answerCounts = new HashMap<String, Integer>(); for (String option: mQuestion.getOptions()) { answerCounts.put(option, 0); } for (QueryRow row : answers) { LazyJsonArray<Object> key = (LazyJsonArray<Object>) row.getKey(); String answer = (String) key.get(1); answerCounts.put(answer, (Integer)row.getValue()); } return answerCounts; } |
QueryEnumerator returned from getAnswersForQuestion() and returns a Map that stores an answer count for each option. The map object makes it quick and easy to access answer counts for each option.Add the following code to
onCreate(), just before the line mQuestionOptions = (GridView) findViewById(R.id.question_options):Query answers = Answer.getAnswersForQuestion(manager.database, mQuestion.get_id()); QueryEnumerator answersQuery = null; try { answersQuery = answers.run(); } catch (CouchbaseLiteException e) { e.printStackTrace(); } |
QueryEnumerator to be used when calling getAnswerCounts() below.Next, find the call to
mQuestionOptions.setAdapter(new QuestionOptionsAdapter(mQuestion.getOptions(), null)); and replace it with this line:mQuestionOptions.setAdapter(new QuestionOptionsAdapter(mQuestion.getOptions(), getAnswerCounts(answersQuery))); |
Map returned from getAnswerCounts() into the GridView adapter, allowing it to display answer counts.Add a LiveQuery
Next, you’ll add the method to set up a LiveQuery to keep the answer counts updated. A LiveQuery is a great way to keep your interface updated with database changes. It automatically refreshes any time Database changes affect your query.In QuestionActivity.java, add the following method:
private void showAnswers() { DataManager manager = DataManager.getSharedInstance(getApplicationContext()); Query answersQuery = Answer.getAnswersForQuestion(manager.database, mQuestion.get_id()); LiveQuery liveQuery = answersQuery.toLiveQuery(); liveQuery.addChangeListener(new LiveQuery.ChangeListener() { @Override public void changed(LiveQuery.ChangeEvent event) { QueryEnumerator result = event.getRows(); Map<String,Integer> counts = getAnswerCounts(result); final QuestionOptionsAdapter adapter = (QuestionOptionsAdapter)mQuestionOptions.getAdapter(); adapter.setAnswerCounts(counts); runOnUiThread(new Runnable() { @Override public void run() { adapter.notifyDataSetChanged(); } }); } }); liveQuery.start(); } |
LiveQuery from Answer.getAnswersForQuestion.You then add a
ChangeListener to the liveQuery object. The liveQuery object calls the changed method when required, and passes to it a ChangeEvent object. Next, you use the previously created
getAnswerCounts to return the map of answer counts, which is passed to the GridView adapter to refresh the counts in the UI.Activity.runOnUiThread updates the GridView on the UI thread.Add the following line to the end of
onCreate in QuestionActivity.java.showAnswers(); |

Great job! You can now see your own answers, but what about those from other users?
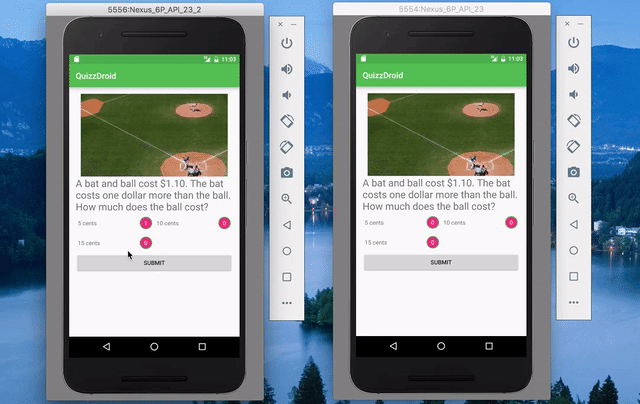
By running two instances of the app at the same time, both accessing the same Sync Gateway, you will have real-time visibility into other user’s answers!
Simulating Multiple Users
In order to simulate other users answering the questions, you can run the app on a second emulator.From Android Studio, you can deploy the app on multiple devices simultaneously using the Run button and Shift key :

Note: The above won’t work in Debug mode, so if you’re having difficulty, be sure to use the Run command in Android Studio, not Debug.
If your using the reverse proxy method, you will need to make sure it
is enabled for both devices. List the running emulators with the
following:$ adb devices List of devices attached emulator-5556 device emulator-5554 device |
$ adb -s emulator-5554 reverse tcp:4984 tcp:4984 $ adb -s emulator-5556 reverse tcp:4984 tcp:4984 |
Well done! You’ve built a shareable quiz application that works equally well when it’s offline.
Where to Go From Here?
You can get the full source code for this project as a downloadable zip or as a repo on GitHub.The Couchbase Lite Guides have detailed explanation for every concept covered in this Couchbase tutorial. Also check out PhotoDrop, a peer-to-peer photo sharing application and ToDoLite Android, a multi-user todo list application, both built on Couchbase.
If you found this tutorial interesting, you might want to try adding peer-to-peer sync capabilities. Start by replacing the remote URL pointing to a Sync Gateway instance with one from another device on the same local network. The challenge in this case is discovering the IP addresses of peer devices. One solution that works well is to use NsdManager, the Android implementation of mDNS.
Feel free to share your feedback, findings and ask any questions in the comments below or in the forums


0 comments:
Post a Comment
Note: only a member of this blog may post a comment.