 In the last quarter of 2015 Google announced a brand new, Android-centric conference called theAndroid Dev Summit. Google kept the conference content secret, promising “deep technical sessions,” but dropped huge hints about something new for Android Studio.
Sure enough, the big superstar of the Android Dev Summit (other than the platform and tool engineers) was Android Studio 2.0. The Android team buffed and polished the interface nicely; what’s more, clearly the Android Tools Team felt the need for speed, as they have increased the speed and performance of builds and the Android Emulator, which has also earned a shiny “2.0” badge.
On April 7, Google released Android Studio 2.0 in their “stable” channel, so it’s no longer just a preview, but the new standard for Android development! In this article, you will learn about the improvements Android Studio 2.0 has to offer, and will try out a few of them.
If you’re brand new to Android Development, you should work through the Android Tutorial for Beginners. In particular, you should be able to set up and run Android Studio and the Android Emulator. If you need some help with that, look at the Beginning Android Development Tutorial: Installing Android Studio.
Alright, let’s take Android Studio 2.0 for a test drive!
Getting Started
First, download the companion project for this article. It’s a complete Android project for you to use on your test drive. There are a few places where you will modify code, but just as part of demoing new Android Studio features.Launch Android Studio, and in the Welcome to Android Studio dialog, select Import project (Eclipse ADT, Gradle, etc.).

Choose the top-level directory of the companion project and click OK.

If you look through the project, you should see two activity classes and two
RecyclerView
view holder classes, along with the accompanying resource and layout
files. Don’t worry too much about the details; you won’t be heavily
editing these files.Build and run. You should see this:

The top card has a few widgets—you’ll get to play with those later. Below the widgets, you should see helpful links for further reading on some of the material covered in this article.
Improved IDE
Just because you’re an Android developer who makes fantastic UIs doesn’t mean you don’t crave ways to make even more fantastic UIs. Android Studio 2.0 feeds your craving, including several UI improvements and new tools for you to enjoy.IntelliJ Features
Google based Android Studio on Jetbrains IntelliJ IDEA. While the two IDEs have different companies and development teams, they do import features from each other, which is great news as IntelliJ is packed with useful tools for code navigation, code inspection, and refactoring. In fact, Android Studio 2.0 already comes with new features from the newest (as of this article’s publication) release of IntelliJ, version 15.One new feature is the instant results in the Find in Path action. Let’s try it out!
In Android Studio, select Edit \ Find \ Find in Path (or use the keyboard short CMD+Shift+F). In the Find in Path window that appears, select the Preview tab. Enter any search text in the Text to find field. For search results to appear in the Preview tab, make sure the Regular expressions checkbox in the Options tab is not checked.

The search results should update in real time as you type. These results also utilize any options you set on the Options tab, giving full search power to even the most impatient.
A handy new code inspection tool from IntelliJ 15, Expression Type, helps out when you cannot immediately tell or remember the resulting type of an expression.
To see it in action, highlight an expression in your code and hit CTRL+Shift+P.

This determines the type of the expression’s value and displays it in a tooltip. Sweet!
You can learn more about the newest IntelliJ 15 features (that you get to use from Android Studio) from Jetbrains.
Deep Links Integration
In your app, you can enable deep links that allow your app to appear in relevant Google search results. You create these deep links via intent filters for handling certain URLs. If you are not familiar with intent filters, check out our Android: Intents Tutorial.Android Studio 1.5 already povided an easy method to generate these intent filters in your Android Manifest, but Android Studio 2.0 adds static analysis that verifies whether your app is ready for app indexing.
To give it a try, open AndroidManifest.xml in Android Studio.
You should see the following:
<?xml version="1.0" encoding="utf-8"?> <manifest package="com.raywenderlich.as20allthethings" xmlns:android="http://schemas.android.com/apk/res/android"> <uses-permission android:name="android.permission.ACCESS_FINE_LOCATION"/> <application android:allowBackup="true" android:icon="@mipmap/ic_launcher" android:label="@string/app_name" android:supportsRtl="true" android:theme="@style/AppTheme"> <activity android:name=".MainActivity"> <intent-filter> <action android:name="android.intent.action.MAIN"/> <category android:name="android.intent.category.LAUNCHER"/> </intent-filter> </activity> <activity android:name=".DeepLinkActivity" android:theme="@style/AppTheme.Green"/> </application> </manifest> |
activity android:name=".DeepLinkActivity" tag, and in the context menu that appears, select Generate \ URL. 
Alternatively, click on the tag and hit Option+Enter; in the pop-up that appears, select Add URL.

Using either method tells Android Studio to generate the necessary intent filter. The
activity should now look like this:<activity android:name=".DeepLinkActivity" android:theme="@style/AppTheme.Green"> <!-- ATTENTION: This intent was auto-generated. Follow instructions at https://g.co/AppIndexing/AndroidStudio to publish your URLs. --> <intent-filter> <action android:name="android.intent.action.VIEW"/> <category android:name="android.intent.category.DEFAULT"/> <category android:name="android.intent.category.BROWSABLE"/> <!-- ATTENTION: This data URL was auto-generated. We recommend that you use the HTTP scheme. TODO: Change the host or pathPrefix as necessary. --> <data android:host="as20allthethings.raywenderlich.com" android:pathPrefix="/deeplink" android:scheme="http"/> </intent-filter> </activity> |
To see the Android Studio 2.0 static analysis in action, change the
data tag to look like the following:<data android:host="as20allthethings.raywenderlich.com"/> |

Here, Android Studio specifically warns you that Google search will not play nice with this invalid URL. Undo those changes to make Android Studio and your app happy again.
You may feel that the improvement is small, but app indexing is a powerful tool, and integrating with Google Search will increase the visibility and utility of your app. For more information on app indexing, check out this overview from Google Developers.
Unified Unit Tests and Android Instrumentation Tests
If you are familiar with unit testing on Android, you know that there are two types of unit tests in Android Studio:- Local unit tests are unit tests without dependencies on the Android framework; these run on the local machine only.
- Instrumented unit tests are unit tests that have Android dependencies and must run on a device or emulator.

Unit Tests selection, before Android Studio 2.0

Android Instrumentation Tests selection, before Android Studio 2.0

For more information about unit testing in Android, check out developer.android.com.
GPU Profiler
A huge feature for GL graphics developers is the new GPU profiler. Aiming to save developers huge amounts of time during graphics debugging, the GPU profiler provides the power to closely examine the GPU state. Developers can record and replay a scene frame-by-frame as well as view the sequence of GPU commands that created that state and scene.This article doesn’t look at all the details of the GPU profiler, but you can find out more on the Android Tools Project Site.
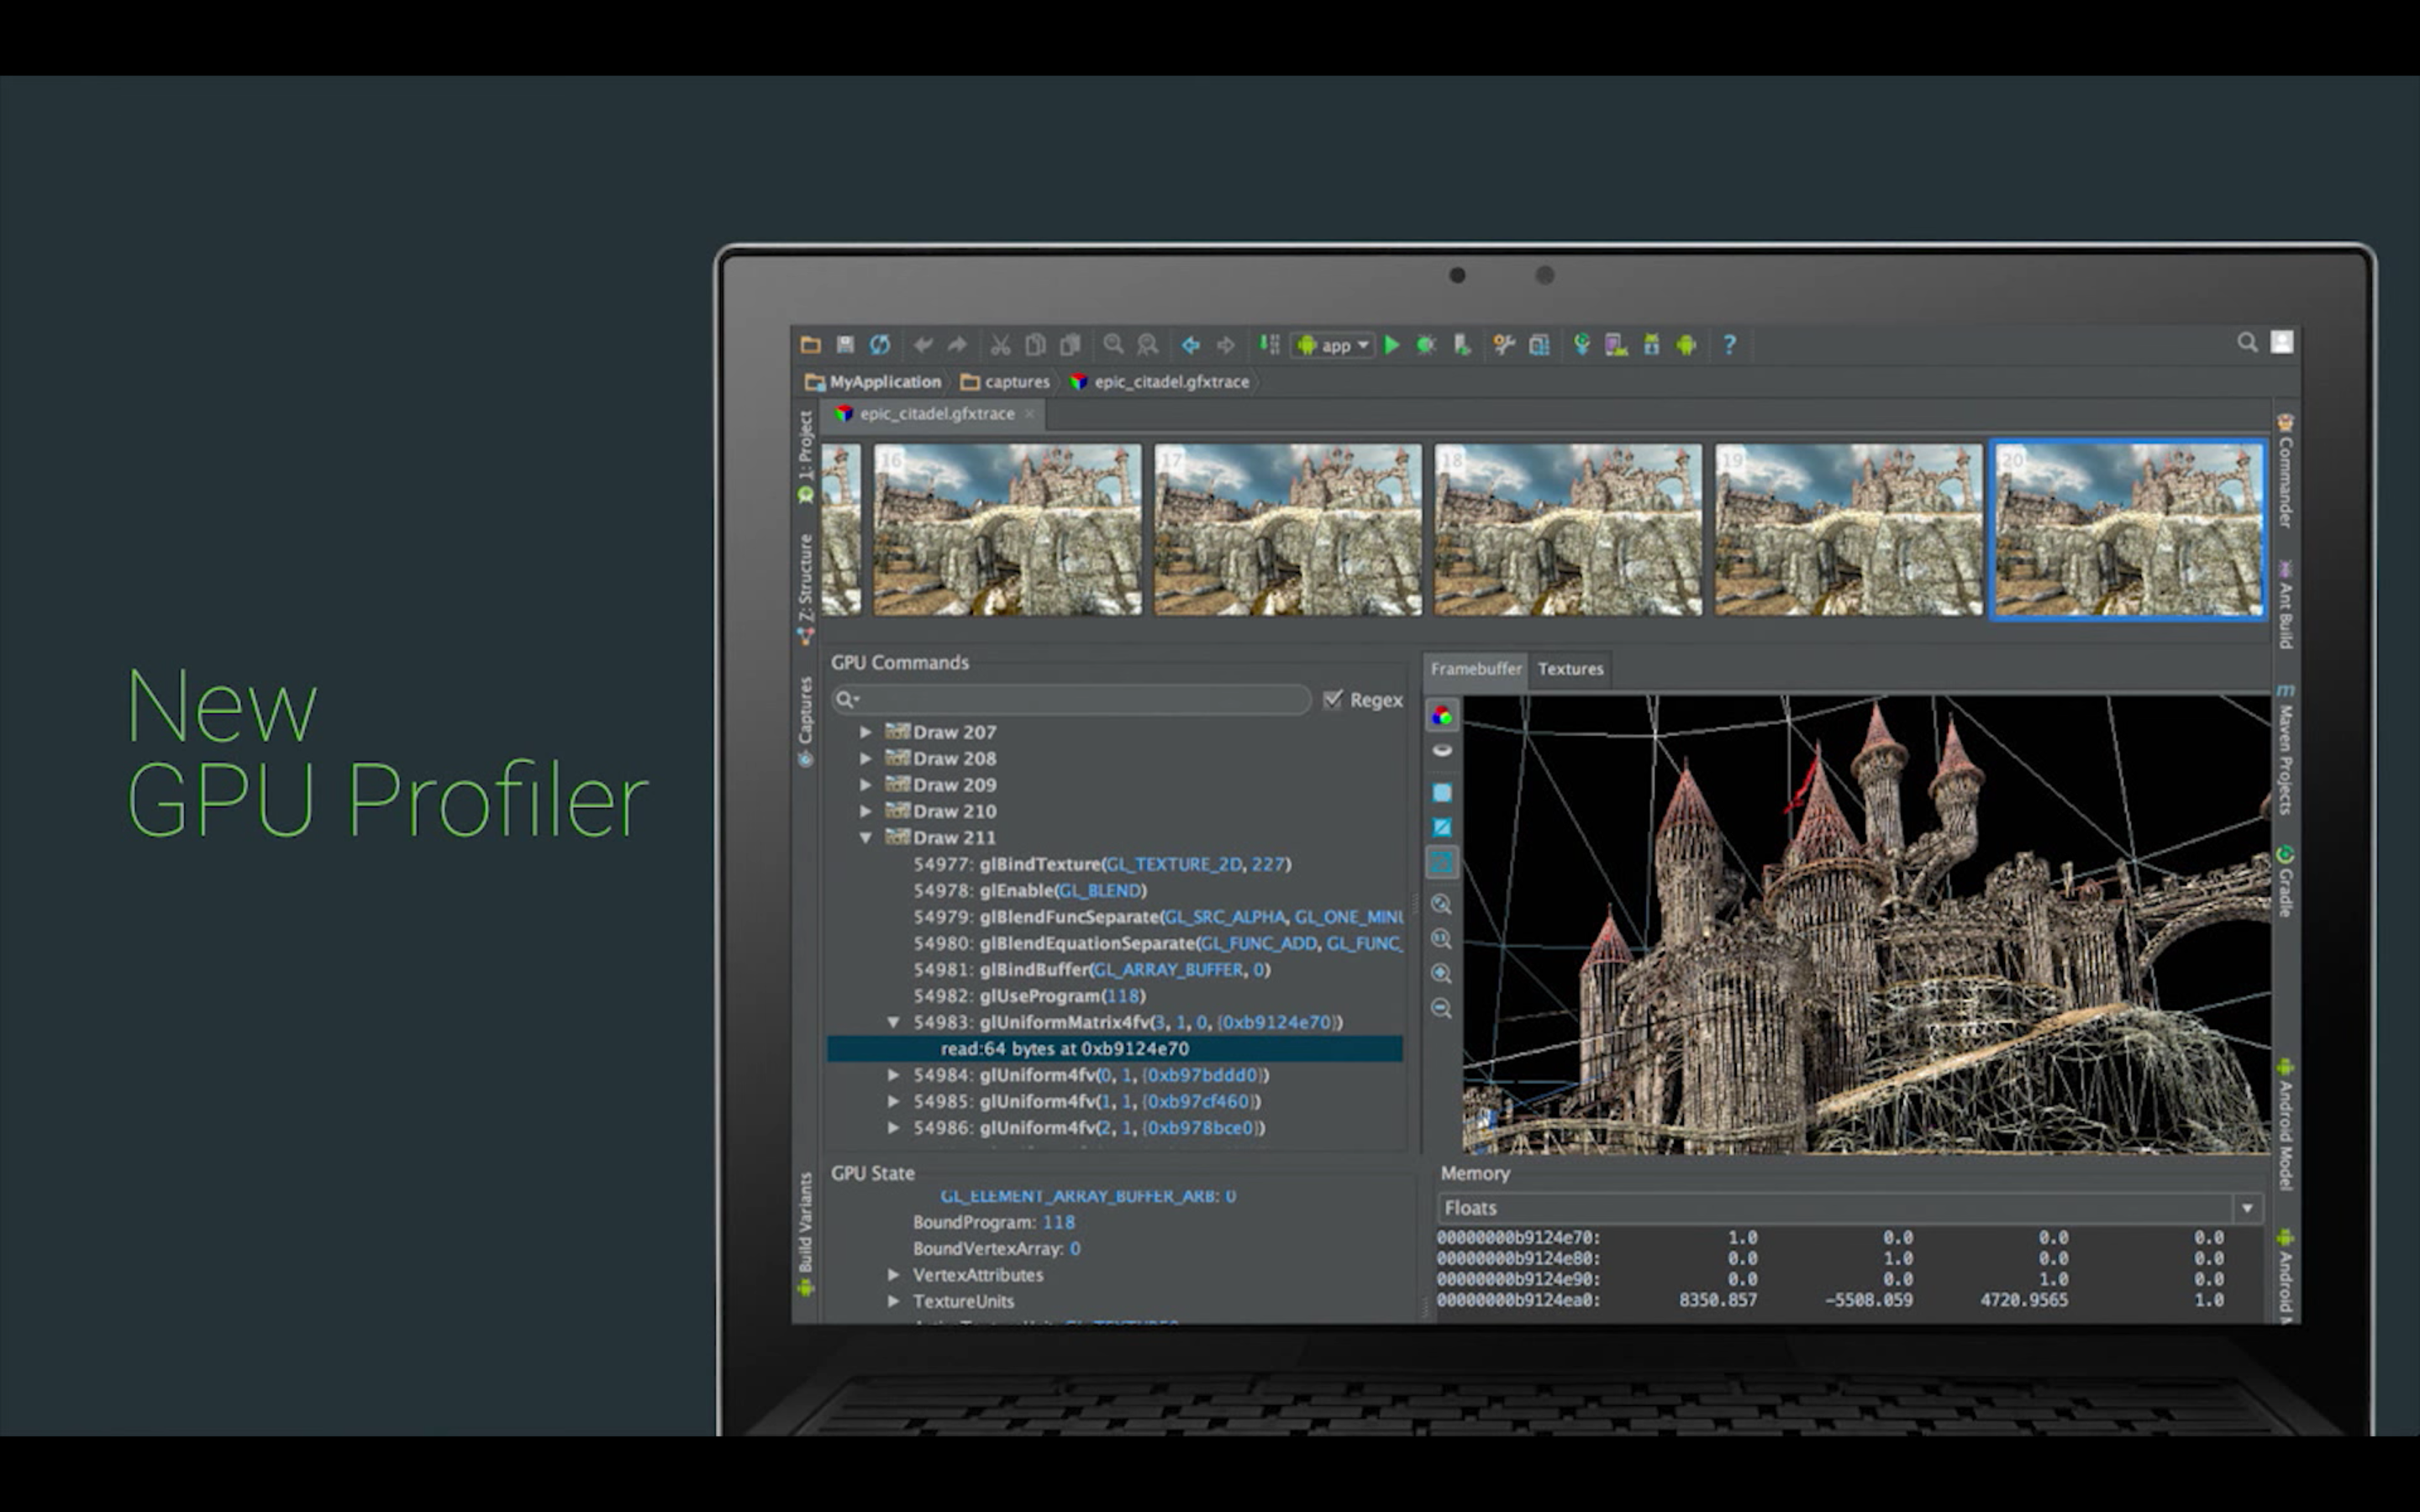
From the Android Dev Summit keynote presentation: https://youtu.be/xdItHEVfQ4U?t=15m57s
Android Emulator 2.0
It’s fair to say that not many developers love the Android Emulator, and that many have lamented its super-slow start up and laggy performance. For a long time, the emulator lacked many of the features and UI convenience of third-party emulators.Happily, the Android Emulator 2.0 has completely changed the game, receiving both a much-improved UI as well as a massive speed-up.
New Interface
The first thing to notice about the Android Emulator 2.0 is that while the screen rendering area might look the same, with a phone frame and gray window border, the emulator has a new toolbar.
The Android team also added a feature that sounds simple but was, as they said, a frequently-wished-for improvement: the ability to resize the emulator by dragging the window (to sometimes ridiculous results).

Speaking of dragging, you can now transfer files onto the virtual device by dragging-and-dropping.

The new emulator toolbar provides easy-access controls for the emulator, such as Volume, Back, Home and Power Off. It also provides a screen rotation button (the old emulator required a keyboard shortcut or an arcane ADB command) and a screenshot button.
Click the bottom button of the toolbar to see the Extended controls window appear. Select Settings. From here, you can set the destination folder for screenshots:
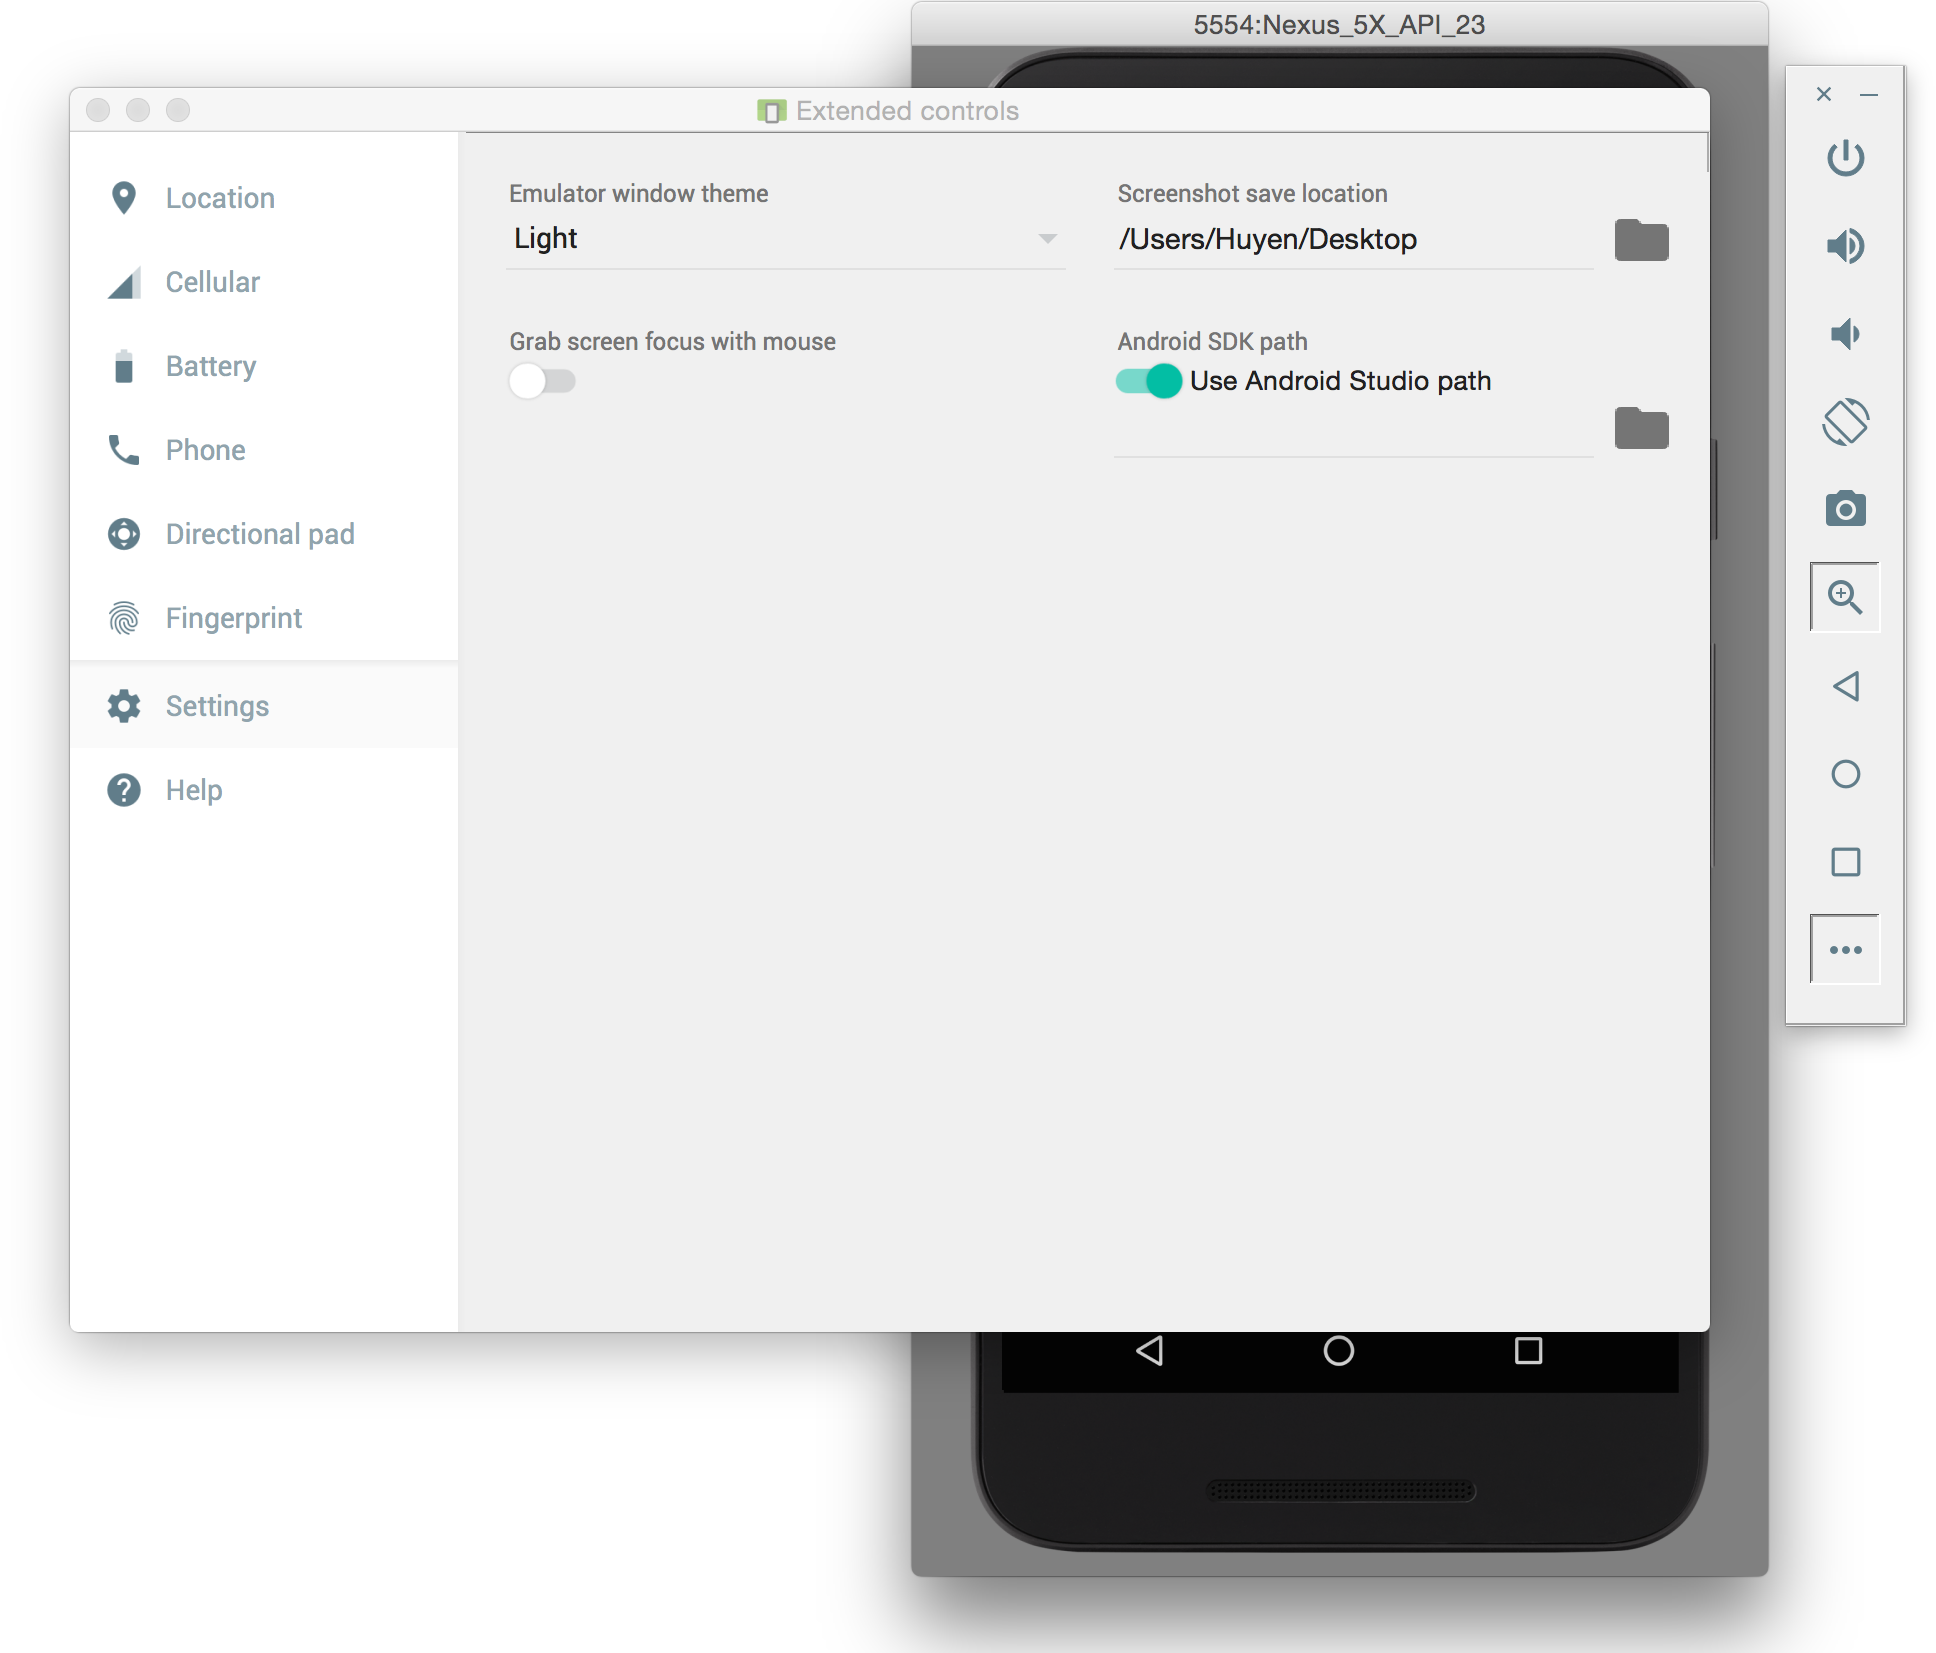
The Extended controls window shows more of the awesome features Android Studio 2.0 provides for testing your app. You can emulate device conditions and verify behaviors such as how your app would handle different types of networks and speeds, battery status changes, location updates and more.

There is even a control for emulating fingerprint sensor input.

Let’s try out a few of these in the companion app.
Phone Call/SMS
Select Phone in the Extended controls window. You should see a form that contains input for a phone number and text message:
In the SMS text, enter Check this out! http://as20allthethings.raywenderlich.com/deeplink
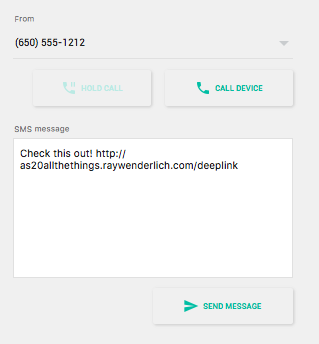
Click SEND MESSAGE.

Woohoo! You just sent your emulator a text message without breaking a sweat.
Note: As you might remember from the discussion about deep
links integration, the companion now has an intent filter that handles
the URL in the text message.
If you want to see the deep linking in action, open the SMS in the emulator and click the link.
If you want to see the deep linking in action, open the SMS in the emulator and click the link.
Battery and Charging States
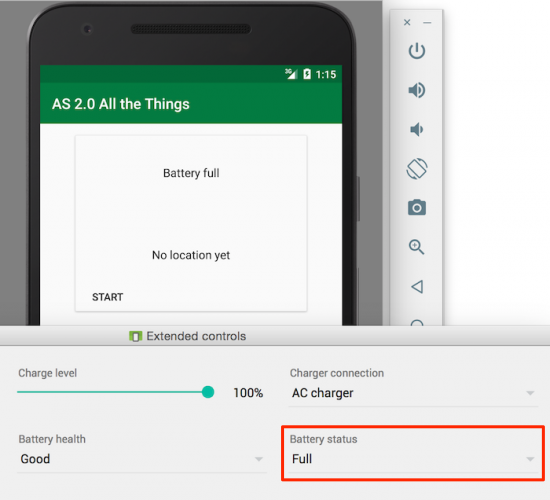
Another device state you can directly set and manipulate in version 2.0 is the battery status and charging state.Launch the companion app. Part of the logic in the top card displays the current battery status of the device, and if you look at the battery status of the emulator and the battery status message in the top card, you will see that they match.

To make changes, open the Extended controls window and select Battery.

There are several controls for manipulating the battery status. Use the Charge level slider to change the battery level, and watch it instantly update in the status bar of the emulator. To explicitly set the battery status, select Full from the Battery status dropdown. The top card detects the change and displays the new status immediately.
Location Updates
For your last stop on the extended controls portion of the tour, you will practice pushing location updates to the emulator.If you look at the top card, you will see the text “No location yet”.

The top card listens for location updates and displays the received location coordinates. Right now it is just waiting for you to give it some!
In the companion app, click the Start button. You’ll be prompted to give the app access to the device’s location. Click ALLOW.

At this point, the companion app waits for location updates.
To pass it an update, open the Extended controls window again and select Location. With Decimal selected, enter 37.4226 into Latitude and -122.084 into Longitude. Click SEND.

The top card should immediately update to reflect the new location.

If you don’t want to enter in location updates one by one, you can even load a set of coordinates into the window and “play” that list.

With all these tools and more, Android Emulator 2.0 has been packed with exciting new utility and a streamlined interface. It is definitely worth the ride.
Better Builds
You might say to yourself, “Okay, a fast emulator is great, but I’m still spending too much time actually building my app. What do I do about that?”Well, you could train your dog to code. If nothing else, that could get you some YouTube fame :]
The better solution is—as you might have guessed—Android Studio 2.0!
The Android Tools Team has attempted to rev up build and deployment speeds. They have also added a new feature: Instant Run. You’ll explore these improvements in the next section.
Faster Build Speeds
Reporting speed-ups of 2-2.5x for full build times, the Tools Team has made improvements in several areas of the build system. To fully discuss them would be a pretty deep dive, but generally speaking they include:- Improvements to the
dxmerger.dxis the build tool that converts Java classes to Dalvik executable format (.dex) files. - A shrinker for debug mode.
- Builds that specifically target connected devices.
For more on these build system improvements in particular, check out this session presented at the Android Dev Summit.
Faster ADB
The Android Debug Bridge (ADB) on the emulator has received a push/pull protocol update. When deploying APKs to the new emulator, you will see up to a 5x speed increase.
From the Android Dev Summit keynote presentation: https://youtu.be/xdItHEVfQ4U?t=13m17s
Instant Run
Wonderfully, Android Studio 2.0 is all about the need for speed. While the Android Tools Team has sped up builds and deployments, they have also tried to reduce the number of times you have to deploy.To this end, they have introduced Instant Run, which provides pushing of updates—code and resources—to a running instance of your app on a device or emulator without requiring a full reinstall. Obviously, this is a huge time-saver.
Instant Run works differently for different kinds of changes. Currently, there are three ways Instant Run implements updates:
- A hot swap: your app continues to run and uses the changes next time the relevant method is called. This applies to method changes.
- A warm swap: your app continutes to run but restarts the current activity. This applies to resource changes.
- A cold swap: your app restarts but does not reinstall. This applies to structural code changes.
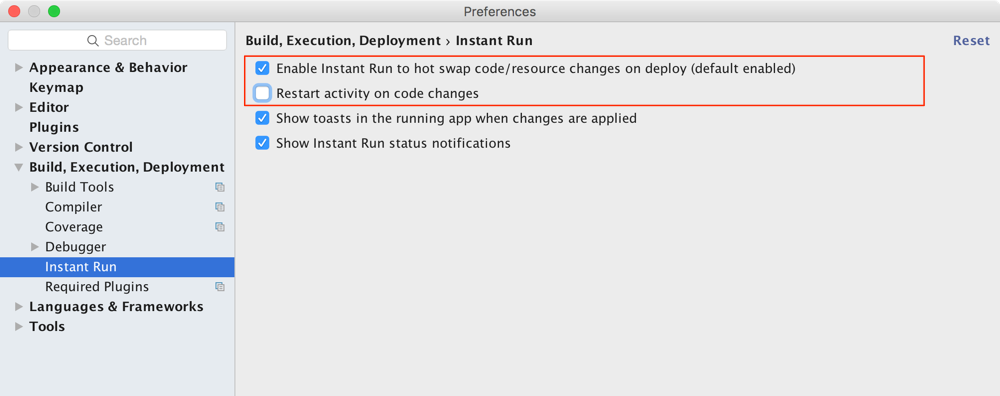
To enable Instant Run, select Preferences \ Build, Execution, Deployment \ Instant Run. Ensure that Enable Instant Run to hot swap code/resource changes on deploy is checked and that Restart activity on code changes is unchecked.
If the companion app is not yet running, launch it by clicking the Run button, and wait for it to launch.
When the app is running, you should see a lightning bolt next to the Run button. The lightning bolt indicates that Instant Run is available.

To test it out, open colors.xml and make the following changes to the colors:
<resources> <color name="colorPrimary">#455A64</color> <color name="colorPrimaryDark">#263238</color> <color name="colorAccent">#2196F3</color> </resources> |
colorPrimary and colorPrimaryDark, which determine the colors of the status bar and action bar.Hit the Run button. The screen will flicker, and you’ll see a toast notifying you that the activity restarted. You will also see that the app already shows the colors changes without a full build and install.

Because of the activity restart, you can probably guess that this was a warm swap.
Now open CardViewHolder.java and make the following changes to the
onClick method:@Override public void onClick(View v) { if (mListener == null) { return; } Snackbar.make(itemView, R.string.instant_run, Snackbar.LENGTH_SHORT).show(); mListener.onToggleLocationUpdates(); } |
Hit the Run button. A toast will appear to notify you that Instant Run “Applied code changes without activity restart.”

Can you guess what kind of swap that was?
If you guessed hot swap, give yourself a cookie! :] Instant Run was able to push the changes without even restarting the activity. And if you click the START/STOP button, you can verify that the changes were successfully pushed:

Instant Run can dramatically increase productivity, and dramatically decrease the time you spend browsing the Internet as you wait for your builds to finish and deploy (you’ll have to catch up on funny dog pics later). Beyond that, Instant Run will make your layout and styling more efficient, since you can immediately and directly see how code changes result in UI changes.
Where to Go From Here
There certainly is a lot to learn and try out in Android Studio 2.0 and Android Emulator 2.0! Much of the information about the two comes from the Android Dev Summit presentations, so check out those and other great sessions via the recordings posted on YouTube.Many of the cool new things in Android Studio 2.0 are works in progress. A great way to keep up with updates, bug fixes and new features is to regularly check the Recent Changes page over at the Android Tools Project Site.
The Android Tools Project Site also contains technical docs on many of the Android Studio features.
If you have any questions or comments, feel free to post your comments below or in the forum!


0 comments:
Post a Comment
Note: only a member of this blog may post a comment.