XAMPP is an open source, easy to use and easy to install stack that
contains Apache webserver, MySQL database, PHP compiler and Perl.
MongoDB is one of the most widely NoSQL database in market today. We often end up in a situation where we might find it useful to set up mongodb also along with PHP in the XAMPP stack.
Since mongoDB is not an integral part of this stack, we have to set it up manually as the XAMPP installer is not going to take care of it for you.
Follow the steps below to configure MongoDB for the XAMPP stack.
Also, keep in mind that you can also install XAMPP on Linux as we discussed earlier.
After the install, start your Apache server from XAMPP controls and create a simple PHP file to get the detailed info about the PHP running with your stack. Just copy paste the below lines to a test.php file in the htdocs folder and execute it to see the output.
This ext folder all the “.dll” files of all the extensions that are installed. XAMPP loads the driver files for the extensions from this folder.
After copying the file over here, rename the “.dll” file to “php_mongo.dll” for simplicity.
Add the following line to the php.ini file.
Add the path of the xampp php installation ( C:\xampp\php ) to the path variable, if it is not present already. This ensures that the newly added “.dll” file is loaded when xampp is started.
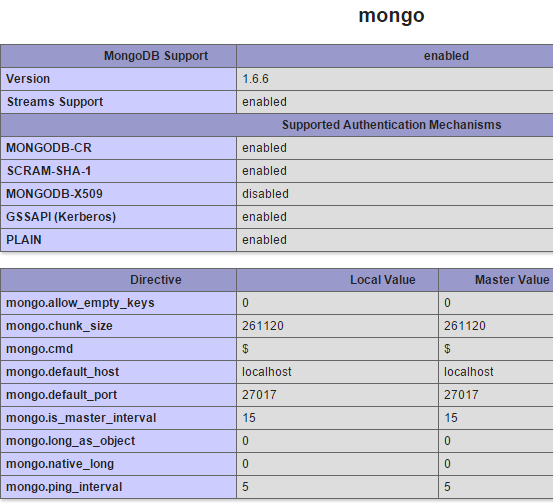
If everything is configured properly, xampp should not throw any error messages while starting apache. You can also check the loaded extension by going through the first step and looking into the php information.
You will be able to see the loaded extension information on the page as shown below.
MongoDB is one of the most widely NoSQL database in market today. We often end up in a situation where we might find it useful to set up mongodb also along with PHP in the XAMPP stack.
Since mongoDB is not an integral part of this stack, we have to set it up manually as the XAMPP installer is not going to take care of it for you.
Follow the steps below to configure MongoDB for the XAMPP stack.
1. Install and Configure XAMPP
First, you should install the XAMPP stack. Download and install the XAMPP stack from Apache friends project.Also, keep in mind that you can also install XAMPP on Linux as we discussed earlier.
After the install, start your Apache server from XAMPP controls and create a simple PHP file to get the detailed info about the PHP running with your stack. Just copy paste the below lines to a test.php file in the htdocs folder and execute it to see the output.
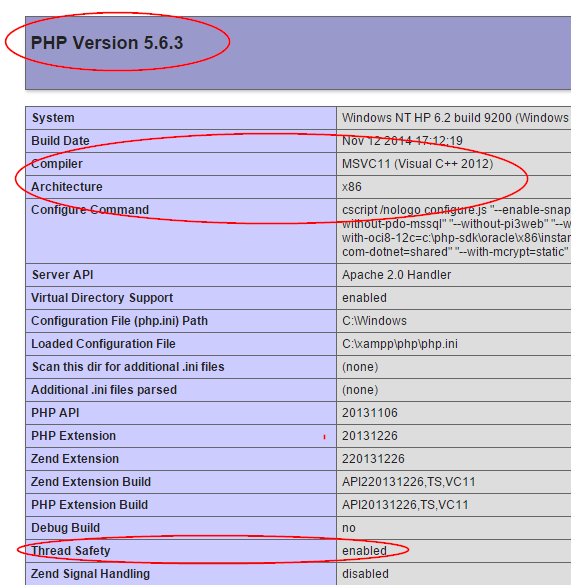
<?php
 echo phpinfo();
?>
As highlighted in the screenshot below, you will find the PHP version, Architecture, Compiler in use and can see whether thread safety is enabled or not.
2. Download PHP Mongo Driver
From this PHP Mongo Driver download page, download the appropriate file that matches the PHP version, Architecture, Compiler in use and Thread Safety from the XAMPP that is installed on your system.3. Copy PHP Mongo DDL to EXT Directory
After you unzip the php monngo driver zip file, copy and paste the “.dll” file to the folder “C:\xampp\php\ext”( Assuming that xampp is installed on C drive).This ext folder all the “.dll” files of all the extensions that are installed. XAMPP loads the driver files for the extensions from this folder.
After copying the file over here, rename the “.dll” file to “php_mongo.dll” for simplicity.
4. Add Extension to php.ini
Next, open the “php.ini” file from the path “C:\xampp\php” (again, assuming that xampp is installed on C drive), and edit this file to add the name of the “.dll” file as an extension.Add the following line to the php.ini file.
extension=php_mongo.dllLater, if you like, you can also disable this extension by adding a semicolon before the line so that it becomes as shown below:
;extension=php_mongo.dll
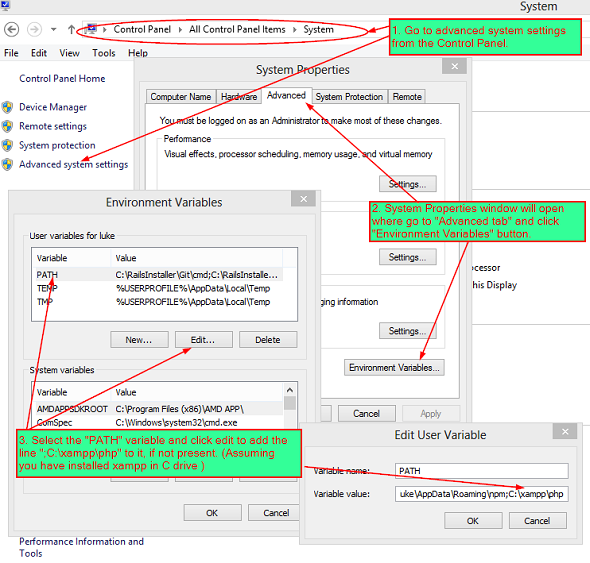
5. Modify the PATH Variable
Go to control panel, and open the system settings to add the “Environment Variable”.Add the path of the xampp php installation ( C:\xampp\php ) to the path variable, if it is not present already. This ensures that the newly added “.dll” file is loaded when xampp is started.
6. Restart Apache and Verify
Finally, restart the Apache server from the XAMPP control panel.If everything is configured properly, xampp should not throw any error messages while starting apache. You can also check the loaded extension by going through the first step and looking into the php information.
You will be able to see the loaded extension information on the page as shown below.


0 comments:
Post a Comment
Note: only a member of this blog may post a comment.