Android Studio is an IntelliJ IDEA based IDE and declared by Google as the official IDE for Android application development.
In this beginning Android development tutorial, you’ll create a simple fortune-telling app and learn to use Android Studio’s key features by:
For bonus points, you’ll also walk away as a bonafide fortune teller — or something to that effect. At least you’ll have a fun app to play around with!
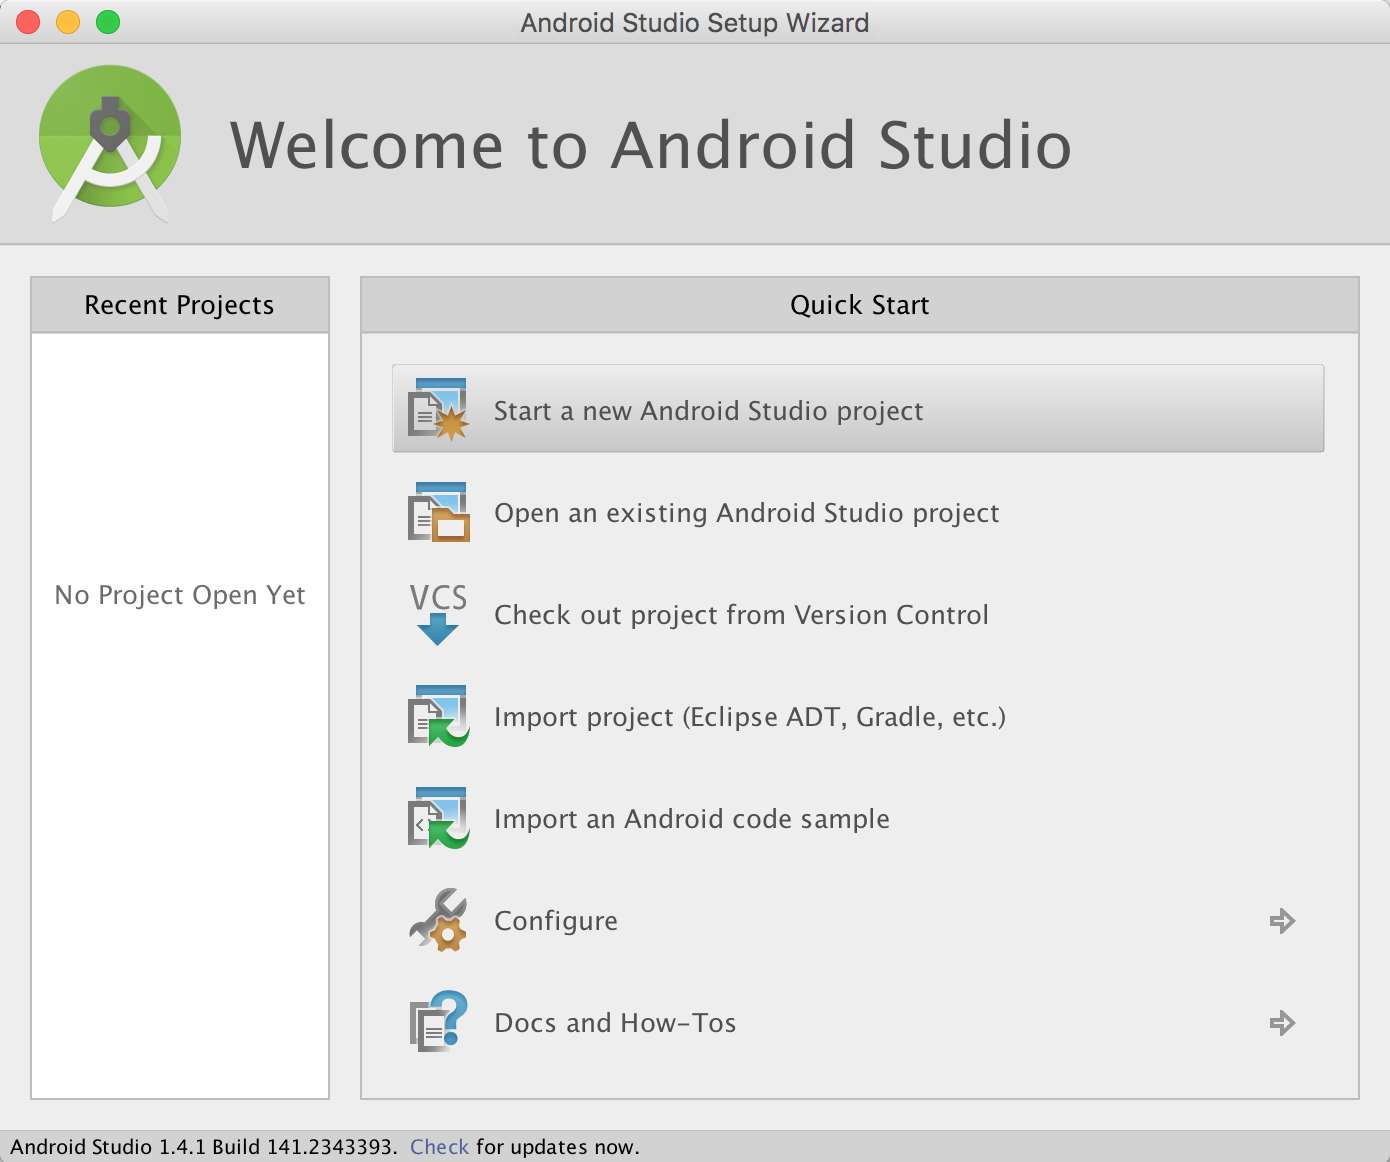
Fire up Android Studio and in the Android Studio Setup Wizard window, select Start a new Android Studio project.

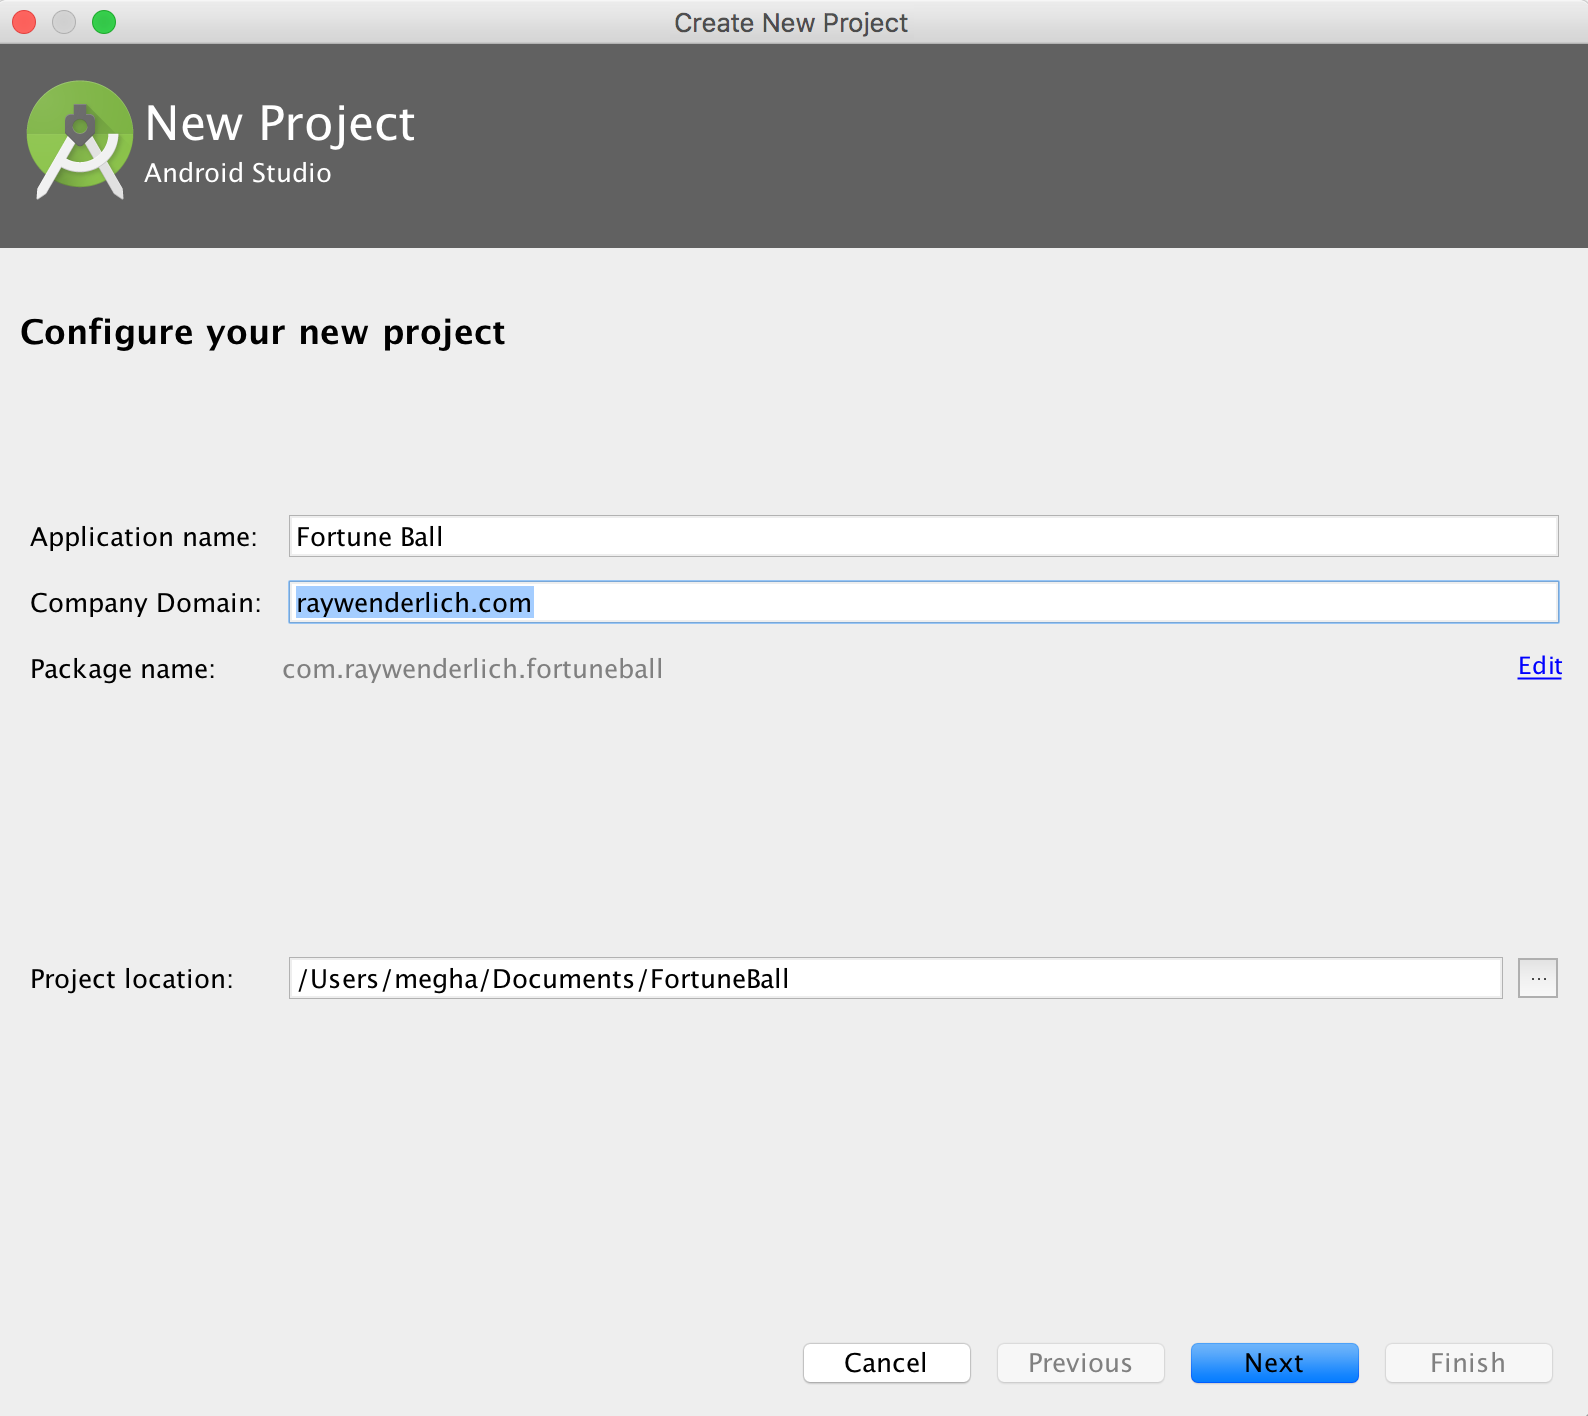
In the Create New Project window, set the Application Name as Fortune Ball, enter a Company Domain of your choosing, and select a convenient location to host your application in the Project location field. Click Next.

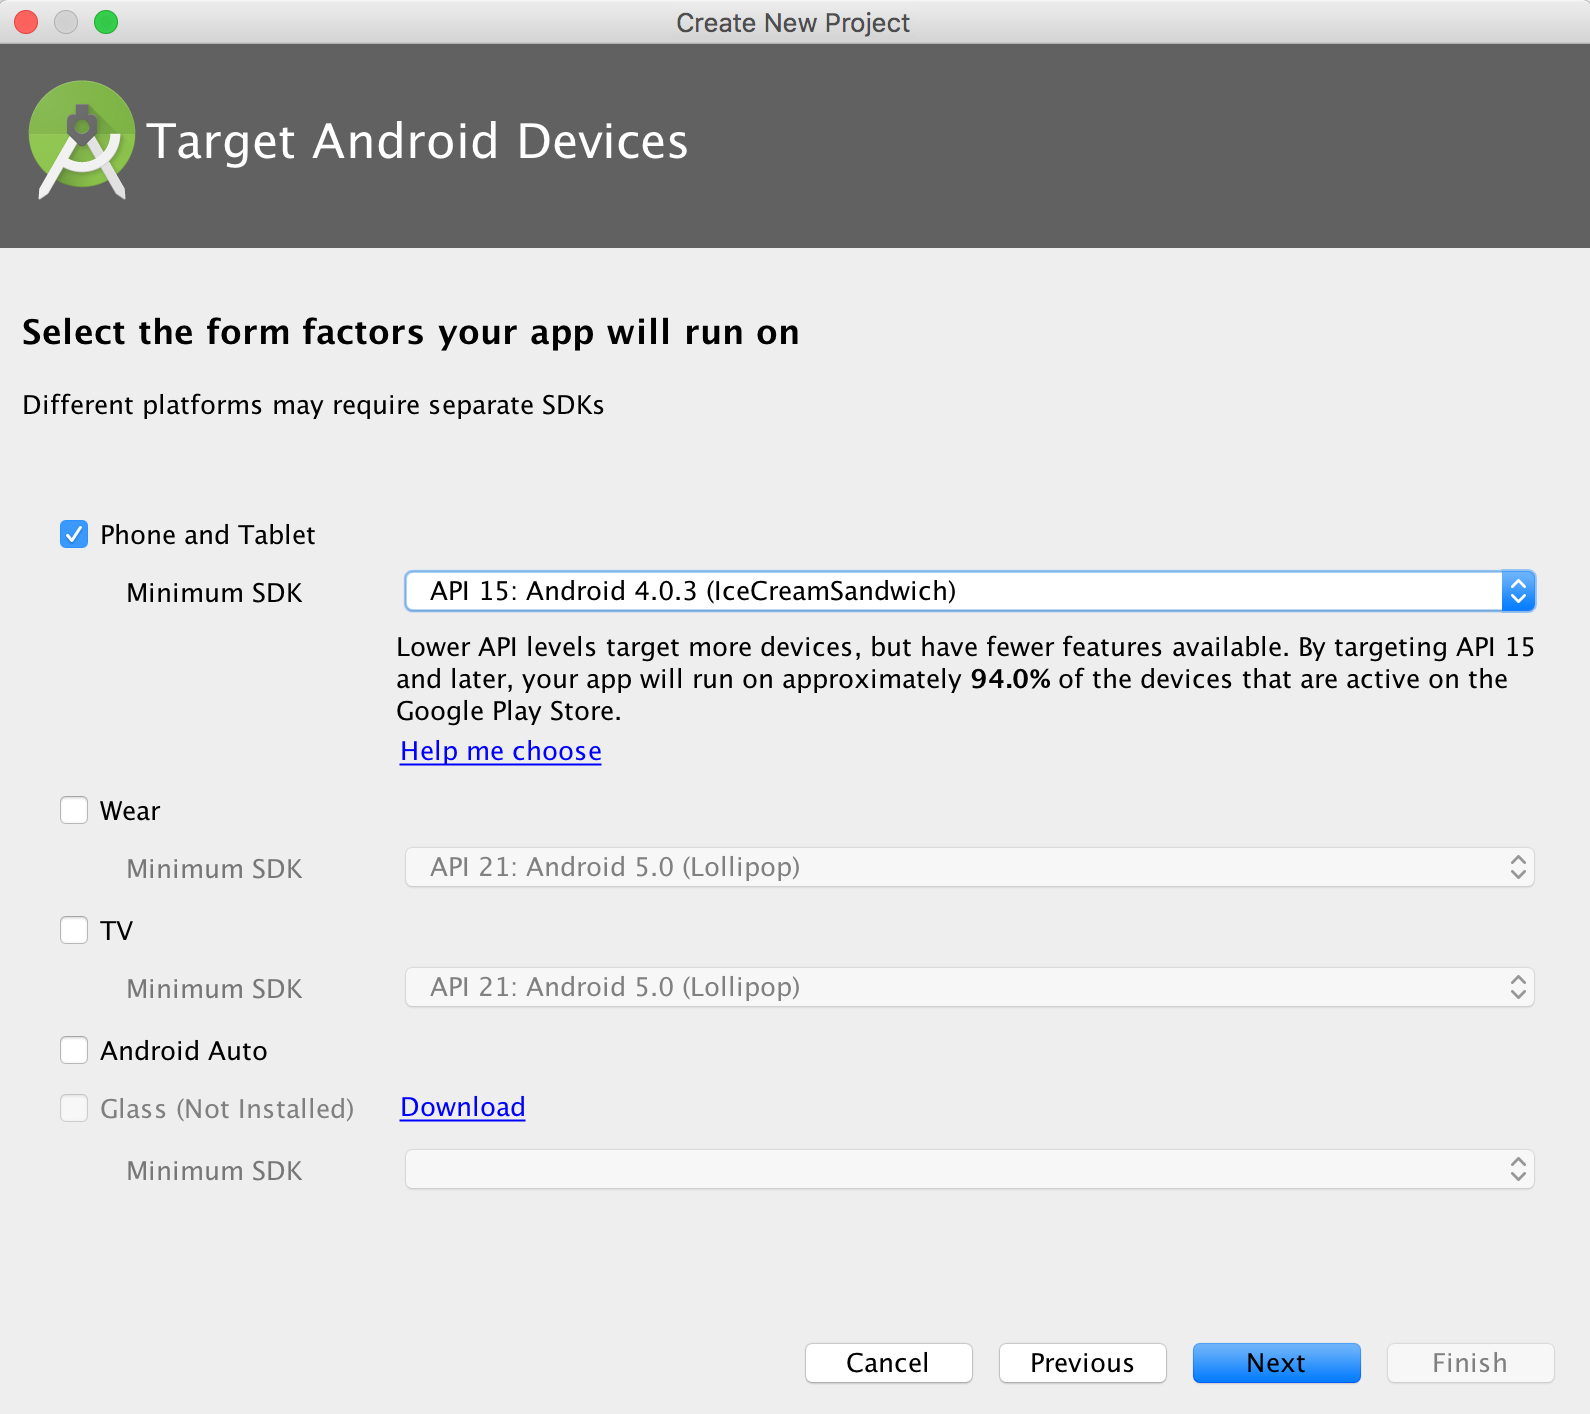
Now you’re looking at the Target Android Devices window. Check the Phone and Tablet box and specify API 15 as the Minimum SDK. Click Next.

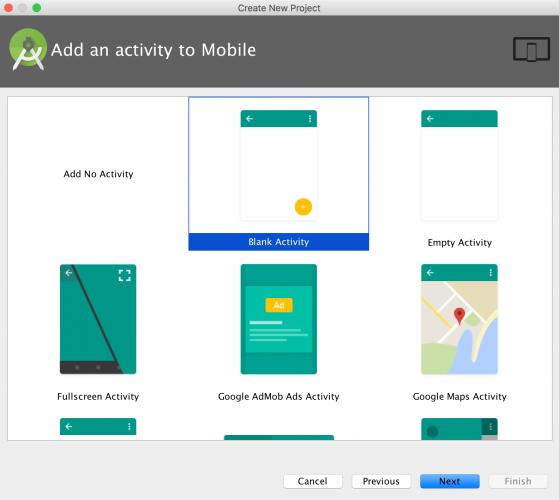
From the Add an activity to Mobile window, select Blank Activity. Take a half minute here to look at all your options; this window gives you an overview of the layout template. In this case, it’ll be a blank activity with a toolbar at the top and a floating action button at the bottom. Click Next to proceed.
In the Customize the Activity window, which is shown in the screenshot below, you’ll have the option to change Activity Name, Layout Name, Title and Menu Resource Name. For the purposes of this tutorial, keep it simple and accept the default values by clicking Finish.

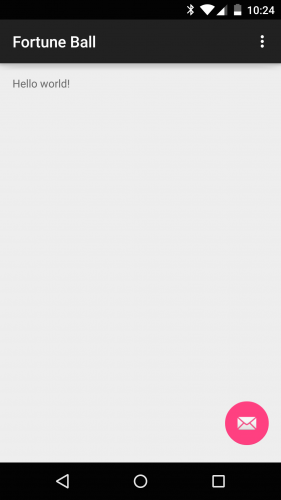
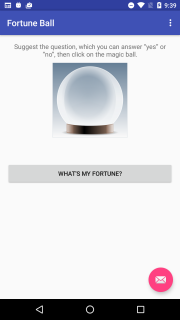
Within a short amount of time (hopefully seconds!), you’ll land on a screen that looks similar to this:
Build and run your application and you should see a similar screen on your device or emulator. Note that the emulator acts like a device, so it will need time to boot and load.
Voila. That’s an app! There’s not much to it, but it’s enough to dive into the next section.
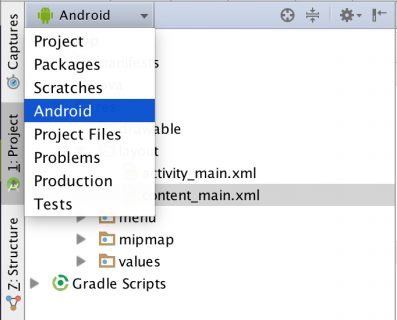
When you select the file dropdown menu as illustrated in the screenshot below, you’ll see several options to filter the files. The key filters here are Project and Android.
The Project filter will show you all the application modules — there is a minimum of one application module in every project.
Other types of modules include third-party library modules or other Android application modules. Each module has its own complete source sets, including a gradle file, resources and source files, e.g. java files.
manifests
java
res
Gradle Scripts
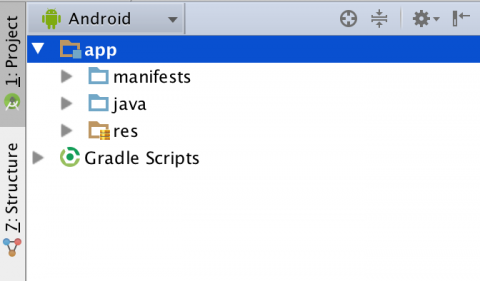
You’ll take a deeper dive into each of these folders, starting with the manifests in the next section.
Go to the app’s manifests folder and expand to select AndroidManifest.xml. Double click on the file to open.
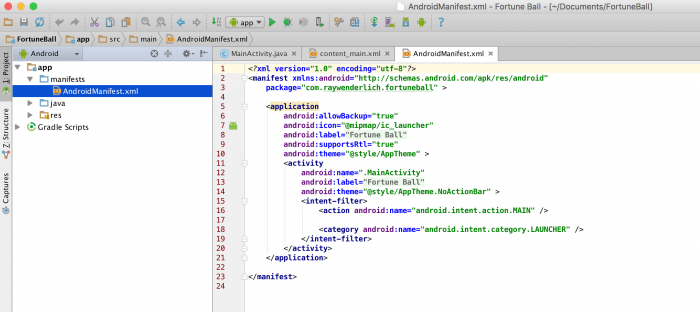
The
In addition to the element name, each tag also defines a set of attributes. For example, some of the many attributes in the
Other common elements that can appear in the manifest include:
Under
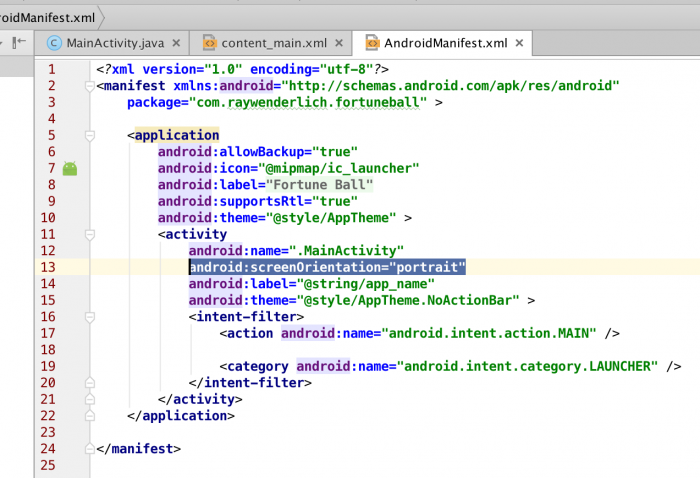
You’ll build and run the app. If you’re testing on your device, rotate your phone. You’ll notice that the screen doesn’t transform into landscape mode as you have restricted this capability in the AndroidManifest file.
As shown below, you can find the build.gradle file, located under Gradle scripts, in your project at two levels: project level and application level. Most of the time, you’ll edit this file at the application or module level.
Open up the build.gradle (Module:app) file. You’ll see the default gradle setup:
Let’s step through the major components:
Next in the
The last component is the
In addition to Android compatibility libraries, you can also add
other third party libraries here. You’ll add an animation library where
you’ll be able to add some cool effects to user interface elements in
your application. Find
Here you added three new third-party dependencies that will help you
make FortuneBall shine. These libraries can be automatically downloaded
and integrated by Android Studio.
In fact, once you add these dependencies, Android Studio realises that it needs to download them and tells you as much. Look for a bar across the top of the build.gradle file as shown the next screenshot. Click Sync Now to integrate these dependencies in your app.

Syncing takes couple of seconds. You can monitor the Gradle file update in the Messages tab in the bottom panel. Look for a success message in that panel as shown in the screenshot below.
Alright, that’s all the config you need to do to Gradle for now. The whole point of this was so that you’re setup to add some fancy animations to your application, which you’ll do in a bit.
For Fortune Ball, you’ll be importing image assets and will place them in drawable folders. Drawable folders can hold images or custom XML drawables (i.e. you can draw shapes via XML code and use them in your app’s layouts).
To get started, download the image assets here, then unzip the contents and save them where they can be easily accessed.
Back to the project in Android Studio, switch the view from Android to Project. Open the res folder under app > src > main. Right click on the res folder, select New > Android resource directory.
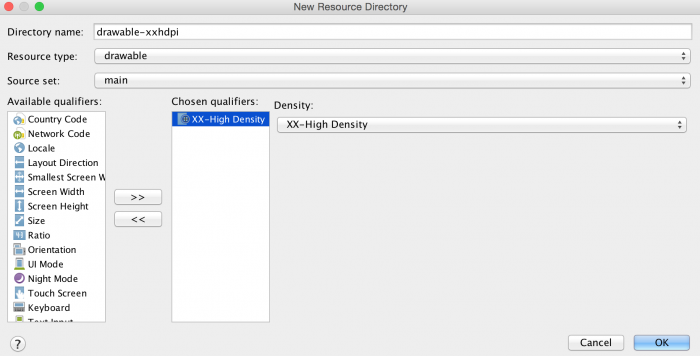
You’ll get a window titled New Resource Directory. From the Resource type dropdown select drawable option. In the Available qualifiers list, select Density and click the button highlighted in the screenshot below:
In the subsequent window, select XX-High Density from the Density dropdown. Click OK.
Repeat the same process and create drawable-xhdpi, drawable-hdpi and drawable-mdpi folders by selecting X-High, high, and medium density respectively from the Density dropdown.
Each drawable folder that has a density qualifier (i.e. xxhdpi, xhdpi, hdpi), houses images corresponding to that particular density or resolution. For example, the folder drawable-xxhdpi contains the image that is extra high density, meaning an Android device with a high resolution screen will pick the image from this folder. This allows your app to look great on all Android devices, irrespective of the screen quality.
After creating all the drawable folders, go back to the unzipped contents in the finder, and copy (cmd + C) the image from each folder and paste (cmd + V) it into the corresponding folder in Android Studio.
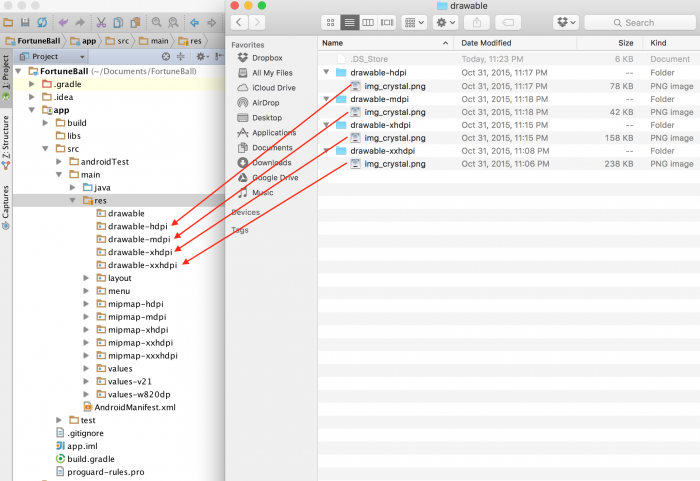
When you paste the files, you’ll be presented with the Copy window. Select OK.

You’ve just put the ball in Fortune Ball and know how to import things now. Looks like you just checked another feature off your to-learn list!

On the right hand side of the Design tab is the Text tab. Switching to this view allows you to edit the XML that makes up the layout directly.
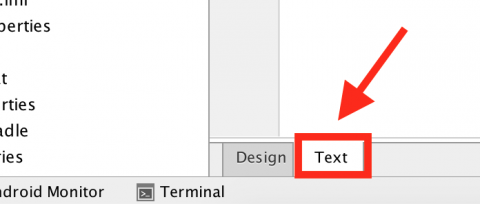
In both tabs, you’ll be able to preview the layout in the device as you build. Choose the Text tab to start building the layout for Fortune Ball.
Before you start building the view, you need to define some values. Open up strings.xml under the res \ values folder and add the following:
strings.xml contains all the user-facing strings that appear
in your app. Splitting the strings out into their own file makes
internationalization a breeze, as you just provide a strings file for
each language you wish to support. Although you might not want to
translate your app right away, it’s considered a best-practice to use a
strings file.
Next, open dimens.xml under values folder and add the following:
dimens.xml contains all the dimensions values such as margin
spacing for your layouts, sizes of text etc. Again, it’s a good
practice to keep the dimensions in this file so that they can be re-used
in constructing layouts.
Head back to content_main.xml and replace the entire content of the file with the code below.
This rather large chunk of XML creates the layout of FortuneBall. At the top level you’ve added a RelativeLayout, whose job it is to layout its contents. It is stretched to match the size of its parent (i.e. the full activity).
Within the relative layout you added two pieces of text, an image and a button. These will appear within the container in the order that you added them, and their content is read from the strings.xml in the case of the text views, and from the drawable you added in the case of the image.
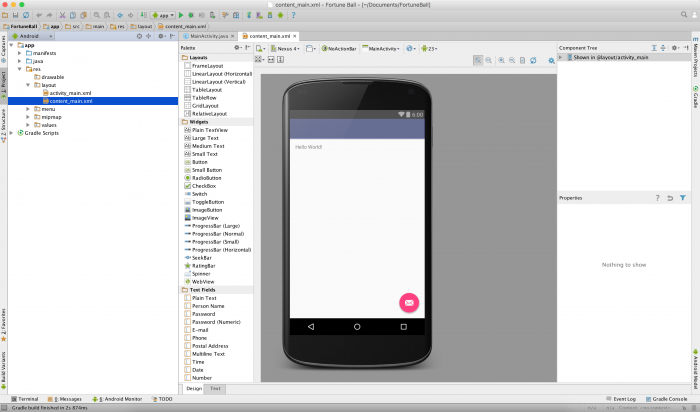
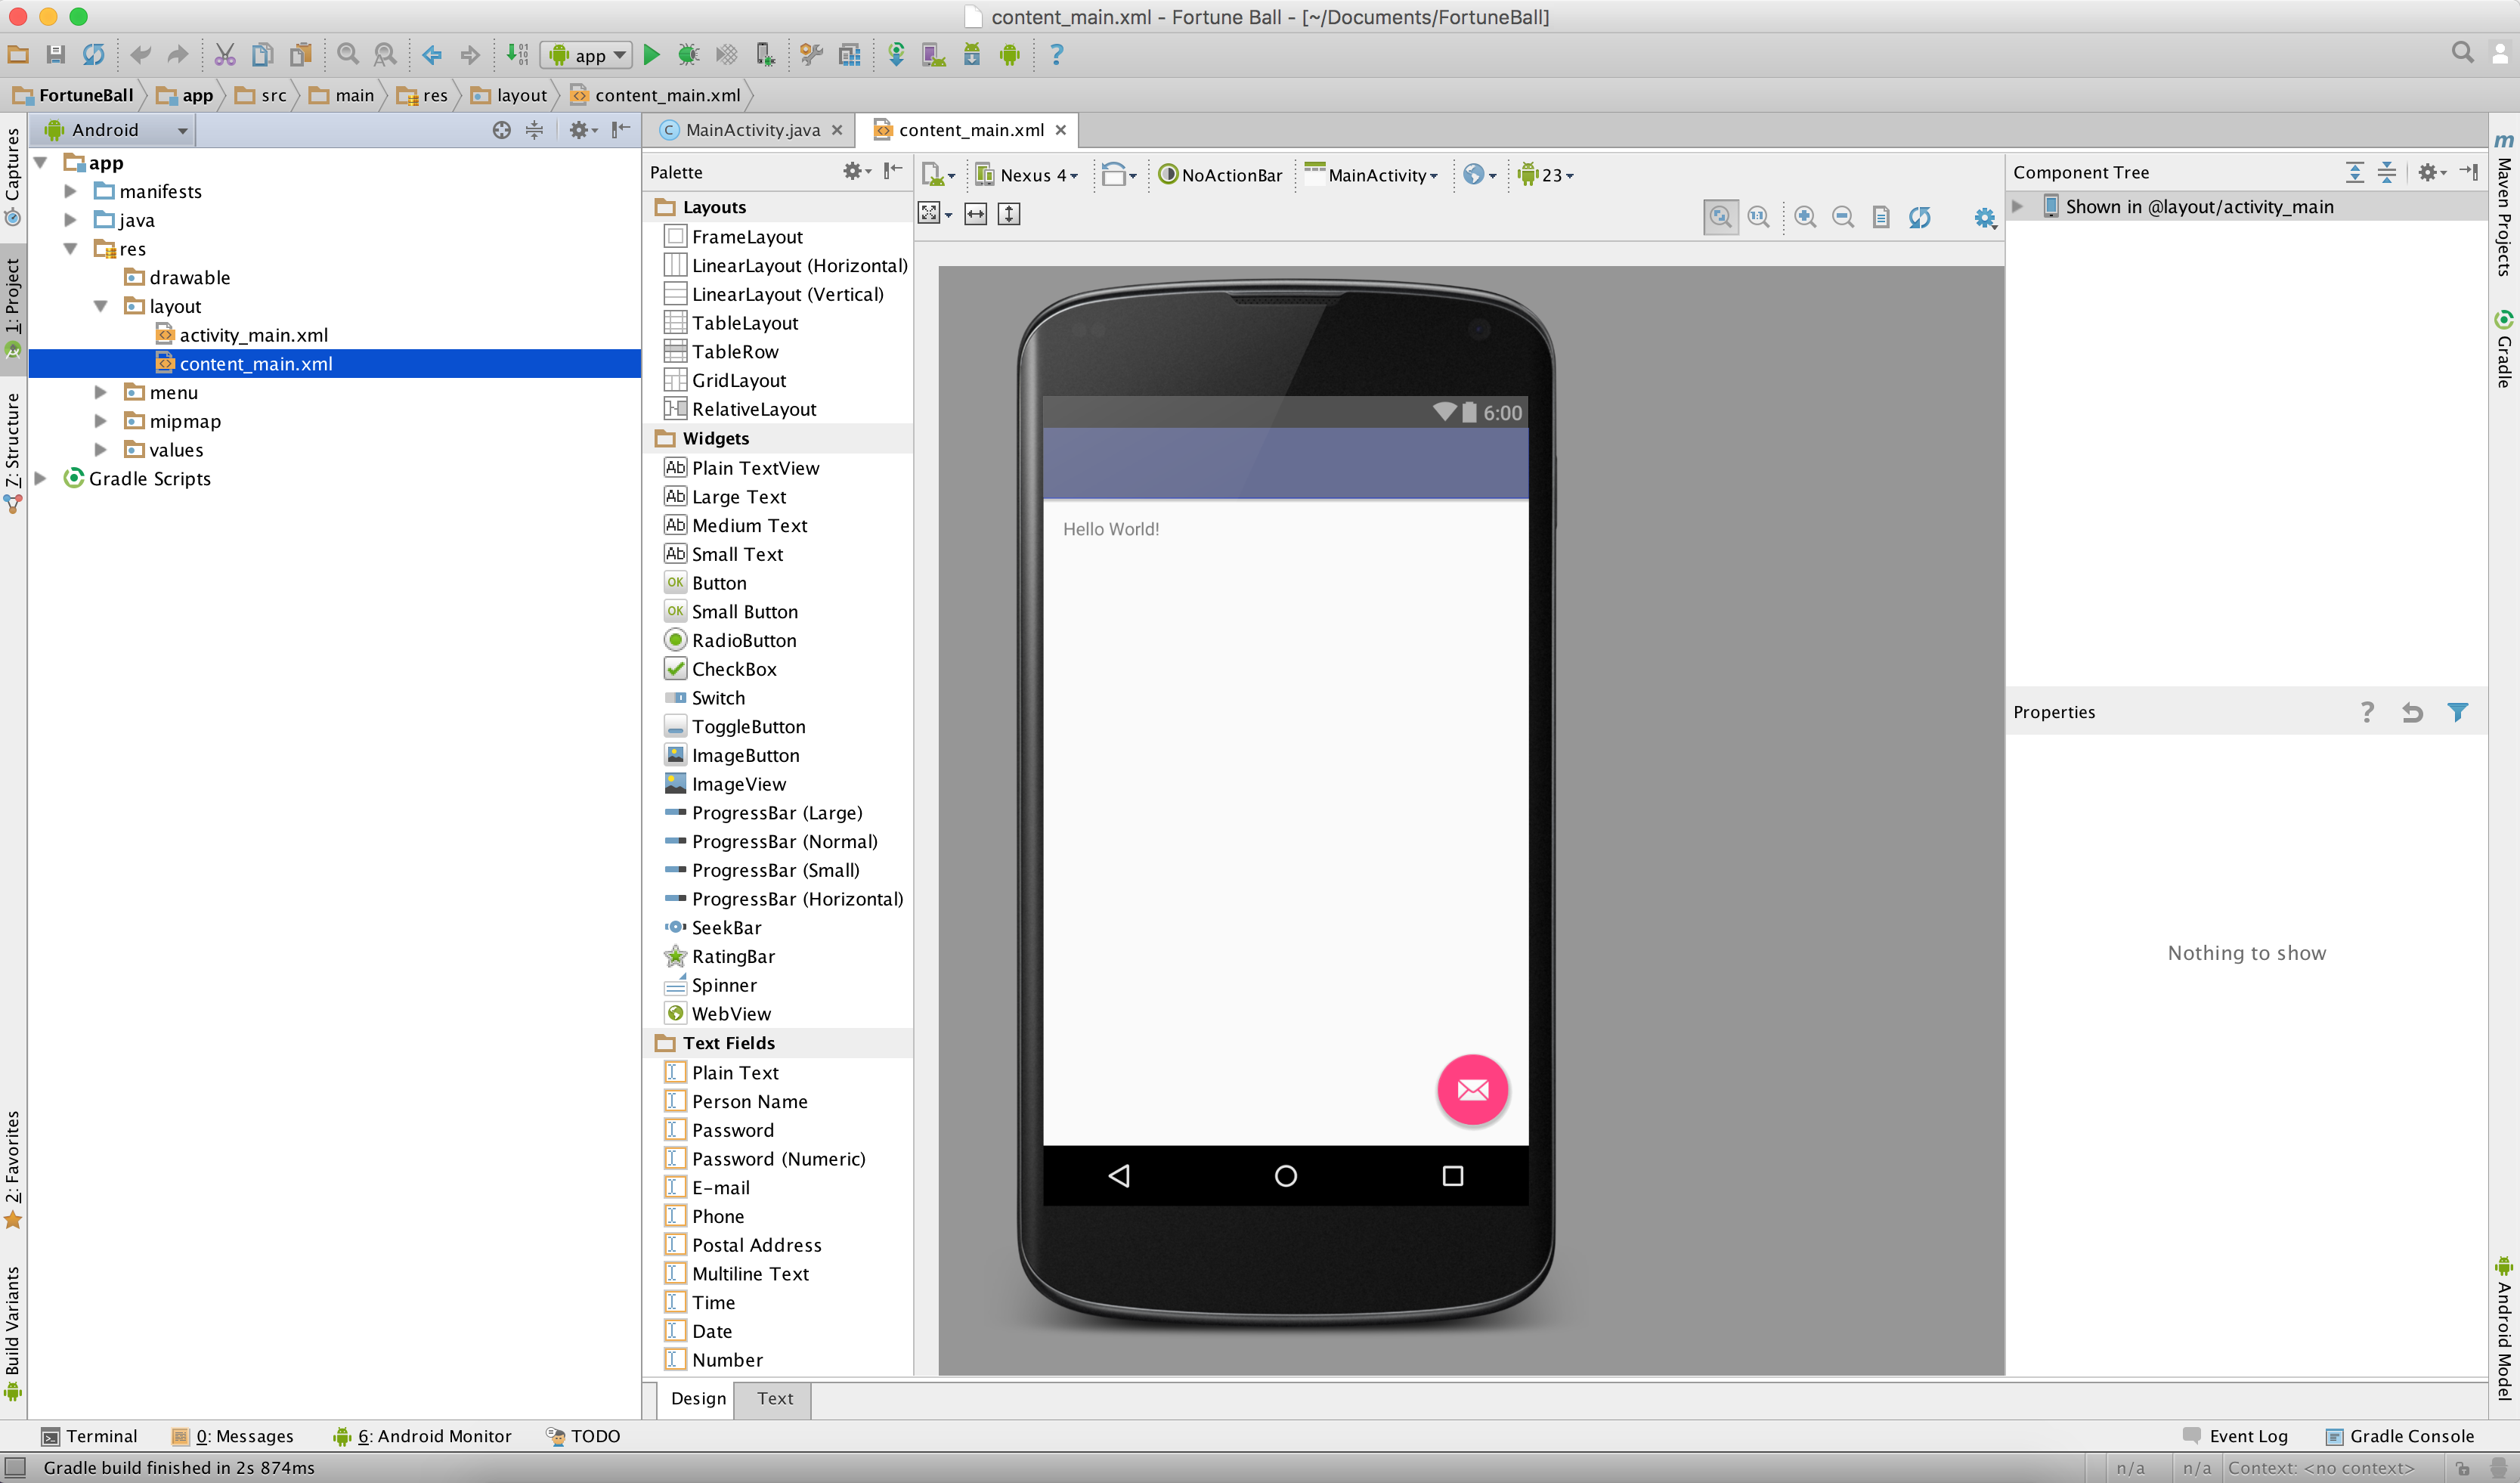
As you’re updating content_main.xml, notice how the Preview window updates the UI:
Congrats! You’ve designed your app’s layout. However, it’s only a pretty picture at this point — clicking on that button doesn’t do anything. Ready to play around with activities?
Open MainActivity.java and add the following inside the
In this small chunk of code you’ve declared 4 member variables for
the activity. The first is an array of strings that represent the
possible fortunes, and the remaining three represent the UI elements you
created in the layout.
Next, replace the content of the
Taking the numbered sections one-by-one:
This layout file contains a reference to content_main.xml that you previously edited. It wraps the content with the default toolbar and floating action button. However, Fortune Ball doesn’t need a floating action button, so remove the following code block from this xml file:
Build and run. You won’t be seeing that the floating button on the bottom right-hand corner around here anymore:
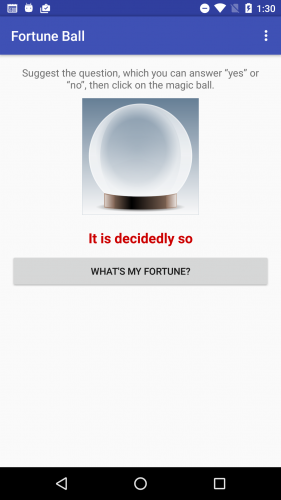
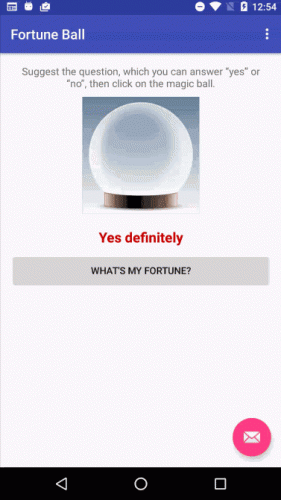
Ask a question, click or tap on What’s my fortune? and let your future unfold before your eyes!
This is a modest overview of the functionality of DDMS. To dig into more details, read up on the documentation on the Android developer’s site.
To fire up DDMS, click the Android Device Monitor button on the Android Studio toolbar.
Once the DDMS launches, you’ll be greeted with the DDMS window:
DDMS presents many panels through which you get a window to peek inside your device or emulator and access a specific application for the purposes of debugging.
On the Devices panel on the left top hand side, you’ll see a list of devices and/or emulators depending on which is connected. If you expand the device or emulator, you’ll get a list of running applications.
On the left of the Devices panel, you’ll see a few panels.
Here are some details about what each panel does:
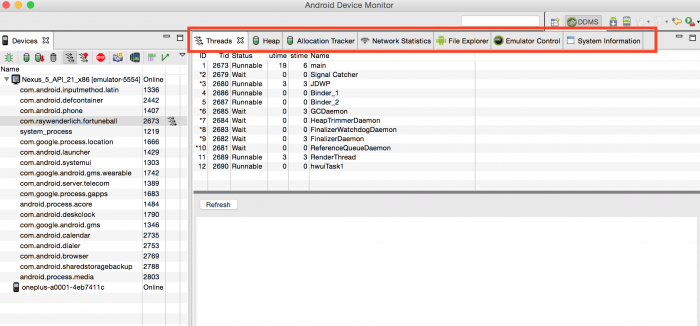
Threads: gives you more detailed insight into processes running in your application
Heap: tracks heap usage for your application, or in other words, memory allocation
Network Statistics: available for each application running
on the device or emulator; it gives you a real-time view into all the
network calls and data transfers made by a specific application
File Explorer: provides a view for the files saved on your
device or emulator. You can even retrieve or save a file to or from your
device or emulator.
Emulator Control: this gives an opportunity for emulating services such as phone calls and location detection
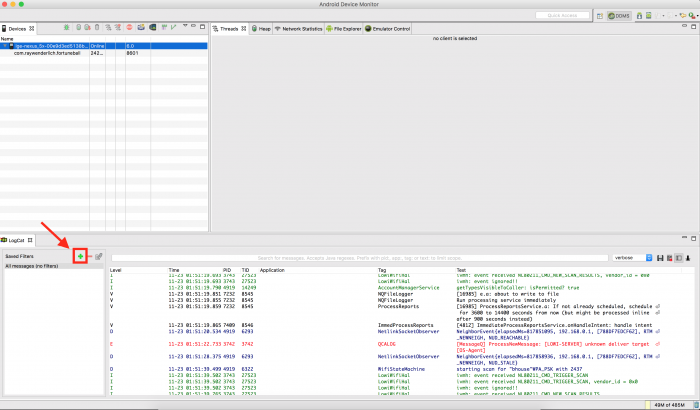
One of the most commonly used features of DDMS is Logcat, which you’ll find located at the bottom of the window.
Logcat gives you a detailed view into your device’s system messages with the ability to drill down into a specific application. To demonstrate this, set up a filter for your app. Click the + icon on the Logcat panel.
You’ll be presented with a window to where you populate specific information about the filters you need:
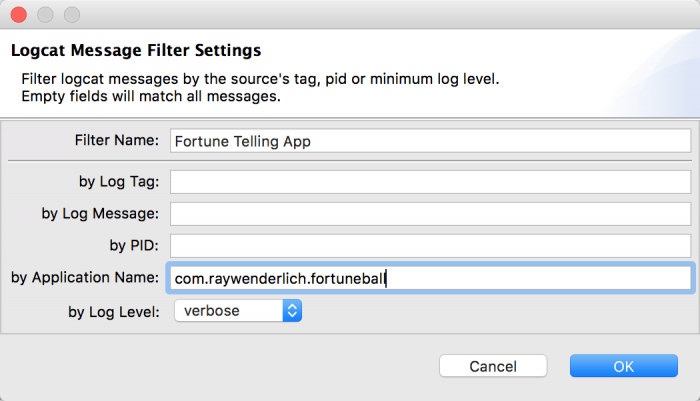
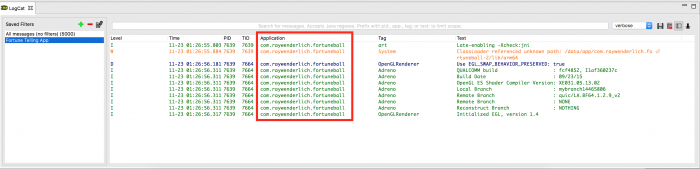
Enter Fortune Telling App in the Filter Name field and com.raywenderlich.fortuneball in the by Application Name filtering field. Hit OK and you’ll notice that Logcat is now filtering messages:
Here you’ll also be able to see your own logged messages you defined in the code. Oh, what? You’ve not added any messages for yourself?
Head to MainActivity.java and add the following to the end of
The
Build and run the app so you can see this log message in the Logcat panel.

Another very useful utility of logcat is the ability to see stacktrace or error messages from app crashes and exceptions. You’ll add a bug to your perfectly working app to see how that works.
Go to MainActivity.java and comment out the following line in
Build and run the application. Once it launches click the What’s My Fortune? button on the screen. Oh no! It crashed.

How would you go about fixing this if you hadn’t put the bug in on purpose? Logcat to the rescue!
Head back to the Logcat panel — it’ll look something like this:
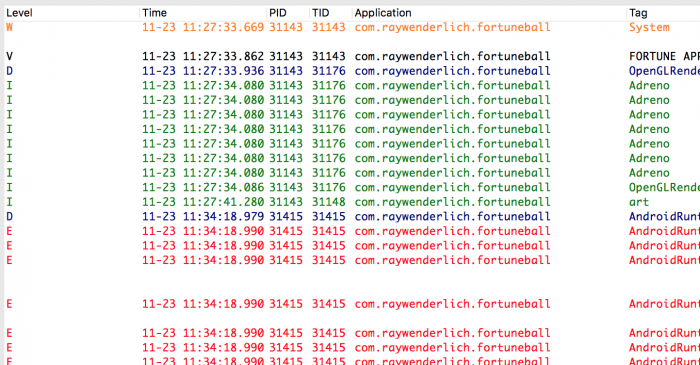
That sure is a lot of red text, and it’s exactly where to go sniffing around for clues. You’re looking for an exception somewhere. In this case, it’s line 58 in the MainActivity.java file.

By commenting out the
Go ahead and uncomment that code and build and run the application. This time there’s no crash!
Logcat is a powerful tool that lets you debug your application errors and exception.
Practice makes perfect! You’ve learned your way around and can now create a project, play around with Gradle, import assets, set up layouts and do some testing.
There’s a lot of cool stuff to learn about Android, and I suggest you start with these next steps:
In this beginning Android development tutorial, you’ll create a simple fortune-telling app and learn to use Android Studio’s key features by:
- Navigating through different files in your project using the project explorer
- Setting up the AndroidManifest.xml file
- Learning about the Gradle build system
- Importing files into your project
- Learning about the rich layout editor with dynamic layout previews
- Using Logcat and DDMS (Dalvik Debug Monitor Server) to debug your app
Note: This beginning Android development tutorial is assumes
that you’ve already installed Android Studio and have set up an
emulator or a device configured for testing. If you haven’t, please
refer to our previous tutorial about installing Android Studio to get up and running in no time!
Getting Started
You’ll start by creating a brand new Android app that you’ll use to explore Android Studio and learn about its capabilities and interface.For bonus points, you’ll also walk away as a bonafide fortune teller — or something to that effect. At least you’ll have a fun app to play around with!
Fire up Android Studio and in the Android Studio Setup Wizard window, select Start a new Android Studio project.
In the Create New Project window, set the Application Name as Fortune Ball, enter a Company Domain of your choosing, and select a convenient location to host your application in the Project location field. Click Next.
Now you’re looking at the Target Android Devices window. Check the Phone and Tablet box and specify API 15 as the Minimum SDK. Click Next.
From the Add an activity to Mobile window, select Blank Activity. Take a half minute here to look at all your options; this window gives you an overview of the layout template. In this case, it’ll be a blank activity with a toolbar at the top and a floating action button at the bottom. Click Next to proceed.

In the Customize the Activity window, which is shown in the screenshot below, you’ll have the option to change Activity Name, Layout Name, Title and Menu Resource Name. For the purposes of this tutorial, keep it simple and accept the default values by clicking Finish.

Within a short amount of time (hopefully seconds!), you’ll land on a screen that looks similar to this:
Build and run your application and you should see a similar screen on your device or emulator. Note that the emulator acts like a device, so it will need time to boot and load.

Voila. That’s an app! There’s not much to it, but it’s enough to dive into the next section.
Project and File Structure
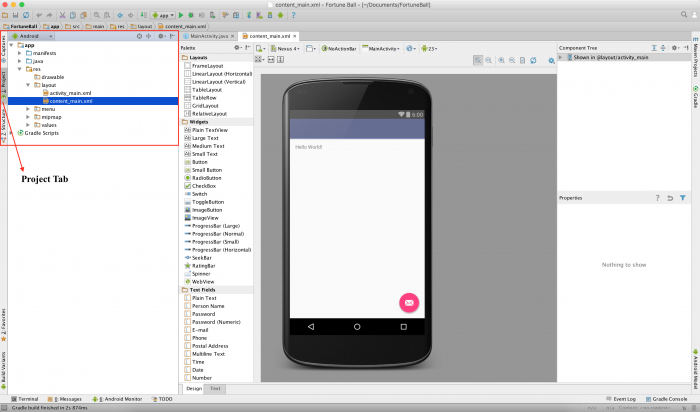
For this portion of the tutorial, your focus will be on the highlighted section of the screenshot below. This window shows the project files of your application. By default, the files are filtered to show Android project files.
When you select the file dropdown menu as illustrated in the screenshot below, you’ll see several options to filter the files. The key filters here are Project and Android.
The Project filter will show you all the application modules — there is a minimum of one application module in every project.
Other types of modules include third-party library modules or other Android application modules. Each module has its own complete source sets, including a gradle file, resources and source files, e.g. java files.

Note: If you don’t see the project view open, you can click on the Project tab on the left side panel as indicated in the screenshot above.
The default filter is Android and you’ll see the following folders at the very top level:
You’ll take a deeper dive into each of these folders, starting with the manifests in the next section.
Overview of the AndroidManifest.xml
Every Android application contains the AndroidManifest.xml file found in the manifests folder. This XML file informs your system of the app’s requirements and must be present in order for the Android system to build your app.Go to the app’s manifests folder and expand to select AndroidManifest.xml. Double click on the file to open.

The
manifest and application tags are required in the manifest file and must only appear once.In addition to the element name, each tag also defines a set of attributes. For example, some of the many attributes in the
application tag are: android:icon, android:label and android:theme.Other common elements that can appear in the manifest include:
uses-permission: requests a special permission that
must be granted to the application in order for it to operate correctly.
For example, an app must request permission from the user in order to
access the Internet—in this case you must specify the android.permission.INTERNET permission.activity: declares an activity that implements part of
the application’s visual user interface and logic. Every activity that
your app uses must appear in the manifest—undeclared activities won’t be
seen by the system and sadly, they’ll never run.service: declares a service that you’re going to use to
implement long-running background operations or a rich communications
API that can be called by other applications. An example includes a
network call to fetch data for your application. Unlike activities,
services have no user interface.receiver: declares a broadcast receiver that enables
applications to receive intents broadcast by the system or by other
applications, even when other components of the application are not
running. One example of a broadcast receiver would be when the battery
is low and you get a system notification within your app, allowing you
to write logic to respond.Configuring the Manifest
You’re currently looking at an excellent example of a framework, but a terrible fortune teller; you’re here because you want to learn how to play around on Android. That’s rather convenient because the manifest needs some changes so you can look into the future.Under
activity, add the following attribute: android:screenOrientation="portrait".
to restrict the screen to portrait mode only. If it’s absent, the
screen will transform to landscape or portrait mode depending on the
device’s orientation. After adding this attribute, your manifest file
should look like the screenshot below:You’ll build and run the app. If you’re testing on your device, rotate your phone. You’ll notice that the screen doesn’t transform into landscape mode as you have restricted this capability in the AndroidManifest file.
Overview of Gradle
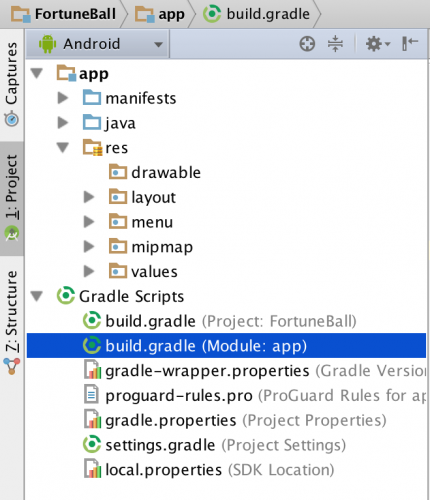
Let’s shift gears to Gradle. In a nutshell, it’s a build system that’s utilized by Android. It takes the Android project and builds/compiles it into an installable APK that in turn can be installed on devices.As shown below, you can find the build.gradle file, located under Gradle scripts, in your project at two levels: project level and application level. Most of the time, you’ll edit this file at the application or module level.

Open up the build.gradle (Module:app) file. You’ll see the default gradle setup:
apply plugin: 'com.android.application' android { compileSdkVersion 23 buildToolsVersion "23.0.2" defaultConfig { applicationId "com.raywenderlich.fortuneball" minSdkVersion 15 targetSdkVersion 23 versionCode 1 versionName "1.0" } buildTypes { release { minifyEnabled false proguardFiles getDefaultProguardFile('proguard-android.txt'), 'proguard-rules.pro' } } } dependencies { compile fileTree(dir: 'libs', include: ['*.jar']) testCompile 'junit:junit:4.12' compile 'com.android.support:appcompat-v7:23.1.0' compile 'com.android.support:design:23.1.0' } |
apply plugin: 'com.android.application' applies the Android plugin at the parent level and makes available the top level build tasks required to build an Android app.android{...} section, you get configuration options such as targetSdkVersion. In this case, the target SDK for your application is 23. Another important component is the minSDKVersion
which defines the minimum SDK version a device should have installed in
order to run your application. For example, if your device’s SDK
version was 14, then this app won’t be able to run on that device since
here the minimum supported version is 15.dependencies{...} that lets you to add dependencies quite effortlessly. The important ones to note are the compile 'com.android.support:appcompat-v7:23.1.0' and compile 'com.android.support:design:23.1.0'. They provide support and compatibility of the new features from API 23 for the older APIs.dependencies, and update it to match the following:dependencies { compile fileTree(dir: 'libs', include: ['*.jar']) testCompile 'junit:junit:4.12' compile 'com.android.support:appcompat-v7:23.1.0' compile 'com.android.support:design:23.1.0' compile 'com.nineoldandroids:library:2.4.0' //Add this dependency compile 'com.daimajia.easing:library:1.0.1@aar' //Add this dependency compile 'com.daimajia.androidanimations:library:1.1.3@aar' //Add this dependency } |
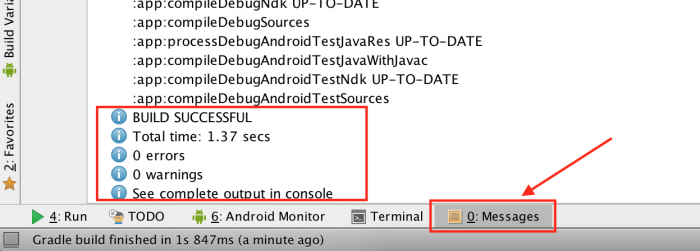
In fact, once you add these dependencies, Android Studio realises that it needs to download them and tells you as much. Look for a bar across the top of the build.gradle file as shown the next screenshot. Click Sync Now to integrate these dependencies in your app.
Syncing takes couple of seconds. You can monitor the Gradle file update in the Messages tab in the bottom panel. Look for a success message in that panel as shown in the screenshot below.
Alright, that’s all the config you need to do to Gradle for now. The whole point of this was so that you’re setup to add some fancy animations to your application, which you’ll do in a bit.
Importing files
An important part of making an Android app involves integrating other resources such as images, custom fonts, sounds, videos etc. These resources have to be imported into Android Studio and must be placed in appropriate folders. This allows the Android operating system to pick the correct resource for your app.For Fortune Ball, you’ll be importing image assets and will place them in drawable folders. Drawable folders can hold images or custom XML drawables (i.e. you can draw shapes via XML code and use them in your app’s layouts).
To get started, download the image assets here, then unzip the contents and save them where they can be easily accessed.
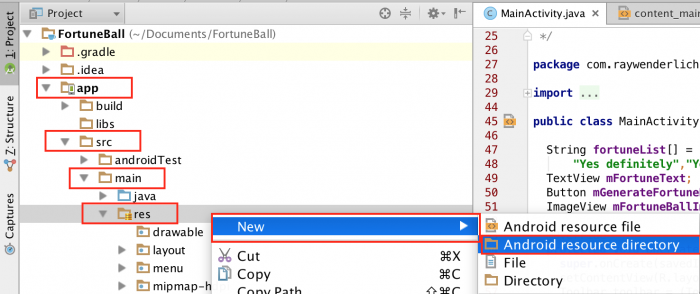
Back to the project in Android Studio, switch the view from Android to Project. Open the res folder under app > src > main. Right click on the res folder, select New > Android resource directory.

You’ll get a window titled New Resource Directory. From the Resource type dropdown select drawable option. In the Available qualifiers list, select Density and click the button highlighted in the screenshot below:

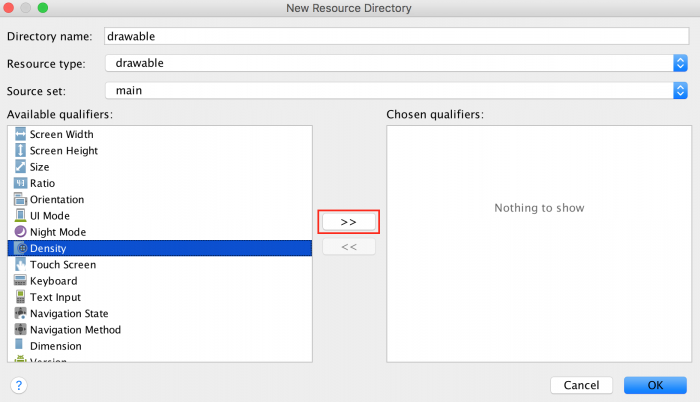
In the subsequent window, select XX-High Density from the Density dropdown. Click OK.

Repeat the same process and create drawable-xhdpi, drawable-hdpi and drawable-mdpi folders by selecting X-High, high, and medium density respectively from the Density dropdown.
Each drawable folder that has a density qualifier (i.e. xxhdpi, xhdpi, hdpi), houses images corresponding to that particular density or resolution. For example, the folder drawable-xxhdpi contains the image that is extra high density, meaning an Android device with a high resolution screen will pick the image from this folder. This allows your app to look great on all Android devices, irrespective of the screen quality.
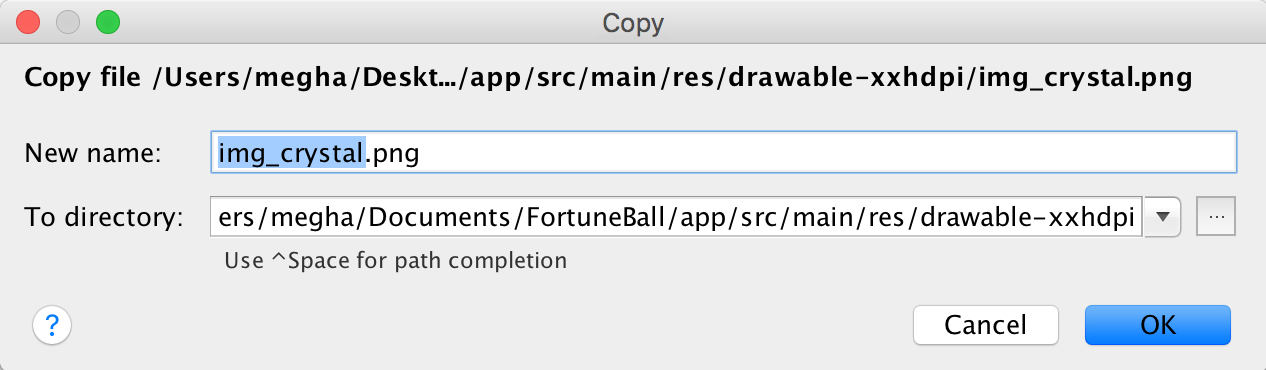
After creating all the drawable folders, go back to the unzipped contents in the finder, and copy (cmd + C) the image from each folder and paste (cmd + V) it into the corresponding folder in Android Studio.

When you paste the files, you’ll be presented with the Copy window. Select OK.
You’ve just put the ball in Fortune Ball and know how to import things now. Looks like you just checked another feature off your to-learn list!
XML View with Dynamic Layout Previews
An incredibly important part of building an Android application is creating a layout that the users of the application interact with. In Android Studio, you do this task in the layout editor. Open up content_main.xml file from res / layout folder. You’ll initially land on the Design tab of the layout editor. In this tab, you can drag user interface elements like buttons, text fields etc. in the editor.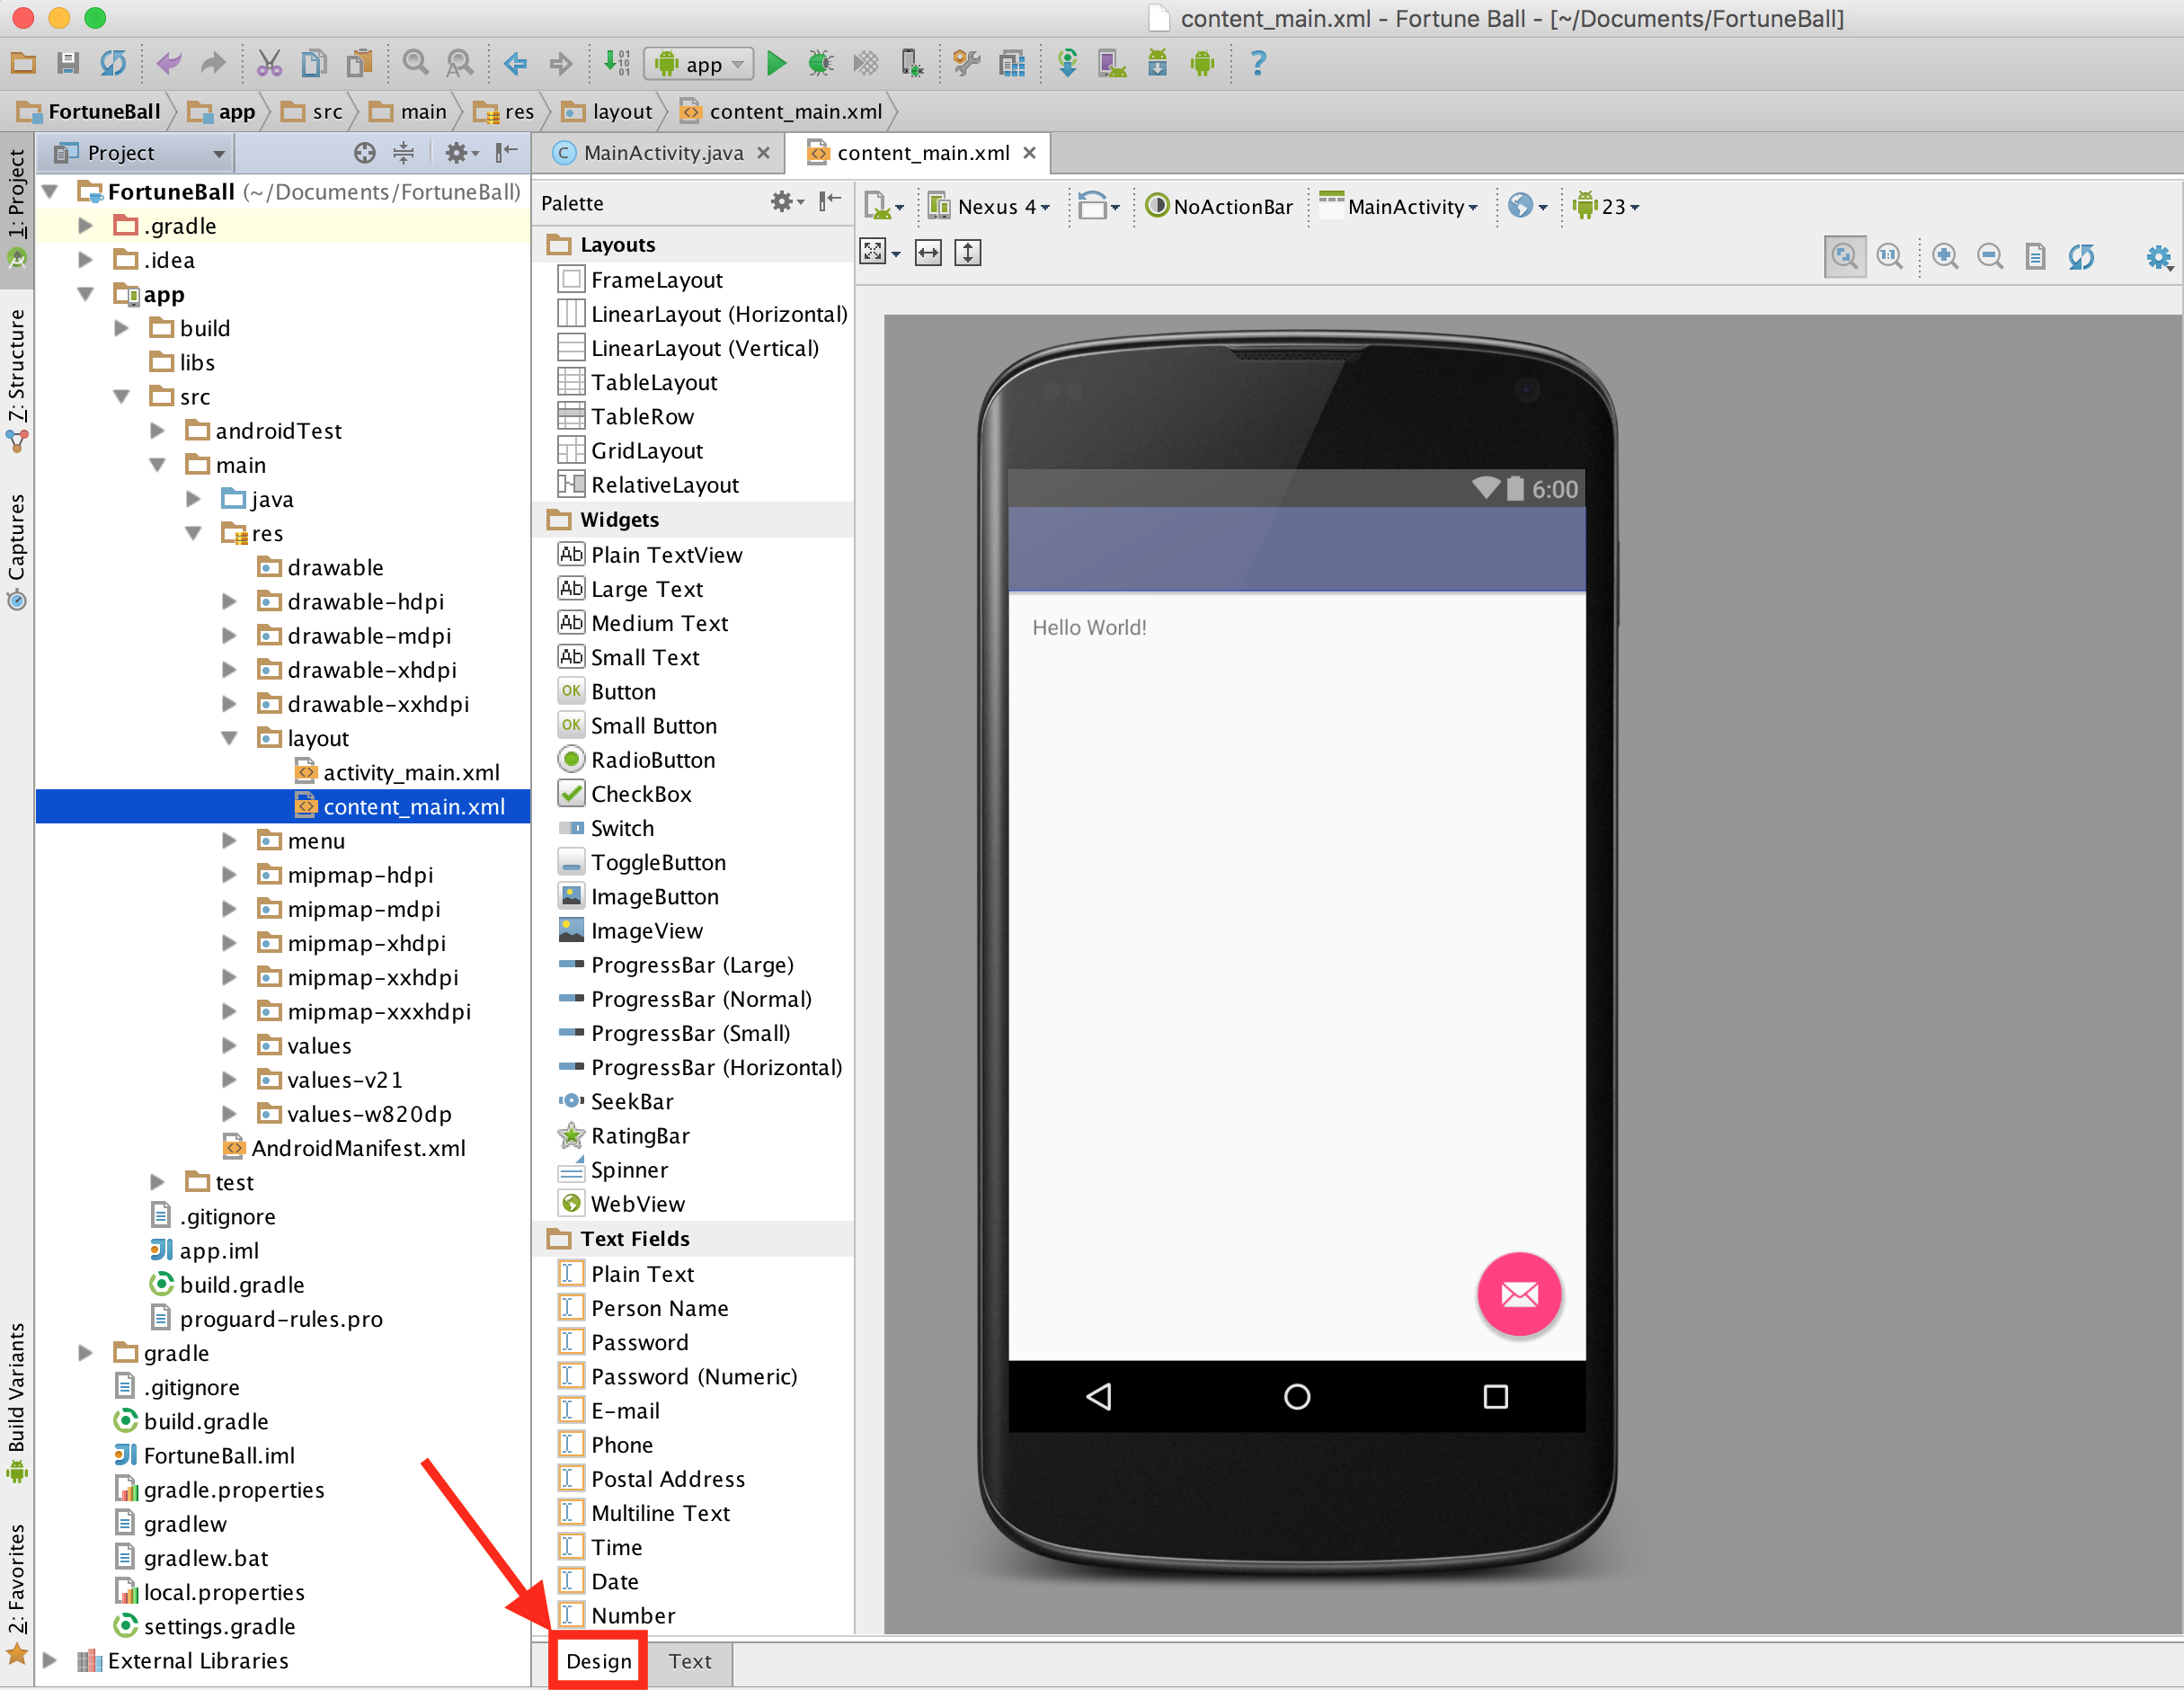
On the right hand side of the Design tab is the Text tab. Switching to this view allows you to edit the XML that makes up the layout directly.
In both tabs, you’ll be able to preview the layout in the device as you build. Choose the Text tab to start building the layout for Fortune Ball.
Before you start building the view, you need to define some values. Open up strings.xml under the res \ values folder and add the following:
<string name="fortune_description">Suggest the question, which you can answer “yes” or “no”, then click on the magic ball.</string> |
Next, open dimens.xml under values folder and add the following:
<dimen name="description_text_size">15sp</dimen> <dimen name="fortune_text_size">20sp</dimen> |
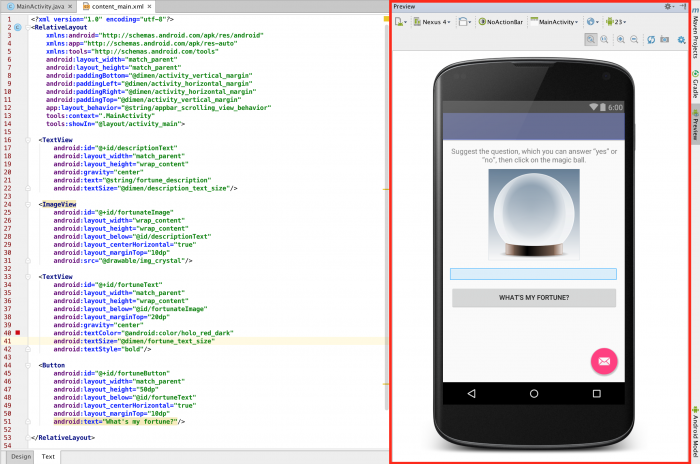
Head back to content_main.xml and replace the entire content of the file with the code below.
<?xml version="1.0" encoding="utf-8"?> <RelativeLayout xmlns:android="http://schemas.android.com/apk/res/android" xmlns:tools="http://schemas.android.com/tools" xmlns:app="http://schemas.android.com/apk/res-auto" android:layout_width="match_parent" android:layout_height="match_parent" android:paddingLeft="@dimen/activity_horizontal_margin" android:paddingRight="@dimen/activity_horizontal_margin" android:paddingTop="@dimen/activity_vertical_margin" android:paddingBottom="@dimen/activity_vertical_margin" app:layout_behavior="@string/appbar_scrolling_view_behavior" tools:showIn="@layout/activity_main" tools:context=".MainActivity"> <TextView android:id="@+id/descriptionText" android:layout_width="match_parent" android:layout_height="wrap_content" android:text="@string/fortune_description" android:gravity="center" android:textSize="@dimen/description_text_size"/> <ImageView android:layout_width="wrap_content" android:layout_height="wrap_content" android:id="@+id/fortunateImage" android:src="@drawable/img_crystal" android:layout_centerHorizontal="true" android:layout_below="@id/descriptionText" android:layout_marginTop="10dp"/> <TextView android:id="@+id/fortuneText" android:layout_width="match_parent" android:layout_height="wrap_content" android:layout_below="@id/fortunateImage" android:gravity="center" android:layout_marginTop="20dp" android:textSize="@dimen/fortune_text_size" android:textStyle="bold" android:textColor="@android:color/holo_red_dark"/> <Button android:id="@+id/fortuneButton" android:layout_width="match_parent" android:layout_height="50dp" android:layout_below="@id/fortuneText" android:text="What's my fortune?" android:layout_centerHorizontal="true" android:layout_marginTop="10dp"/> </RelativeLayout> |
Within the relative layout you added two pieces of text, an image and a button. These will appear within the container in the order that you added them, and their content is read from the strings.xml in the case of the text views, and from the drawable you added in the case of the image.
As you’re updating content_main.xml, notice how the Preview window updates the UI:

Note: If you can’t see the preview window, then click on the Preview button on the right-hand side panel of the layout editor while you’re still in the Text tab.
Build and run.
Congrats! You’ve designed your app’s layout. However, it’s only a pretty picture at this point — clicking on that button doesn’t do anything. Ready to play around with activities?
Connecting Views with Activities
You use the java files located in app / src / main / java to implement your app’s logic.Open MainActivity.java and add the following inside the
MainActivity class:String fortuneList[] = {"Don’t count on it","Ask again later","You may rely on it","Without a doubt","Outlook not so good","It's decidedly so","Signs point to yes","Yes definitely","Yes","My sources say NO"}; TextView mFortuneText; Button mGenerateFortuneButton; ImageView mFortuneBallImage; |
Next, replace the content of the
onCreate() method with the following:// 1: super.onCreate(savedInstanceState); // 2: setContentView(R.layout.activity_main); Toolbar toolbar = (Toolbar) findViewById(R.id.toolbar); setSupportActionBar(toolbar); // 3: mFortuneText = (TextView) findViewById(R.id.fortuneText); mFortuneBallImage = (ImageView) findViewById(R.id.fortunateImage); mGenerateFortuneButton = (Button) findViewById(R.id.fortuneButton); // 4: mGenerateFortuneButton.setOnClickListener(new View.OnClickListener() { @Override public void onClick(View view) { // 5: int index = new Random().nextInt(fortuneList.length); mFortuneText.setText(fortuneList[index]); // 6: YoYo.with(Techniques.Swing) .duration(500) .playOn(mFortuneBallImage); } }); |
- Call the superclass implementation to ensure the activity is ready to go.
- Specify that the layout for this activity is provided by the layout you created before, and perform some preparation on the toolbar.
- Populate the values of the three member variables you created before for the views in the layout using the
findViewByIdmethod. Theidvalue is the same as the one you provided in the XML layout. - Add an
OnClickListenerto the button. This is a simple class that encapsulates the functionality you’d like to perform when the button is pressed. - Firstly, find a random fortune from the
fortuneListarray, and update the fortune text to show it - Use the third-party animation library you added as a dependency to the gradle file to add a fun animation to the crystal ball image.

Tidy Up
You’re almost done. But before you start planning your release party, you have some clean up ahead, like getting rid of that floating button. Head to res / layout and open activity_main.xml.This layout file contains a reference to content_main.xml that you previously edited. It wraps the content with the default toolbar and floating action button. However, Fortune Ball doesn’t need a floating action button, so remove the following code block from this xml file:
<android.support.design.widget.FloatingActionButton android:id="@+id/fab" android:layout_width="wrap_content" android:layout_height="wrap_content" android:layout_gravity="bottom|end" android:layout_margin="@dimen/fab_margin" android:src="@android:drawable/ic_dialog_email"/> |

Ask a question, click or tap on What’s my fortune? and let your future unfold before your eyes!
DDMS Overview
DDMS is short for Dalvik Debug Monitor Server and is integrated into Android Studio. It provides services like simulating phone calls, taking screenshots, checking memory status, logging output, and it helps you dig into errors.This is a modest overview of the functionality of DDMS. To dig into more details, read up on the documentation on the Android developer’s site.
To fire up DDMS, click the Android Device Monitor button on the Android Studio toolbar.
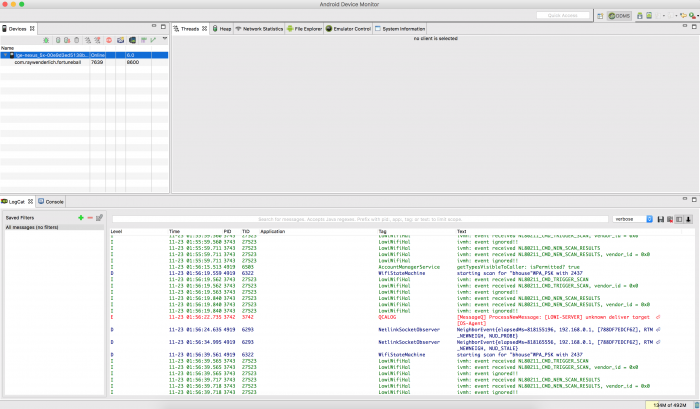
Once the DDMS launches, you’ll be greeted with the DDMS window:

DDMS presents many panels through which you get a window to peek inside your device or emulator and access a specific application for the purposes of debugging.
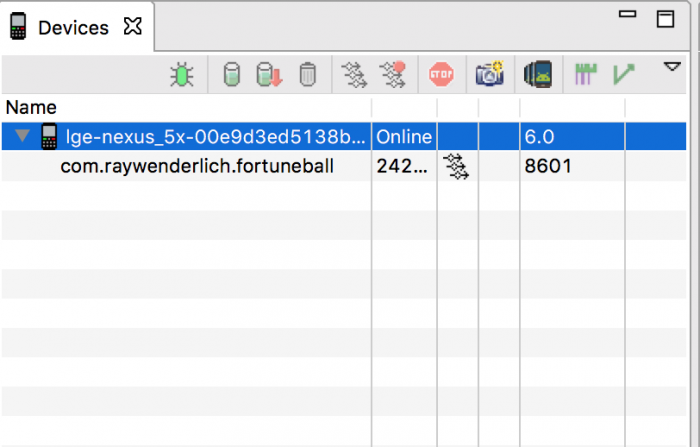
On the Devices panel on the left top hand side, you’ll see a list of devices and/or emulators depending on which is connected. If you expand the device or emulator, you’ll get a list of running applications.

On the left of the Devices panel, you’ll see a few panels.

Here are some details about what each panel does:
Logcat gives you a detailed view into your device’s system messages with the ability to drill down into a specific application. To demonstrate this, set up a filter for your app. Click the + icon on the Logcat panel.

You’ll be presented with a window to where you populate specific information about the filters you need:

Enter Fortune Telling App in the Filter Name field and com.raywenderlich.fortuneball in the by Application Name filtering field. Hit OK and you’ll notice that Logcat is now filtering messages:

Here you’ll also be able to see your own logged messages you defined in the code. Oh, what? You’ve not added any messages for yourself?
Head to MainActivity.java and add the following to the end of
onCreate():Log.v("FORTUNE APP TAG","onCreateCalled"); |
Log.v calls for two parameters — a tag and a message. In this case, you’ve defined the tag as "FORTUNE APP TAG" and the message as "onCreateCalled". Build and run the app so you can see this log message in the Logcat panel.
Another very useful utility of logcat is the ability to see stacktrace or error messages from app crashes and exceptions. You’ll add a bug to your perfectly working app to see how that works.
Go to MainActivity.java and comment out the following line in
onCreate()://mFortuneText = (TextView) findViewById(R.id.fortuneText);
|

How would you go about fixing this if you hadn’t put the bug in on purpose? Logcat to the rescue!
Head back to the Logcat panel — it’ll look something like this:
That sure is a lot of red text, and it’s exactly where to go sniffing around for clues. You’re looking for an exception somewhere. In this case, it’s line 58 in the MainActivity.java file.

By commenting out the
mFortuneText = (TextView) findViewById(R.id.fortuneText), you created a variable but didn’t assign it a value — hence the null pointer exception. Go ahead and uncomment that code and build and run the application. This time there’s no crash!
Logcat is a powerful tool that lets you debug your application errors and exception.
Where to Go From Here?
You can download the final project here.Practice makes perfect! You’ve learned your way around and can now create a project, play around with Gradle, import assets, set up layouts and do some testing.
There’s a lot of cool stuff to learn about Android, and I suggest you start with these next steps:
- Get familiar with Logcat and the filtering mechanism. Filter by different criteria.
- There will be times where you’ll want to test your application’s robustness in different network environments. Emulator controls in DDMS make this possible by giving you the ability to change emulator’s state, speed and latency.
- This beginning Android development tutorial has just touched on some of the tools used to build out the layout and UI. To learn more, pour over the official Android documentation for UI.
- Keep coming back to raywenderlich.com—we’ve got some great Android content coming your way over the next days, weeks and months.
- Talk to other developers. Make use of the forums below and ask your questions, share your findings and pick up tips.


0 comments:
Post a Comment
Note: only a member of this blog may post a comment.