 Road trip! Summer is almost here, and for families the world over,
that means hopping in the car and
Road trip! Summer is almost here, and for families the world over,
that means hopping in the car andheading to a favorite vacation spot. For long trips, the inevitable “Are we there yet?” questions will ring forth from the kids in the back seat.
Wouldn’t it be great to give them an easy means to know definitively one way or another? Geofences can do just that! And may in fact lead to more peace and tranquility for the whole family. :]
“What’s a geofence?” I here you ask – it’s nothing more than a virtual perimeter around a specified geographic location, which can be monitored and used to trigger events when its boundaries are crossed.
In this tutorial, you’ll build an Android app named “AWTY?” which uses GoogleApiClient, a component of Google Play Services, to add geofences. Your users will be able to enter a name, location, and size for a desired geofence. When entering the geofence, your users will get an Android notification of a geofence crossing.
Note: If you are new to Android development
and have any questions about the starter project or using Android
Studio, it may help to check out some of the tutorials on Android development found on this site.
Getting Started
Download the starter project for this tutorial. This project was created using Android Studio 1.2.Fire up Android Studio, and choose either Open an existing Android Studio project or File\Open…, then navigate to and select the downloaded project folder. Once the project is open, you may need to select View\Tool Windows\Project to see the project files in the Project pane.
There are seven source code files in the starter project; take a moment to familiarize yourself with them:
- AddGeofenceFragment.java: a
DialogFragmentused to create a geofence. - AllGeofencesActivity.java: an
ActionBarActivitythat displays a single fragment. - AllGeofencesAdapter.java: a
RecyclerViewadapter that transforms geofences to instances ofCardView. - AllGeofencesFragment.java: a
Fragmentthat displays geofences in aRecyclerView. - AreWeThereIntentService.java: an
IntentServicethat will send a notification to the user when they enter a geofence. - Constants.java: a class to hold some static constants.
- NamedGeofence.java: a model class that will be used to serialize the geofences.
ViewHolder inner classes containing the associated views. Each of the res subfolders has a number of other resource files that define colors, strings, dimensions, and styles; res/layout has files for each of the activity and fragment classes. Finally, the listitem_geofence.xml layout file defines the CardView that will be used to display geofences.The following build settings have been specified in build.gradle, and you should make sure you have the corresponding Android SDK packages installed:
- minSdkVersion: 16
- compileSdkversion: 22
- targetSdkVersion: 22
- buildToolsVersion: 22.0.1
CardView and RecyclerView classes from the Android Support Library along with two third-party libraries: Gson, for serializing objects to JSON, and FAB, a library used to display a floating action button.
Note: If you are unsure how to check which
SDKs you have installed, or how to install an SDK, then please review
the tutorials I linked to above.

Running the Starter Project
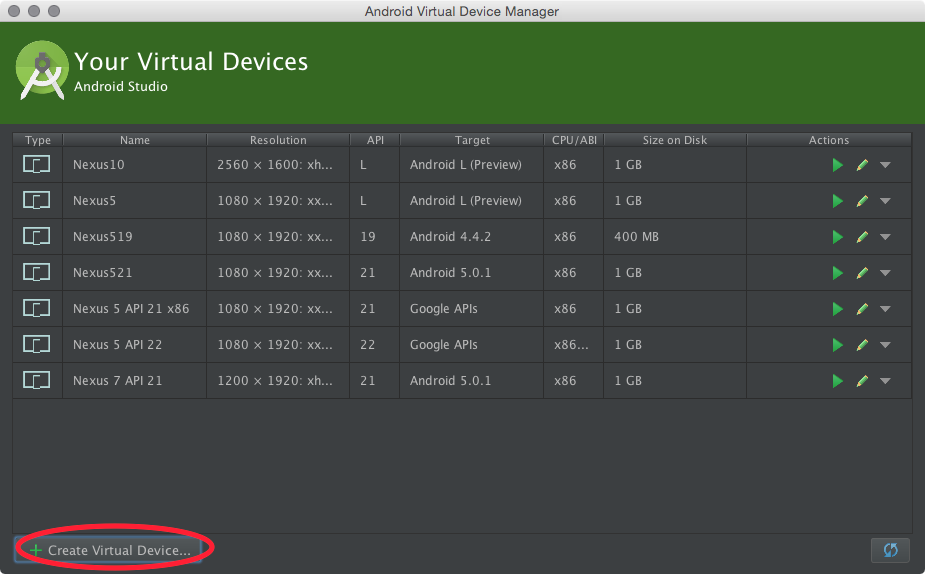
Time to run up your app to see how it looks in its current state. Testing geofences on a physical device is best, but if need be, you can run the app on the Android emulator. Doing so requires an emulator setup with Google Play Services installed.To create a new emulator that will work with Google Play Services, choose Tools\Android\AVD Manager from the Android Studio menu. Next choose the Create Virtual Device… button in the lower left:
Select the Nexus 5, and choose Next:

On the next screen, choose an API Level of 22 as this is the latest version at time of writing. For the best emulator performance, use an ABI of x86 or x86_64 if you have HAXM installed. If you don’t have HAXM, choose armebi-v7a for the ABI. Also, to use geofences in the emulator you must choose a target with Google APIs to ensure that Google Play Services are available:

Note: For more information on using an emulator with HAXM, check out this Intel document on HAXM.
Once you’ve selected your system image, click Finish in the lower right: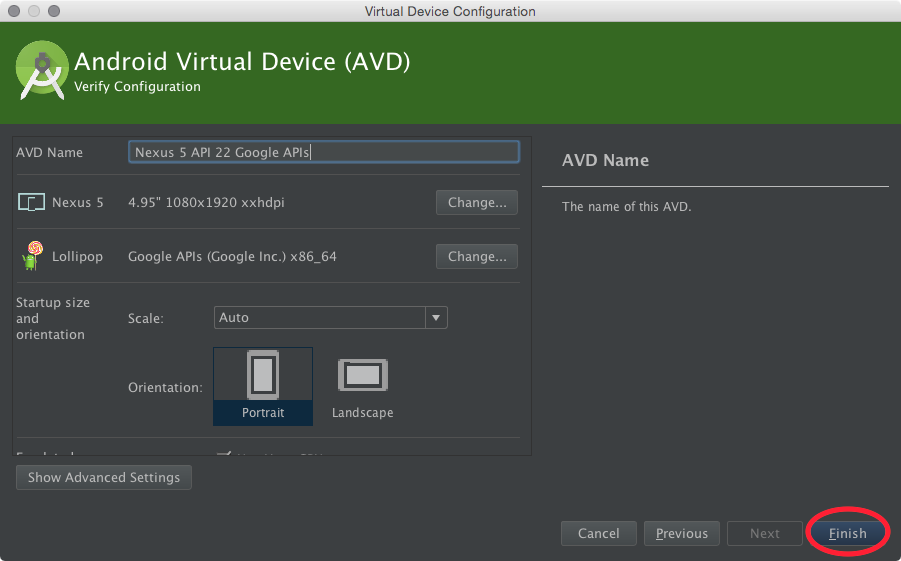
To test your new emulator, go back to the AVD Manager and hit play on the emulator you just created:

Press Ctrl-R or click the run button in the Android Studio toolbar to ensure the starter app builds and runs successfully:

Now that you’ve successfully launched the starter project, you can begin building out the full app. Time to start tracking your users…no, not really. Promise you’ll never, ever do that! :]
Working with GoogleApiClient
With the December 2014 release of Google Play Services 6.5, geofences are now created usingGoogleApiClient. The Location package is one of the dependencies listed in build.gradle:dependencies { compile fileTree(dir: 'libs', include: ['*.jar']) compile 'com.android.support:appcompat-v7:22.0.0' compile 'com.android.support:cardview-v7:22.0.0' compile 'com.android.support:recyclerview-v7:22.0.0' compile 'com.google.code.gson:gson:2.3' compile 'com.github.shell-software:fab:1.0.5' compile 'com.google.android.gms:play-services-location:6.5.87' } |
If you’ve never installed Google Play Services, go to Tools\Android\SDK Manager to open the Android SDK Manager and install the requisite library:

Creating Geofence Objects
TheNamedGeofence class stores geofence data in primitives, but you will also use it to create Geofence objects. Add the following public method to the class:
public Geofence geofence() { id = UUID.randomUUID().toString(); return new Geofence.Builder() .setRequestId(id) .setTransitionTypes(Geofence.GEOFENCE_TRANSITION_ENTER) .setCircularRegion(latitude, longitude, radius) .setExpirationDuration(Geofence.NEVER_EXPIRE) .build(); } |
NamedGeofence. The geofence type is specified as GEOFENCE_TRANSITION_ENTER, and the geofence is set to never expire.
Note: Beyond the basic properties of location (in terms of
latitude and longitude) and size (usually given as a radius), geofences
can have a fixed lifespan, or stay active with no expiration.
Geofences can be defined as entry, which triggers when the user enters the fence; exit, when the user leaves the fence; dwell, where the user stays inside the fence for a certain length of time period, or even a combination of these three.
In this tutorial, you’ll stick with creating entry geofences.
Now that you have a way to create Geofences can be defined as entry, which triggers when the user enters the fence; exit, when the user leaves the fence; dwell, where the user stays inside the fence for a certain length of time period, or even a combination of these three.
In this tutorial, you’ll stick with creating entry geofences.
Geofence objects, it’s time to create a companion controller class.Creating GeofenceController
You’ll use a singleton class namedGeofenceController to interact with the GoogleApiClient. Right-click on the app package name in app/src/main/java, select New\Java Class, name the class GeofenceController and click OK:

Next, add the following code to the file you just created:
public class GeofenceController { private final String TAG = GeofenceController.class.getName(); private Context context; private GoogleApiClient googleApiClient; private Gson gson; private SharedPreferences prefs; private List<NamedGeofence> namedGeofences; public List<NamedGeofence> getNamedGeofences() { return namedGeofences; } private List<NamedGeofence> namedGeofencesToRemove; private Geofence geofenceToAdd; private NamedGeofence namedGeofenceToAdd; } |
String TAG property, a Context property that you’ll need to connect with GoogleApiClient, a GoogleApiClient property, as well as Gson and SharedPreferences properties that you’ll use to serialize geofences to disk.You’ve also added
List properties to store the current
geofences in memory and maintain a list of geofences to remove. Finally,
there are properties that will store Geofence and NamedGeofence objects to be added to the list.Be sure to add any required imports by clicking on the red highlighted types and pressing Option-Return for each one.
Next, add the following code just below the property declarations:
private static GeofenceController INSTANCE; public static GeofenceController getInstance() { if (INSTANCE == null) { INSTANCE = new GeofenceController(); } return INSTANCE; } |
private static property to hold the singleton reference to the GeofenceController class, as well as a method to create and access the instance.Now add the following initializer to your class:
public void init(Context context) { this.context = context.getApplicationContext(); gson = new Gson(); namedGeofences = new ArrayList<>(); namedGeofencesToRemove = new ArrayList<>(); prefs = this.context.getSharedPreferences(Constants.SharedPrefs.Geofences, Context.MODE_PRIVATE); } |
ArrayList class. This method simply initializes the context and some other properties of the controller.Open
AllGeofencesActivity and add the following call to the bottom of onCreate():GeofenceController.getInstance().init(this); |
GeofenceController when the app starts.Now that you’ve added the controller, run your app to make sure all is well; your app won’t look any different, but rest assured
GeofenceController is there in the background, waiting to do its job.
Adding Geofences
When the user taps Add inAddGeofenceFragment to create a new fence, you’ll kick off a chain of calls that result in GeofenceController connecting to GoogleApiClient to add the geofence.Both the Add and Cancel buttons in
AddGeofenceFragment have existing OnClickListeners, so you simply need to add the listener calls. Open
AddGeofenceFragment and add the following to the end of onClick for the Cancel click listener:if (listener != null) { listener.onDialogNegativeClick(AddGeofenceFragment.this); } |
Next, replace
onClick() for the Add click listener with the following:public void onClick(View view) { // 1. Check for valid data if (dataIsValid()) { // 2. Create a named geofence NamedGeofence geofence = new NamedGeofence(); geofence.name = getViewHolder().nameEditText.getText().toString(); geofence.latitude = Double.parseDouble( getViewHolder().latitudeEditText.getText().toString()); geofence.longitude = Double.parseDouble( getViewHolder().longitudeEditText.getText().toString()); geofence.radius = Float.parseFloat( getViewHolder().radiusEditText.getText().toString()) * 1000.0f; // 3. Call listener and dismiss or show error if (listener != null) { listener.onDialogPositiveClick(AddGeofenceFragment.this, geofence); dialog.dismiss(); } } else { // 4. Display an error message showValidationErrorToast(); } } |
- Check if the user entered valid data.
- If so, create a new
NamedGeofenceand set its properties. - Call the listener and dismiss the dialog.
- If the user entered invalid data, show a validation error toast.
Connecting to GoogleApiClient
Add the following interface to the bottom ofGeofenceController:public interface GeofenceControllerListener { void onGeofencesUpdated(); void onError(); } |
Add the following field to the other fields near the top of the class:
private GeofenceControllerListener listener; |
GeofenceController must connect to GoogleApiClient and implement its defined interfaces ConnectionCallbacks and OnConnectionFailedListener.Add the following code after the listener you added above:
private GoogleApiClient.ConnectionCallbacks connectionAddListener = new GoogleApiClient.ConnectionCallbacks() { @Override public void onConnected(Bundle bundle) { } @Override public void onConnectionSuspended(int i) { } }; private GoogleApiClient.OnConnectionFailedListener connectionFailedListener = new GoogleApiClient.OnConnectionFailedListener() { @Override public void onConnectionFailed(ConnectionResult connectionResult) { } }; |
Bundle and ConnectionResult.Before implementing the callbacks, add the following two helper methods to the bottom of the class:
private GeofencingRequest getAddGeofencingRequest() { List<Geofence> geofencesToAdd = new ArrayList<>(); geofencesToAdd.add(geofenceToAdd); GeofencingRequest.Builder builder = new GeofencingRequest.Builder(); builder.setInitialTrigger(GeofencingRequest.INITIAL_TRIGGER_ENTER); builder.addGeofences(geofencesToAdd); return builder.build(); } private void connectWithCallbacks(GoogleApiClient.ConnectionCallbacks callbacks) { googleApiClient = new GoogleApiClient.Builder(context) .addApi(LocationServices.API) .addConnectionCallbacks(callbacks) .addOnConnectionFailedListener(connectionFailedListener) .build(); googleApiClient.connect(); } |
getAddGeofencingRequest() adds the geofenceToAdd object to an ArrayList, then uses the builder pattern to create a GeofencingRequest object that will be used in the connection callbacks. connectWithCallbacks() populates the googleApiClient property and uses it to connect to the location service. Make sure to import both
GeofencingRequest and LocationServices.Now add the following two helper methods:
private void sendError() { if (listener != null) { listener.onError(); } } private void saveGeofence() { namedGeofences.add(namedGeofenceToAdd); if (listener != null) { listener.onGeofencesUpdated(); } } |
sendError() calls the listener to pass along the error. saveGeofence() adds the new geofence to the controller’s list of geofences and calls the listener’s onGeofencesUpdated method.With these two helper methods in place, add the following code to
onConnected() within connectionAddListener:// 1. Create an IntentService PendingIntent Intent intent = new Intent(context, AreWeThereIntentService.class); PendingIntent pendingIntent = PendingIntent.getService(context, 0, intent, PendingIntent.FLAG_UPDATE_CURRENT); // 2. Associate the service PendingIntent with the geofence and call addGeofences PendingResult<Status> result = LocationServices.GeofencingApi.addGeofences( googleApiClient, getAddGeofencingRequest(), pendingIntent); // 3. Implement PendingResult callback result.setResultCallback(new ResultCallback<Status>() { @Override public void onResult(Status status) { if (status.isSuccess()) { // 4. If successful, save the geofence saveGeofence(); } else { // 5. If not successful, log and send an error Log.e(TAG, "Registering geofence failed: " + status.getStatusMessage() + " : " + status.getStatusCode()); sendError(); } } }); |
- Create a
PendingIntentforAreWeThereIntentService. - Associate the pending intent with
geofenceToAddand make the call toaddGeofences(). - Handle the
PendingResultcallback. - On success, make a call to save the geofence.
- On error, make a call to send an error.
Status, ResultCallback, and LocationServices are all from subpackages of com.google.android.gms.Add the following public method to
GeofenceController you can use to start the process of adding a geofence:public void addGeofence(NamedGeofence namedGeofence, GeofenceControllerListener listener) { this.namedGeofenceToAdd = namedGeofence; this.geofenceToAdd = namedGeofence.geofence(); this.listener = listener; connectWithCallbacks(connectionAddListener); } |
Wiring Everything Up
All the hooks are in place and ready to be connected. OpenAllGeofencesFragment, and add the following along with the other properties:private GeofenceController.GeofenceControllerListener geofenceControllerListener = new GeofenceController.GeofenceControllerListener() { @Override public void onGeofencesUpdated() { refresh(); } @Override public void onError() { showErrorToast(); } }; |
You now need to hook up the adapter in order for the geofence card views to display.
Add the following near the end of
onViewCreated(), just above the call to refresh():allGeofencesAdapter = new AllGeofencesAdapter(GeofenceController.getInstance().getNamedGeofences()); viewHolder.geofenceRecyclerView.setAdapter(allGeofencesAdapter); |
allGeofencesAdapter with the list of named geofences and set the adapter on the recycler view.Add the following code to
refresh():allGeofencesAdapter.notifyDataSetChanged(); if (allGeofencesAdapter.getItemCount() > 0) { getViewHolder().emptyState.setVisibility(View.INVISIBLE); } else { getViewHolder().emptyState.setVisibility(View.VISIBLE); } |
Finally, add the following line to
onDialogPositiveClick():GeofenceController.getInstance().addGeofence(geofence, geofenceControllerListener); |
It’s time to test this all out!
Build and run. Tap the floating action button, and enter some geofence data. If you need to find a specific location, Google Maps will give you the latitude and longitude you require. It’s best to use six significant figures after the decimal.
You should see your first geofence card:

If you’re developing on the emulator, you may receive an error when you attempt to add a geofence. If you do, follow these steps to add location permissions to your emulator:
- Go to Settings\Location in your emulator.
- Tap on Mode; on Lollipop this is near the top of the list.
- Set the mode to set to Device Only, then set the mode to any other option, such as High accuracy.
- Tap Agree on the “Use Google’s location service?” popup.
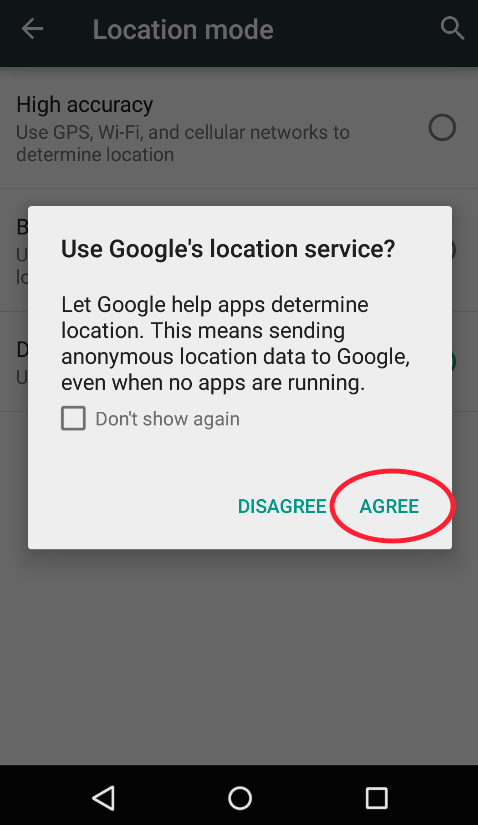
This should remove the error you received when adding geofences in the emulator.
Add a few of your favorite destinations as new geofences and scroll through the list:

Your users can add as many geofences as they like, but right now they’ll lose their data when the app restarts. Time to implement a save data function!
Adding Persistence
Open GeofenceController.java and add the following code to the bottom ofsaveGeofence():String json = gson.toJson(namedGeofenceToAdd); SharedPreferences.Editor editor = prefs.edit(); editor.putString(namedGeofenceToAdd.id, json); editor.apply(); |
Gson to convert namedGeofenceToAdd into JSON and store that JSON as a string in the users’ shared preferences.That will save the newly created geofence, but what about reloading saved geofences when the app launches?
Add the following method to
GeofenceController:private void loadGeofences() { // Loop over all geofence keys in prefs and add to namedGeofences Map<String, ?> keys = prefs.getAll(); for (Map.Entry<String, ?> entry : keys.entrySet()) { String jsonString = prefs.getString(entry.getKey(), null); NamedGeofence namedGeofence = gson.fromJson(jsonString, NamedGeofence.class); namedGeofences.add(namedGeofence); } // Sort namedGeofences by name Collections.sort(namedGeofences); } |
Gson to convert the saved JSON back into a NamedGeofence. Finally, you sort the geofences by name.As always, import the missing headers; in this case,
Map and Collections.Add the following code to the end of
init() to call your new method:loadGeofences(); |
Removing Geofences
Adding geofences is handy, but what if you want to remove some – or all – of them?Add the following callback to
GeofenceController, which is similar to the one you wrote for adding fences:private GoogleApiClient.ConnectionCallbacks connectionRemoveListener = new GoogleApiClient.ConnectionCallbacks() { @Override public void onConnected(Bundle bundle) { // 1. Create a list of geofences to remove List<String> removeIds = new ArrayList<>(); for (NamedGeofence namedGeofence : namedGeofencesToRemove) { removeIds.add(namedGeofence.id); } if (removeIds.size() > 0) { // 2. Use GoogleApiClient and the GeofencingApi to remove the geofences PendingResult<Status> result = LocationServices.GeofencingApi.removeGeofences( googleApiClient, removeIds); result.setResultCallback(new ResultCallback<Status>() { // 3. Handle the success or failure of the PendingResult @Override public void onResult(Status status) { if (status.isSuccess()) { removeSavedGeofences(); } else { Log.e(TAG, "Removing geofence failed: " + status.getStatusMessage()); sendError(); } } }); } } @Override public void onConnectionSuspended(int i) { Log.e(TAG, "Connecting to GoogleApiClient suspended."); sendError(); } }; |
- Builds a list of geofence id values to remove.
- Removes the list of geofences you just built from the device.
- Handles success or failure of the removal in a result callback.
public void removeGeofences(List<NamedGeofence> namedGeofencesToRemove, GeofenceControllerListener listener) { this.namedGeofencesToRemove = namedGeofencesToRemove; this.listener = listener; connectWithCallbacks(connectionRemoveListener); } public void removeAllGeofences(GeofenceControllerListener listener) { namedGeofencesToRemove = new ArrayList<>(); for (NamedGeofence namedGeofence : namedGeofences) { namedGeofencesToRemove.add(namedGeofence); } this.listener = listener; connectWithCallbacks(connectionRemoveListener); } private void removeSavedGeofences() { SharedPreferences.Editor editor = prefs.edit(); for (NamedGeofence namedGeofence : namedGeofencesToRemove) { int index = namedGeofences.indexOf(namedGeofence); editor.remove(namedGeofence.id); namedGeofences.remove(index); editor.apply(); } if (listener != null) { listener.onGeofencesUpdated(); } } |
To get this all working, you’ll need to wire up the DELETE button in the geofence card view.
Open AllGeofencesFragment.java and add the following to
onViewCreated(), just before the call to refresh():allGeofencesAdapter.setListener(new AllGeofencesAdapter.AllGeofencesAdapterListener() { @Override public void onDeleteTapped(NamedGeofence namedGeofence) { List<NamedGeofence> namedGeofences = new ArrayList<>(); namedGeofences.add(namedGeofence); GeofenceController.getInstance().removeGeofences(namedGeofences, geofenceControllerListener); } }); |
removeGeofences().Build and run. Tap DELETE on any geofence, and you’ll be prompted to confirm the deletion:
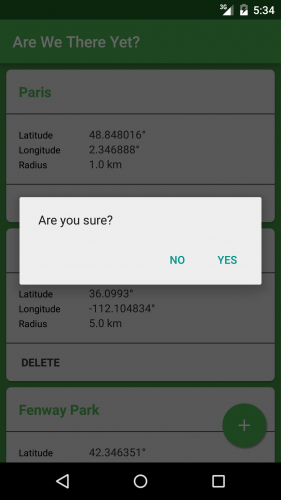
Click YES and you’ll see the geofence disappear from the list.
Wouldn’t it be great if you could delete them all at once? That would be a perfect job for a menu item.
Open AllGeofencesActivity.java and add the following:
@Override public boolean onCreateOptionsMenu(Menu menu) { getMenuInflater().inflate(R.menu.menu_all_geofences, menu); MenuItem item = menu.findItem(R.id.action_delete_all); if (GeofenceController.getInstance().getNamedGeofences().size() == 0) { item.setVisible(false); } return true; } |
Now go to
AllGeofencesFragment, and add the following:@Override public void onCreate(Bundle savedInstanceState) { super.onCreate(savedInstanceState); setHasOptionsMenu(true); } |
setHasOptionsMenu() call indicates that the fragment will handle the menu. Next, add the following override to
AllGeofencesFragment:@Override public boolean onOptionsItemSelected(MenuItem item) { int id = item.getItemId(); if (id == R.id.action_delete_all) { AlertDialog.Builder builder = new AlertDialog.Builder(getActivity()); builder.setMessage(R.string.AreYouSure) .setPositiveButton(R.string.Yes, new DialogInterface.OnClickListener() { public void onClick(DialogInterface dialog, int id) { GeofenceController.getInstance().removeAllGeofences(geofenceControllerListener); } }) .setNegativeButton(R.string.No, new DialogInterface.OnClickListener() { public void onClick(DialogInterface dialog, int id) { // User cancelled the dialog } }) .create() .show(); return true; } return super.onOptionsItemSelected(item); } |
removeAllGeofences on GeofenceController. Import any missing headers as you’ve done previously. Finally, add the following line to the bottom of
refresh():getActivity().invalidateOptionsMenu(); |
Build and run. Add multiple geofences, then bring up the menu and tap the Delete All Geofences option:
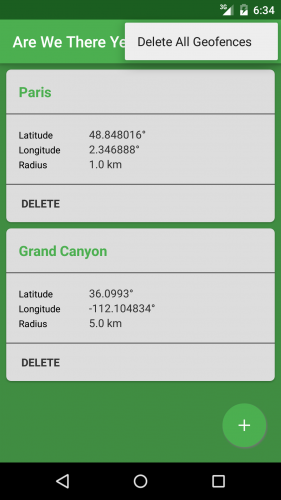
Poof! Your geofences are no more. :]
Displaying a Notification
There’s nothing yet to inform a user when they’ve reached one of their geofences. Time to fix that!Open up AreWeThereIntentService.java; you’ll see the starter project includes an empty
onHandleIntent() implementation. The pending intent you associated with the geofence triggers AreWeThereIntentService and fires the onHandleIntent() callback.Add the following implementation to
onHandleIntent(), importing the missing headers as you go:prefs = getApplicationContext().getSharedPreferences( Constants.SharedPrefs.Geofences, Context.MODE_PRIVATE); gson = new Gson(); // 1. Get the event GeofencingEvent event = GeofencingEvent.fromIntent(intent); if (event != null) { if (event.hasError()) { onError(event.getErrorCode()); } else { // 2. Get the transition type int transition = event.getGeofenceTransition(); if (transition == Geofence.GEOFENCE_TRANSITION_ENTER || transition == Geofence.GEOFENCE_TRANSITION_DWELL || transition == Geofence.GEOFENCE_TRANSITION_EXIT) { List<String> geofenceIds = new ArrayList<>(); // 3. Accumulate a list of event geofences for (Geofence geofence : event.getTriggeringGeofences()) { geofenceIds.add(geofence.getRequestId()); } if (transition == Geofence.GEOFENCE_TRANSITION_ENTER || transition == Geofence.GEOFENCE_TRANSITION_DWELL) { // 4. Pass the geofence list to the notification method onEnteredGeofences(geofenceIds); } } } } |
prefs and gson properties of the service, you do the following:- Create a
GeofencingEventobject from the service intent. - Create an integer that stores the type of geofence transition.
- Build up a list of ids that triggered the service.
- Pass that list on to the notification method.
onEnteredGeofences(), importing any missing headers:// 1. Outer loop over all geofenceIds for (String geofenceId : geofenceIds) { String geofenceName = ""; // 2, Loop over all geofence keys in prefs and retrieve NamedGeofence from SharedPreferences Map<String, ?> keys = prefs.getAll(); for (Map.Entry<String, ?> entry : keys.entrySet()) { String jsonString = prefs.getString(entry.getKey(), null); NamedGeofence namedGeofence = gson.fromJson(jsonString, NamedGeofence.class); if (namedGeofence.id.equals(geofenceId)) { geofenceName = namedGeofence.name; break; } } // 3. Set the notification text and send the notification String contextText = String.format(this.getResources().getString(R.string.Notification_Text), geofenceName); } |
- Loop over all the geofence ids.
- Then loop again to pull out the geofence name from
SharedPreferences. - Finally, you create a string to display to the user.
for loop, just below the creation of contextText:// 1. Create a NotificationManager NotificationManager notificationManager = (NotificationManager) this.getSystemService(Context.NOTIFICATION_SERVICE); // 2. Create a PendingIntent for AllGeofencesActivity Intent intent = new Intent(this, AllGeofencesActivity.class); intent.addFlags(Intent.FLAG_ACTIVITY_SINGLE_TOP | Intent.FLAG_ACTIVITY_CLEAR_TOP); PendingIntent pendingNotificationIntent = PendingIntent.getActivity(this, 0, intent, PendingIntent.FLAG_UPDATE_CURRENT); // 3. Create and send a notification Notification notification = new NotificationCompat.Builder(this) .setSmallIcon(R.mipmap.ic_launcher) .setContentTitle(this.getResources().getString(R.string.Notification_Title)) .setContentText(contextText) .setContentIntent(pendingNotificationIntent) .setStyle(new NotificationCompat.BigTextStyle().bigText(contextText)) .setPriority(NotificationCompat.PRIORITY_HIGH) .setAutoCancel(true) .build(); notificationManager.notify(0, notification); |
- You create a notification manager using
getSystemService(). - Next, you create an intent to start up
AllGeofencesActivity. - The builder pattern creates the notification with the intent using the app icon, a string constant title, and the context string.
Time to take your app on a virtual road trip to test this all out! :]
Testing with Mock Locations
Ideally, you’d test this on a device and physically move into the geofences you created.If you’re working with the emulator, or you don’t quite have the resources to fly to Bora Bora right now, there’s a way to mock your location and trigger your geofences in a virtual fashion. This tutorial focuses on mocking through the emulator, but you can also mock locations on a device using third-party apps such a Fake GPS and My Fake Location.

On the emulator, go to Settings\Developer options. Make sure Allow mock locations is already on:

Build and run the app in the emulator, and add some geofences.
In order to mock your location, you can use the Android Debug Bridge or telnet from the command line, but in this case you’ll use the Android DDMS which is bundled with Android Studio.
From the menu, choose Tools\Android\Android Device Monitor to open the DDMS window.
Choose the Emulator Control tab and locate (sorry!) Location Controls near the bottom:

Enter the longitude and latitude of one of your geofences for your mock location; note that the fields are reversed from your app’s interface. Click Send to mock the emulator location. You will likely need to open the Google Maps app on the emulator to trigger a location lookup.
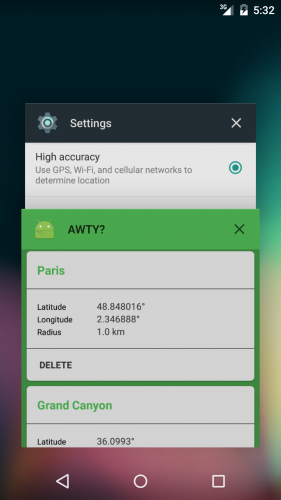
If you don’t see anything pop up, click and drag the emulator screen down from where the battery is shown to display the notification center. At that point, you should see the geofence notification in the emulator:
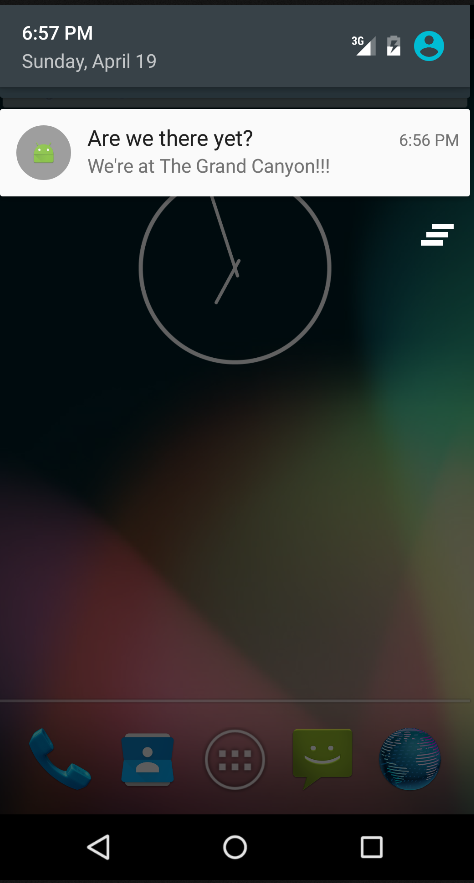
Now you can say, with all certainty, “YES, we’re here!” :]
Where To Go From Here?
You can download the final project for this tutorial here.You’ve come a long way in this tutorial: you’ve learned how to add and remove geofences, and trigger notifications for your user.
Geofences can be finicky on device reboot, as well as when Location services turn on and off. As a nice challenge for yourself, create a broadcast receiver that listens for
BOOT_COMPLETED and reregisters your app’s stored geofences on reboot.Also be sure to check out the Google Play Services overview on developer.android.com to find out what else you can do with Google Play Services and GoogleApiClient.
If you have any questions or comments on this tutorial, feel free to join the forum discussion below


Spot on with this article, I really think this website needs more attention. I'll probably be back to read more, thanks for the info.
ReplyDeleteGPSdata