fragment | noun | /’frag-mənt/
an isolated or incomplete part of something
an isolated or incomplete part of something
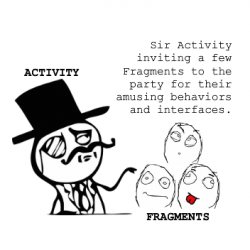
A fragment can be many things, but for the purposes of this tutorial, it is a module of code that holds part of the behavior and/or UI of an activity. As the name intimates, fragments are not independent entities, but are subservient to a single activity.
In many ways, they resemble and echo the functionality of activities.
Imagine for a moment that you’re an activity. You have a lot to do, so you’d employ a few mini-me’s to run around and do your laundry and taxes in exchange for lodging and food. That’s kind of like the relationship between activities and fragments.
And just like you don’t actually need a few minions to do your bidding, you don’t have to use fragments. However, if you do use them and use them well, they can provide:
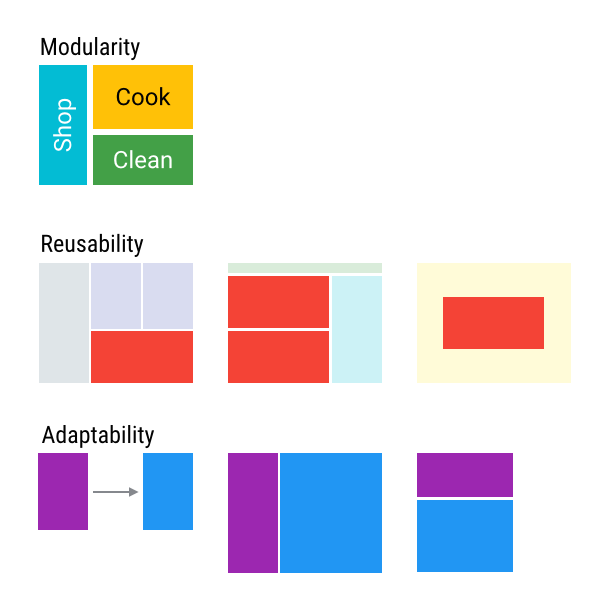
- Modularity: dividing complex activity code across fragments for better organization and maintenance.
- Reusability: placing behavior or UI parts into fragments that can be shared across multiple activities.
- Adaptability: representing sections of a UI as different fragments and utilizing different layouts depending on screen orientation and size.
In this introduction to Android fragments tutorial, you’ll build a mini encyclopedia of Rage Comics. The app will display a list of Rage Comics arranged in a grid. When a Rage Comic is selected, the app displays information about it. In this tutorial, you’ll learn:
- How to create and add fragments to an activity.
- How to let your fragments send information to an activity.
- How to add and replace fragments by using transactions.
Note: This tutorial assumes you’re comfortable the basics of
Android programming and understand what activity lifecycle means. If
you’re brand new to Android, you should work through both the Android Tutorial for Beginners and the Introduction to Activities first.
The time has come to release the fragments!Getting Started
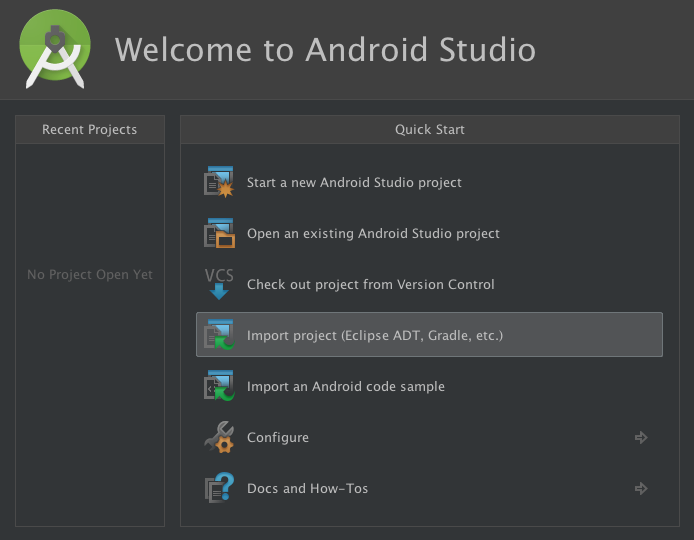
Download the starter project and start Android Studio.In the Welcome to Android Studio dialog, select Import project (Eclipse ADT, Gradle, etc.).
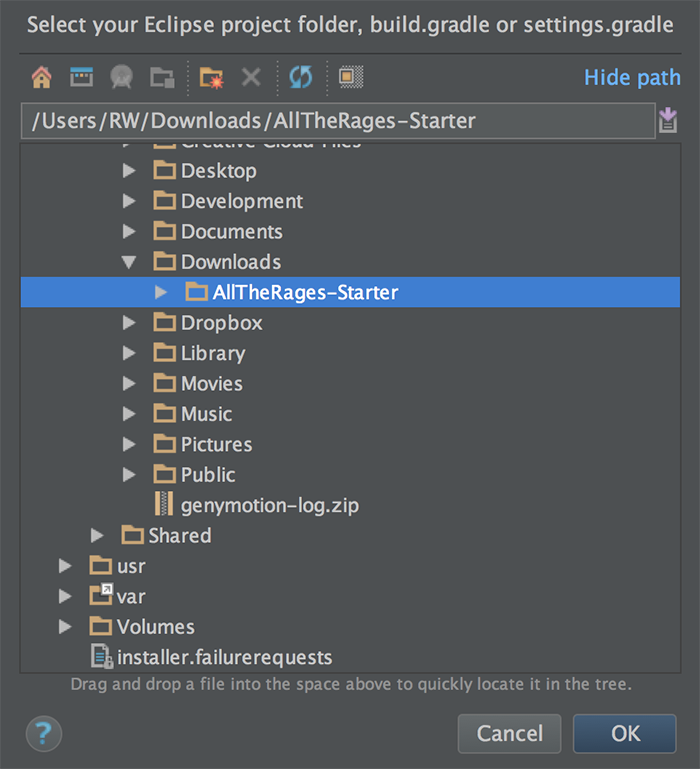
Choose the top-level directory of the starter project, and click OK.
Check out the project, and you’ll find some resources like Strings and Drawables, XML layouts and an activity. They provide some boilerplate, layouts for your fragments, non-fragment code you’ll need, and a fragment class you’ll use later to write your own.
The
MainActivity will host all your wee fragments, and RageComicListFragment contains code to display a list of the Rage Comic content so you can focus on fragments.Build and run the project. You’ll see that it’s pretty quiet in there.

You’ll fix that…

Fragment Lifecycle
Like an activity, a fragment has a full lifecycle, complete with events that occur at different points throughout. For instance, an event happens when the fragment becomes visible and active or when the fragment becomes unused and is removed.Here’s a fragment lifecycle diagram from the official Android Developer documentation.
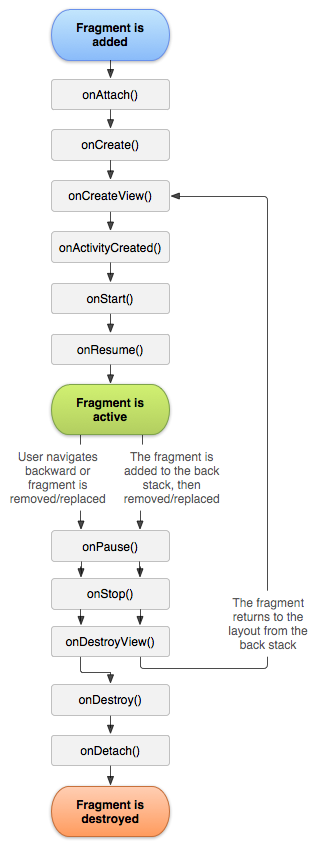

The following lifecycle events come into play when you add a fragment:
- onAttach: when the fragment attaches to its host activity
- onCreate: when a new fragment instance initializes, which always happens after it attaches to the host — fragments are a bit like a virus in that way
- onCreateView: when a fragment creates its portion of the view hierarchy, which is added to its activity’s view hierarchy
- onActivityCreated: when the fragment’s activity has finished its own onCreate event
- onStart: when the fragment is visible; a fragment cannot start until its starts and often starts immediately after the activity does
- onResume: when the fragment is visible and interactable; a fragment cannot resume until its activity resumes and often does so in quick succession after the activity
- onPause: when the fragment is no longer interactable; it occurs when either the fragment is about to be removed or replaced, or the host activity takes a pause
- onStop: when the fragment is no longer visible; it occurs either after the fragment is about to be removed or replaced or when the host activity stops
- onDestroyView: when the view and related resources created in onCreateView is removed from the activity’s view hierarchy and destroyed
- onDestroy: when the fragment does its final clean up
- onDetach: when the fragment is detached from its host activity
Creating a Fragment
Fragments were introduced as part of the oft-forgotten, tablet-targeted Honeycomb release for creating device-specific layouts for a single app.The v4 Support Library provides a fragment implementation for devices running Android below 3.0, specifically under android.support.v4.app.Fragment.
Even if your app is running on 4.0+, you should probably use support fragments.

It’s not just developers that depend on the Support Library. Other libraries also need it, like the v7 AppCompat Library, which holds the
AppCompatActivity and other back-porting of API 21 functionality. AppCompatActivity is a subclass of the v4 FragmentActivity. So, if you want to get that sweet Lollipop functionality, you’ll need to take the same road as v4.
Creating a Fragment
Eventually, All the Rages will show a list of Rage Comics on launch, and tapping on any of the items will display details about that particular comic. To start, you’ll work backwards and first create the detail page.Open the starter project in Android Studio and find fragment_rage_comic_details.xml; this XML file lays out the comic detail display. It also displays one of the Drawables and the associated string resources.

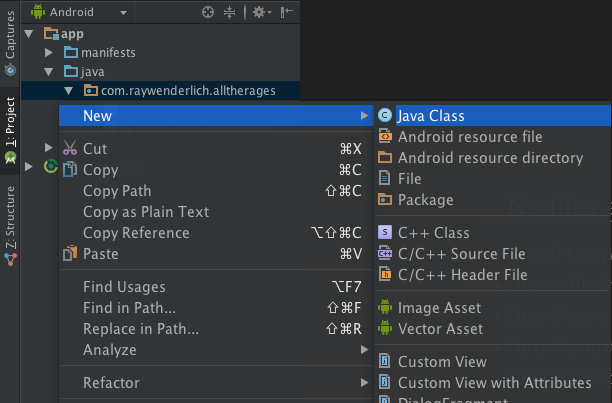
Select Android Studio’s Project tab and right-click the com.raywenderlich.alltherages package. In the context menu, select New\Java Class, name it RageComicDetailsFragment and select OK.
This class will be responsible for displaying details for a selected comic.
In RageComicDetailsFragment.java, replace the code underneath the imports with the following:
import android.os.Bundle; import android.support.annotation.Nullable; import android.support.v4.app.Fragment; import android.view.LayoutInflater; import android.view.View; import android.view.ViewGroup; public class RageComicDetailsFragment extends Fragment { public static RageComicDetailsFragment newInstance() { return new RageComicDetailsFragment(); } public RageComicDetailsFragment() { } @Nullable @Override public View onCreateView(LayoutInflater inflater, ViewGroup container, Bundle savedInstanceState) { return inflater.inflate(R.layout.fragment_rage_comic_details, container, false); } } |
setContentView() to specify an XML file to use for their layouts, but fragments create their view hierarchy in onCreateView(). The third parameter of
inflate specifies whether the inflated fragment should be added to the container. You should always set this to false: the FragmentManager will take care of adding the fragment to the container.There’s a new kid in town here:
FragmentManager. Each
activity has a FragmentManager that, as its name implies, manages an
activity’s fragments. It also provides an interface for you to access,
add and remove those fragments.You’ll notice that
RageComicDetailsFragment has a factory instance method, newInstance(), as well as an empty public constructor.Wait, but why do you need both of those methods? The
newInstance just calls the constructor.Fragment subclasses require an empty default constructor. If you don’t provide one but specify a non-empty constructor, Lint will give you an error:

Oddly enough it will compile, but when you run your application, you’ll get an even nastier exception.
You probably know that Android may destroy and later re-create an activity and all its associated fragments when the app goes into the background. When the activity comes back, its
FragmentManager starts re-creating fragments by using the empty default constructor. If it cannot find one, you get an exception.Wait, what if you need to pass information or data to a Fragment? Hold on tight: you’ll get the answer to that later.
Adding a Fragment
Here’s where you get to add your own shiny new fragment, and the way you’ll do it is the simplest approach: add it to the activity’s XML layout.To do this, open activity_main.xml and add the following inside of the root FrameLayout:
<fragment android:id="@+id/details_fragment" class="com.raywenderlich.alltherages.RageComicDetailsFragment" android:layout_width="match_parent" android:layout_height="match_parent"/> |
<fragment> tag inside of the activity layout and specifying the type of fragment the class attribute should inflate. The view ID of the <fragment> is required by the FragmentManager.Build and run. You will see the fragment:

Adding a Fragment Dynamically
First, open activity_main.xml again and remove the<fragment> you just placed. (Yes, I know, you just put it there — sorry.) You’ll replace it with the list of Rage Comics.Open RageComicListFragment.java, which has all the lovely list code. You can see that the
RageComicListFragment has the empty default constructor and a newInstance().The list code in RageComicListFragment depends on some resources. You have to ensure that the fragment has a valid reference to a
Context for accessing those resources. That’s where onAttach() comes into play.Open RageComicListFragment.java, and add these imports directly below the existing imports:
import android.content.res.Resources; import android.content.res.TypedArray; import android.support.annotation.Nullable; import android.os.Bundle; import android.support.v7.widget.GridLayoutManager; import android.app.Activity; |
Inside of RageComicListFragment.java, add the following two methods above the definition of the
RageComicAdapter:@Override public void onAttach(Context context) { super.onAttach(context); // Get rage face names and descriptions. final Resources resources = context.getResources(); mNames = resources.getStringArray(R.array.names); mDescriptions = resources.getStringArray(R.array.descriptions); mUrls = resources.getStringArray(R.array.urls); // Get rage face images. final TypedArray typedArray = resources.obtainTypedArray(R.array.images); final int imageCount = mNames.length; mImageResIds = new int[imageCount]; for (int i = 0; i < imageCount; i++) { mImageResIds[i] = typedArray.getResourceId(i, 0); } typedArray.recycle(); } @Nullable @Override public View onCreateView(LayoutInflater inflater, ViewGroup container, Bundle savedInstanceState) { final View view = inflater.inflate(R.layout.fragment_rage_comic_list, container, false); final Activity activity = getActivity(); final RecyclerView recyclerView = (RecyclerView) view.findViewById(R.id.recycler_view); recyclerView.setLayoutManager(new GridLayoutManager(activity, 2)); recyclerView.setAdapter(new RageComicAdapter(activity)); return view; } |
onAttach() contains code that accesses the resources you need via the Context to which the fragment has attached. Because the code is in onAttach(), you can rest assured that the fragment has valid Context.In
onCreateView(), you inflate the view hierarchy of RageComicListFragment and perform some setup. A RecyclerView is an efficient means of displaying multiple items on-screen that would require the user to scroll up and down. It is more efficient than traditional methods of displaying items in a list or grid, because as the user scrolls a currently visible item out of view, that item is “recycled” and refused for any new item that becomes visible.
Generally, if you have some poking and prodding to do on the fragment’s view,
onCreateView() is a good place to start because you have the view right there.Next you need to get
RageComicListFragment into MainActivity. You will ask your new friend, FragmentManager, to add it.Open MainActivity.java and add the following to
onCreate():@Override protected void onCreate(Bundle savedInstanceState) { super.onCreate(savedInstanceState); setContentView(R.layout.activity_main); if (savedInstanceState == null) { getSupportFragmentManager() .beginTransaction() .add(R.id.root_layout, RageComicListFragment.newInstance(), "rageComicList") .commit(); } } |

FragmentManager helped achieve this awesomeness through FragmentTransactions, which are basically fragment operations such as, add, remove, etc.First you grab the
FragmentManager by calling getSupportFragmentManager(), as opposed to getFragmentManager since you are using support fragments. Then you ask that
FragmentManager to start a new transaction by calling beginTransaction() — you probably figured that out yourself. Next you specify the operation that you want by calling replace and passing in:-
The view ID of a container for the fragment’s view hierarchy in the activity’s layout. If you sneak a quick peek at
activity_main.xml, you’ll find@+id/root_layout. - The fragment instance to be added.
-
A string that acts as a tag/identifier for the fragment instance. This allows the
FragmentManagerto later retrieve the fragment for you.
FragmentManager to execute the transaction by calling commit(). And with that, the fragment is added!
An
if block contains the code that displays the fragment
and checks that the activity doesn’t have saved state. When an activity
is saved, all of its active fragments are also saved. If you don’t
perform this check, this could happen:
And you would be like this:

The lesson: Always keep in mind how the saved state affects your fragments.
Communicating with the Activity
Even though fragments are attached to an activity, they don’t necessarily all talk to one another without some further “encouragement” from you.For All the Rages, you’ll need
RageComicListFragment to let MainActivity know when the user has made a selection so that RageComicDetailsFragment can display the selection.To start, open RageComicListFragment.java and add the following Java interface at the bottom:
public interface OnRageComicSelected { void onRageComicSelected(int imageResId, String name, String description, String url); } |
onRageComicSelected() when an item is selected, passing the selection to the activity.Add this new field below the existing ones:
private OnRageComicSelected mListener; |
In
onAttach(), add the following just below super.onAttach(context);:if (context instanceof OnRageComicSelected) { mListener = (OnRageComicSelected) context; } else { throw new ClassCastException(context.toString() + " must implement OnRageComicSelected."); } |
onAttach() to ensure that the fragment actually attached itself. Then you verify that the activity implements the OnRageComicSelected interface via instanceof. If it doesn’t, it throws an exception since you can’t proceed. If it does, then you set the activity as the
listener for RageComicListFragment.In the
onBindViewHolder() method, add this code to the bottom — okay, I fibbed a little; the RageComicAdapter doesn’t have everything you need):viewHolder.itemView.setOnClickListener(new View.OnClickListener() { @Override public void onClick(View v) { mListener.onRageComicSelected(imageResId, name, description, url); } }); |
View.OnClickListener to each Rage Comic so that it invokes the callback on the listener (the activity) to pass along the selection.Open MainActivity.java and update the class definition to following:
public class MainActivity extends AppCompatActivity implements RageComicListFragment.OnRageComicSelected { |
MainActivity is an implementation of the OnRageComicSelected interface.For now, you’ll just show a toast to verify that the code works. Add the following import below the existing imports so that you can use toasts:
import android.widget.Toast; |
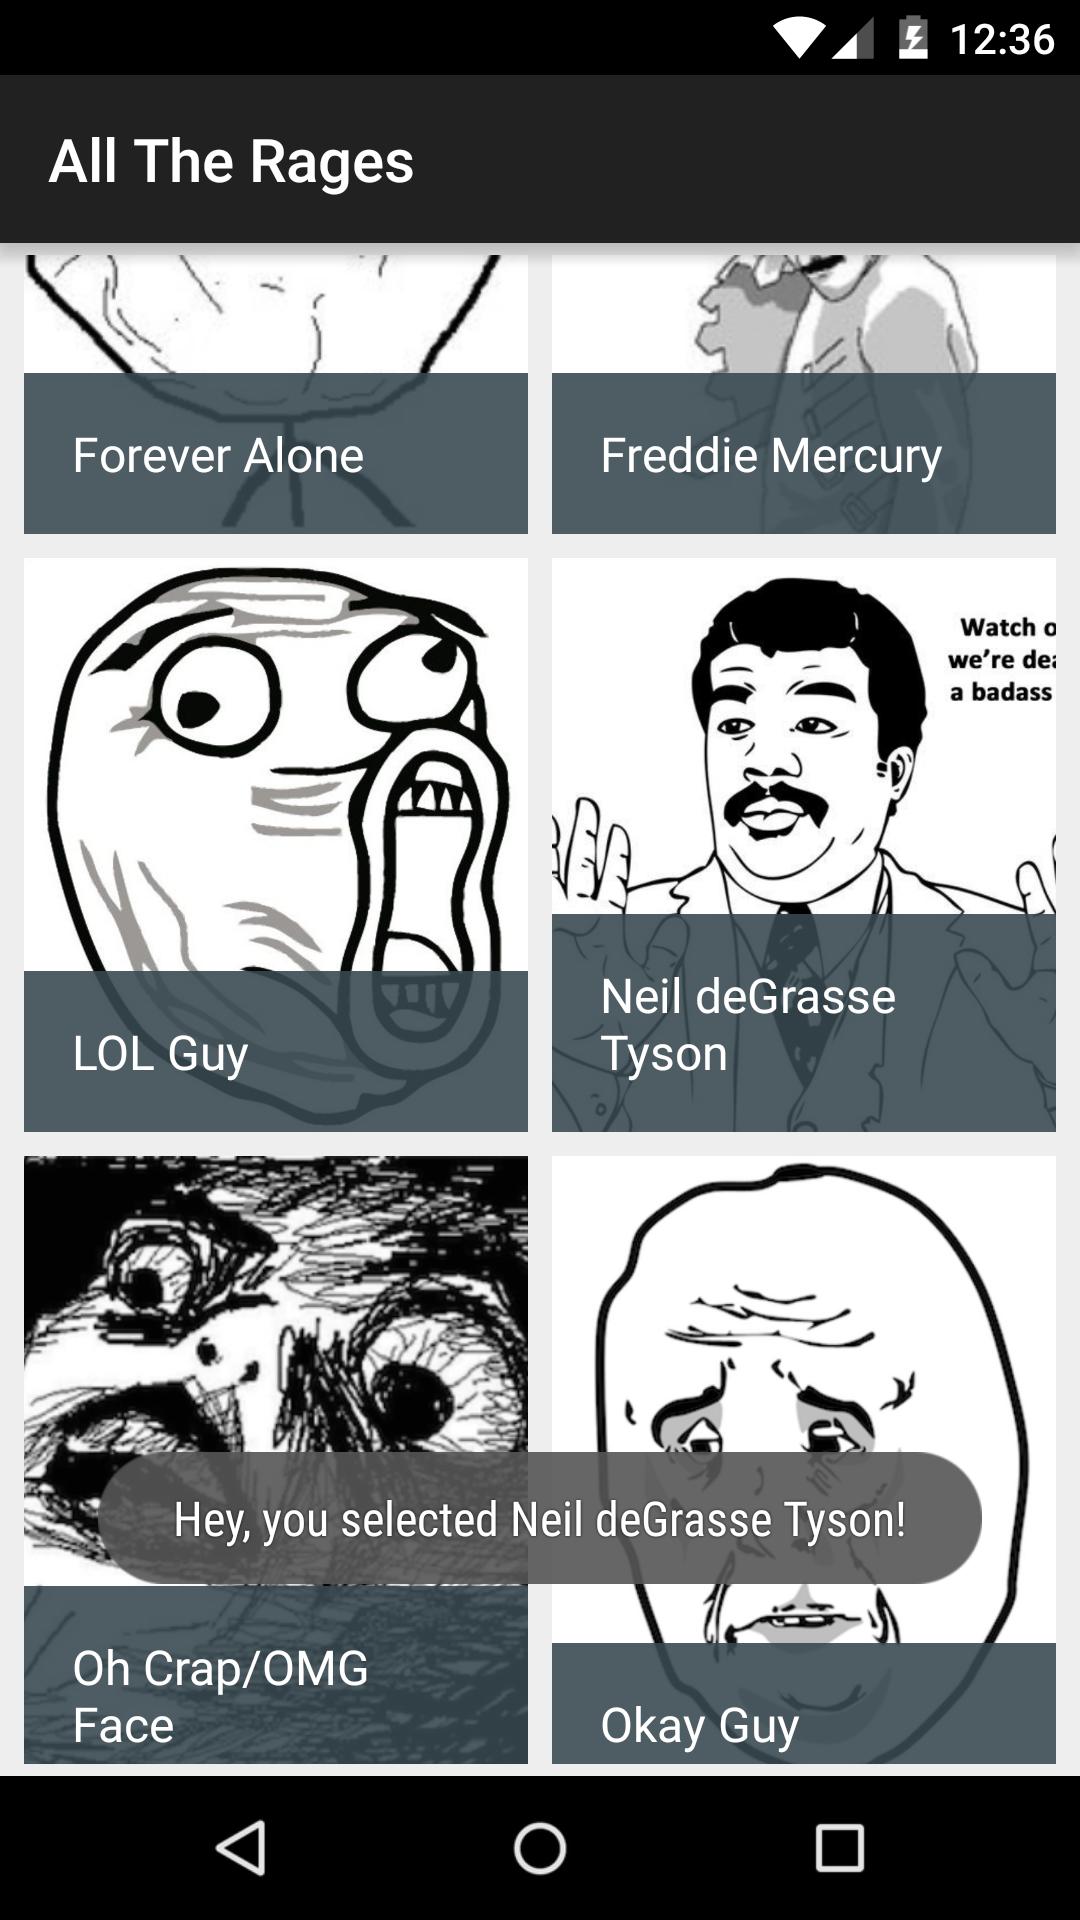
onCreate():@Override public void onRageComicSelected(int imageResId, String name, String description, String url) { Toast.makeText(this, "Hey, you selected " + name + "!", Toast.LENGTH_SHORT).show(); } |
You got the activity and its fragments talking. You’re like a master digital diplomat.
Fragment Arguments and Transactions
Currently,RageComicDetailsFragment displays a static Drawable and set of strings, but you want it to display the user’s selection.Open RageComicDetailsFragment.java and add the following constants at the top of the class definition:
private static final String ARGUMENT_IMAGE_RES_ID = "imageResId"; private static final String ARGUMENT_NAME = "name"; private static final String ARGUMENT_DESCRIPTION = "description"; private static final String ARGUMENT_URL = "url"; |
newInstance() with the code shown below:public static RageComicDetailsFragment newInstance(int imageResId, String name, String description, String url) { final Bundle args = new Bundle(); args.putInt(ARGUMENT_IMAGE_RES_ID, imageResId); args.putString(ARGUMENT_NAME, name); args.putString(ARGUMENT_DESCRIPTION, description); args.putString(ARGUMENT_URL, url); final RageComicDetailsFragment fragment = new RageComicDetailsFragment(); fragment.setArguments(args); return fragment; } |
getArguments() and setArguments(). The arguments are actually a Bundle that stores them as key-value pairs, just like the Bundle in Activity.onSaveInstanceState. You create and populate the arguments’
Bundle, call setArguments, and when you need the values later, you call getArguments to retrieve them.As you learned earlier, when a fragment is re-created, the default empty constructor is used — no parameters for you.
Because the fragment can recall initial parameters from its persisted arguments, you can utilize them in the re-creation. The above code also stores information about the selected Rage Comic in the
RageComicDetailsFragment arguments.Add the following imports to the top of RageComicDetailsFragment.java:
import android.widget.ImageView; import android.widget.TextView; |
@Nullable @Override public View onCreateView(LayoutInflater inflater, ViewGroup container, Bundle savedInstanceState) { final View view = inflater.inflate(R.layout.fragment_rage_comic_details, container, false); final ImageView imageView = (ImageView) view.findViewById(R.id.comic_image); final TextView nameTextView = (TextView) view.findViewById(R.id.name); final TextView descriptionTextView = (TextView) view.findViewById(R.id.description); final Bundle args = getArguments(); imageView.setImageResource(args.getInt(ARGUMENT_IMAGE_RES_ID)); nameTextView.setText(args.getString(ARGUMENT_NAME)); final String text = String.format(getString(R.string.description_format), args.getString (ARGUMENT_DESCRIPTION), args.getString(ARGUMENT_URL)); descriptionTextView.setText(text); return view; } |
RageComicDetailsFragment with the selection, you grab references to the ImageView and TextViews in the fragment view in onCreateView. Then you populate them with the image and text you passed to RageComicDetailsFragment, using them as arguments.Finally, you need to create and display a
RageComicDetailsFragment when a user clicks an item, instead of just showing a dinky little toast. Open MainActivity and replace the logic inside onRageComicSelected with:@Override public void onRageComicSelected(int imageResId, String name, String description, String url) { final RageComicDetailsFragment detailsFragment = RageComicDetailsFragment.newInstance(imageResId, name, description, url); getSupportFragmentManager() .beginTransaction() .replace(R.id.root_layout, detailsFragment, "rageComicDetails") .addToBackStack(null) .commit(); } |
You’ll find that this code is similar to your first transaction that added the list to
MainActivity, but there are some notable differences.- You create a fragment instance that included some nifty parameters.
-
You call
replace(), instead ofadd, which removes the fragment currently in the container and then adds the new Fragment. -
You call another new friend: the
addToBackStack()ofFragmentTransaction. Fragments have a back stack, or history, just like activities.
When you navigate between activities, each one gets placed on the activity back stack. Whenever you commit a
FragmentTransaction, you have the option to add that transaction to the back stack. So what does
addToBackStack() do? It adds the replace()
to the back stack so that when the user hits the device’s back button
it undoes the transaction. In this case, hitting the back button sends
the user back to the full list. The
add() transaction for the list omits calling addToBackStack().
This means that the transaction is part of the same history entry as
the entire activity. If the user hits the back button from the list, it
backs the user out of the app.Guess what? That’s all the code, so build and run.
There won’t be too much difference at first; it’s still the same ol’ list. This time, however, if you click on a Rage Comic, you should see the details for that comic instead of a dinky little toast:

Woo hoo! Your app is now officially All the Rages, and you have a nice understanding of fragments.
Where To Go From Here?
You can download the final project here.There is a lot more to learn and do with fragments. Like any kind of tool or feature, consider whether fragments fit your app’s needs and if they do, try to follow best practices and conventions.
To take your skills to the next level, here are some things to explore:
-
Using fragments within a
ViewPager: many apps, including the Play Store, utilize a swipeable, tabbed content structure viaViewPagers. -
Using a more powerful, advantageous
DialogFragmentinstead of a plain old dialog orAlertDialog. - Playing with how fragments interact with other parts of the activity, like the app bar.
- Creating adaptive UIs with fragments. In fact, you should run through Adaptive UI in Android Tutorial.


0 comments:
Post a Comment
Note: only a member of this blog may post a comment.