 When you make an Android app, it’s pretty likely that the first thing
you’ll do is plot and plan howactivity. These are where all the action happens, because they are the screens that allow the user to interact with your app.
When you make an Android app, it’s pretty likely that the first thing
you’ll do is plot and plan howactivity. These are where all the action happens, because they are the screens that allow the user to interact with your app. you’ll take over the world. Just kidding. Actually, the first thing you do is create an
In short, activities are one of the basic building blocks of an Android application.
In this introduction to Android activities tutorial, you’ll dive into how to work with activities. You’ll work through creating a to-do list app named Forget Me Not and along the way learn:
- The process for creating, starting and stopping an activity and handle navigation between activities.
- The various stages in the lifecycle of an activity and how to handle each stage gracefully.
- The way to manage configuration changes and persist data within your activity.
Getting Started
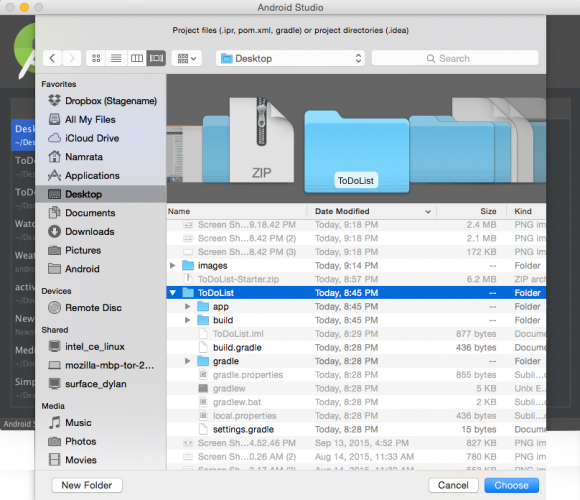
Download the starter project for this tutorial. Open Android Studio, and choose Open an Existing Android Studio Project.
Navigate to where you downloaded the sample project, and click Choose.
Your subject and new best friend for the rest of the tutorial is Forget Me Not, which is a simple app that lets you add and delete tasks from a list. It also displays the current date and time so you’re always on top of your game!
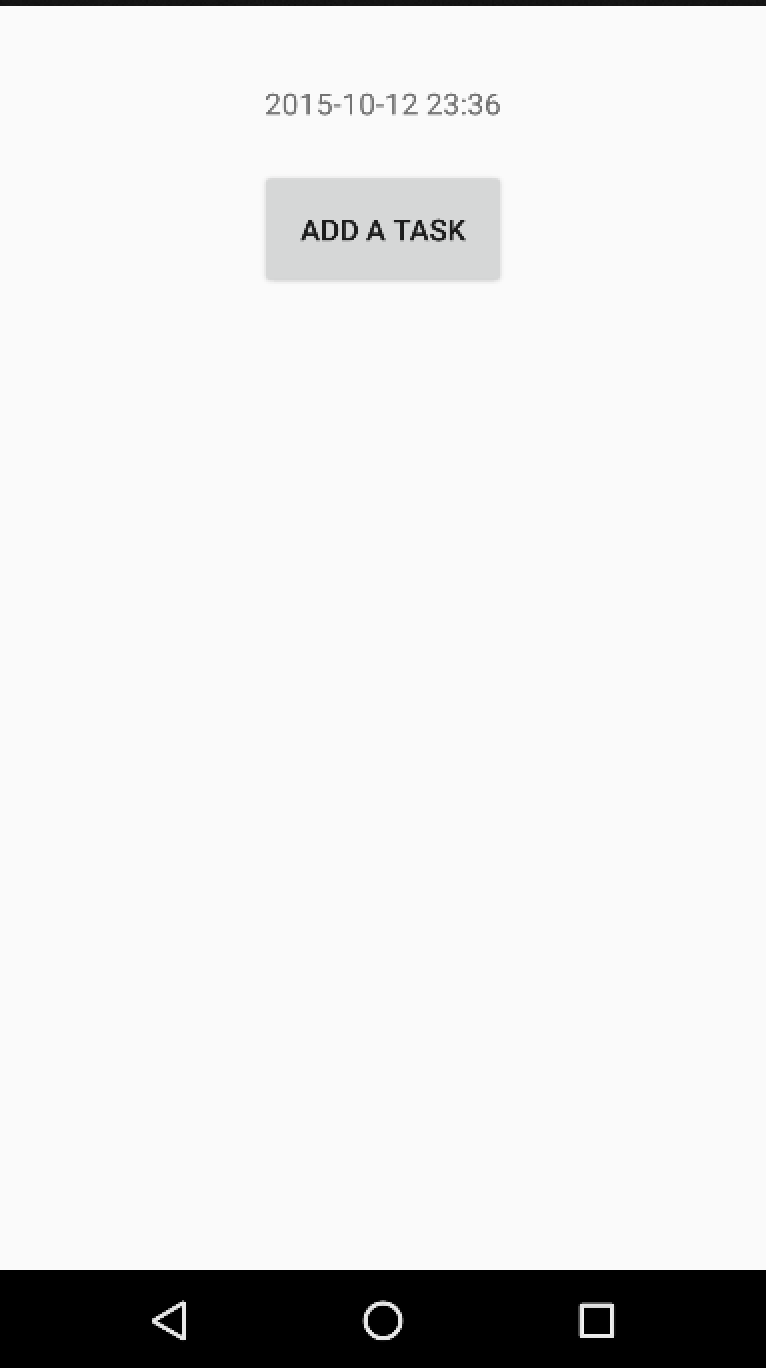
Run the project as it is now and you’ll see a very basic screen:
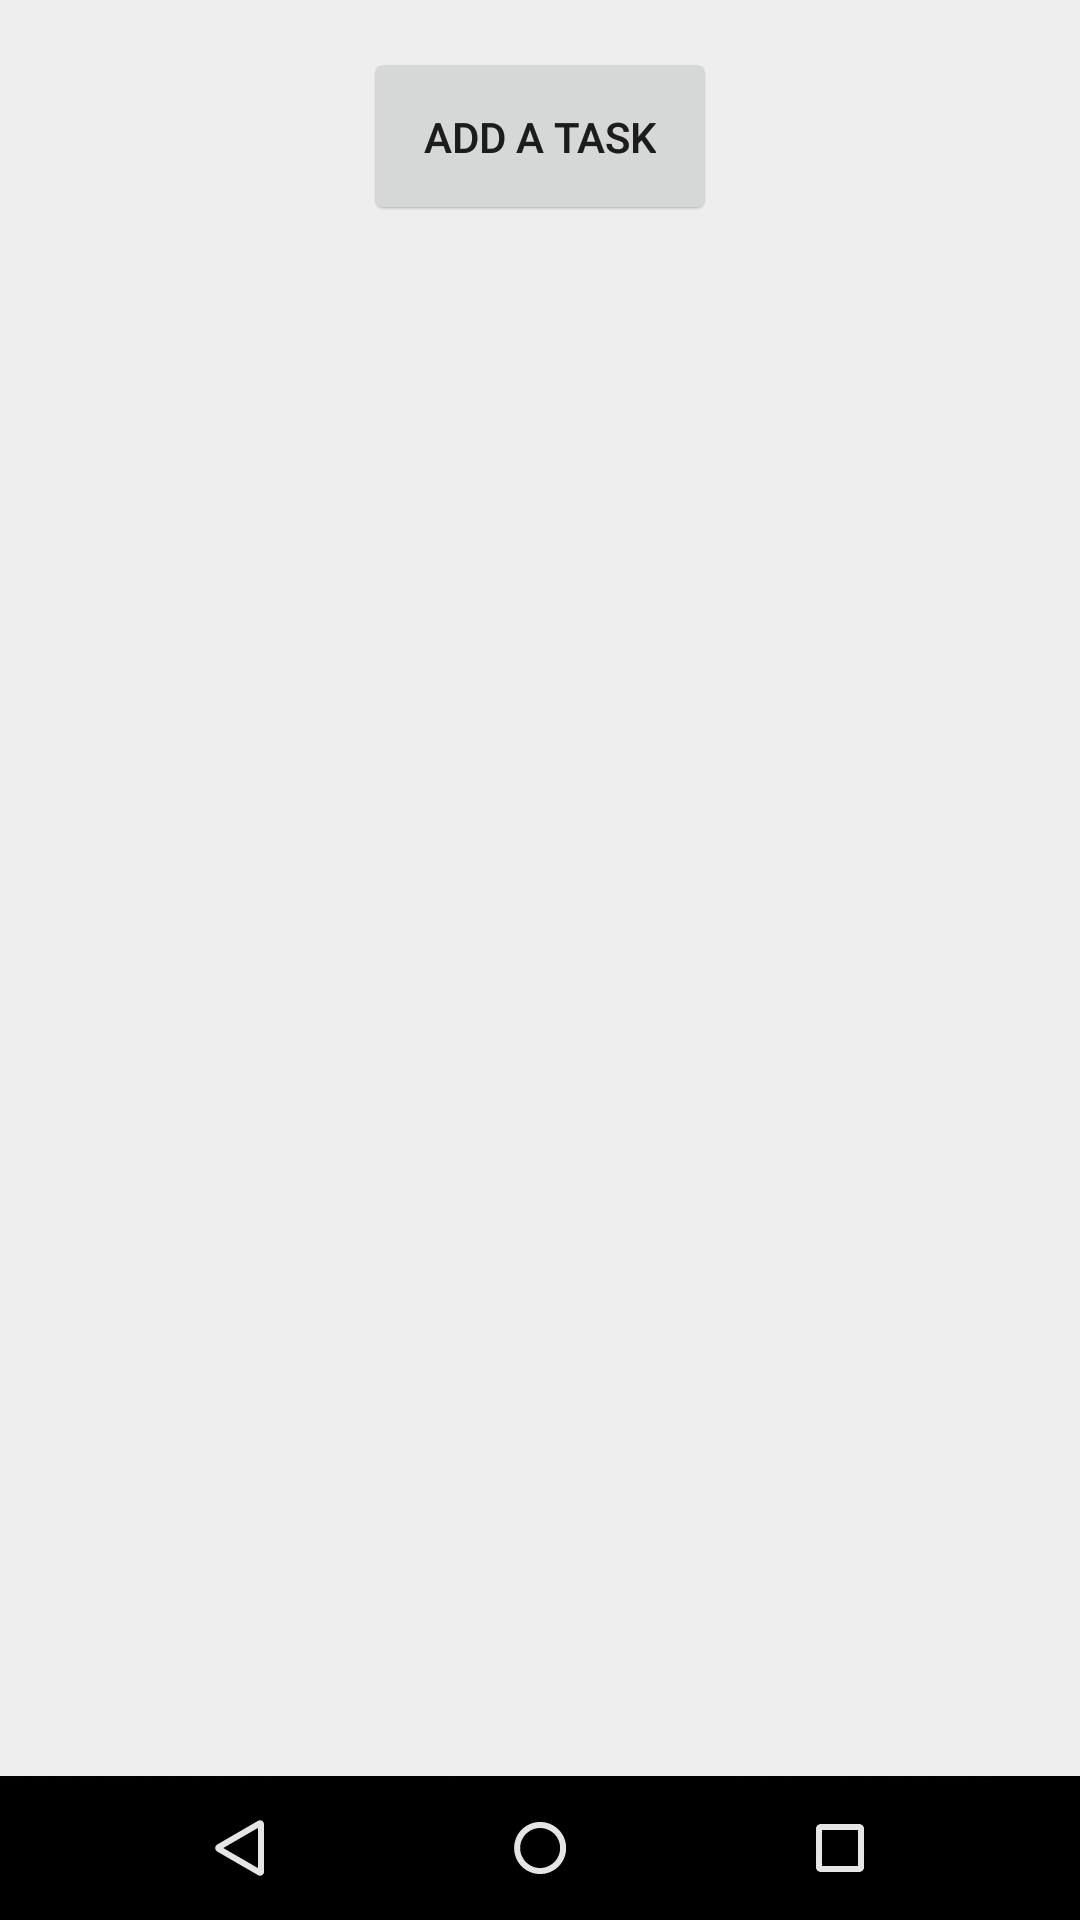
At this point, there isn’t much you can do. Your to-do list is empty and the add a task button does nothing when you tap it. Your task is to make this screen more exciting by making this a modifiable list.
Activity Lifecycle
Before firing up your fingers, indulge yourself in a bit of theory.As mentioned earlier, activities are the foundations upon which you build screens for your app. They encompass multiple components the user can interact with, and it’s likely that your app will have multiple activities to handle the various screens you create.
Having all these activities doing different things makes it sound like developing an Android app is a complicated undertaking.
Fortunately, Android handles this with specific callback methods that initiate code only when it’s needed. This system is known as the activity lifecycle.
Handling the various lifecycle stages of your activities is crucial to creating a robust and reliable app. The lifecycle of an activity is best illustrated as a step pyramid of different stages linked by the core callback methods:
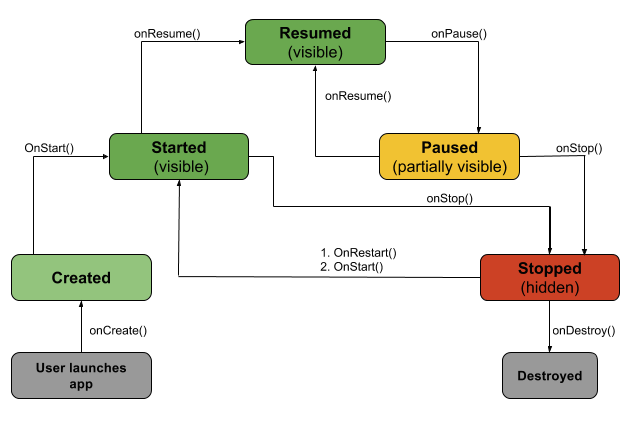
Following the diagram above, you can picture the lifecycle in action as it courses through your code. Take a closer look at each of the callbacks:
- onCreate(): When you first create an activity, you also
call this method. This also where you initialize any UI elements or data
objects. You also have the
savedInstanceStateof the activity that contains its previously saved state, and you can use it to recreate that state. - onStart(): Just before presenting the user with an activity, this method is called. It’s always followed by
onResume()and very rarely byonStop(). In here, you generally should start UI animations, audio based content or anything else that requires the activity’s contents to be on screen. - onResume(): Before bringing an activity back to the
foreground, you call this method. Here you have a good place to restart
animations, update UI elements, restart camera previews, resume
audio/video playback or initialize any components that you release
during
onPause(). - onPause(): Before sliding into the background, this method
is called. Here you should stop any visuals or audio associated with the
activity such as UI animations, music playback or the camera. This
method is followed by
onResume()if the activity returns to the foreground or byonStop()if it becomes hidden. - onStop(): You call this method right after
onPause(), but before the activity goes into the background, and it’s a good place to save data that you want to commit to the disk. It’s followed by eitheronRestart(), if this activity is coming back to the foreground, oronDestroy()if it’s being released from memory. - onRestart(): After stopping an activity, but just before starting it again, you call this method. It’s always followed by
onStart(). - onDestroy(): This is the final callback you’ll receive from the system before the activity is destroyed. A call to
finish()is one way to destroy the activity, or it can be triggered by the system when it needs to recoup memory. If your activity includes any background threads or other long-running resources, destruction could lead to a memory leak if they’re not released, so you need to remember stop these processes here as well.
Creating an Activity
Keeping the activity lifecycle in mind, take a look at an activity in the sample project. Open MainActivity, you’ll see thatonCreate looks like this:@Override protected void onCreate(Bundle savedInstanceState) { // 1 super.onCreate(savedInstanceState); // 2 getWindow().setFlags(WindowManager.LayoutParams.FLAG_FULLSCREEN, WindowManager.LayoutParams.FLAG_FULLSCREEN); // 3 setContentView(R.layout.activity_main); // 4 mDateTimeTextView = (TextView) findViewById(R.id.dateTi |

- You call
onCreate()on the superclass; remember that this is always the first thing you should do in a callback method. - You tell the
WindowManagerto make your activity’s window full screen. - You set the content view of your activity with the corresponding layout file resource.
- Here you initialize all the UI and data variables. In this case, you’re using a
TextViewto show the current date and time, abuttonto add tasks to your list, aListViewto display your list, and anArrayListto hold your data. You can find the implementation of all these UI elements in the activity_main.xml file. - Here you initialize and set the
Adapterthat will handle the data for yourListView. - You set an
OnItemClickListener()for theListViewto capture the user’s tap on individual list entries.
Starting an Activity
In its current stat, the app is a fairly useless lump of ones and zeros because you can’t add anything to the to-do list. You have the power to change that, and that’s exactly what you’ll do next.In the MainActivity file you have open, add a field to the top of the class:
private final int ADD_TASK_REQUEST = 1; |
int value to ADD_TASK_REQUEST. If it returns the value you entered on the request, you can assume your request was handled successfully. More on this later. Then add the following implementation for
addTaskClicked:Intent intent = new Intent(MainActivity.this, TaskDescriptionActivity.class); startActivityForResult(intent, ADD_TASK_REQUEST); |
addTaskClicked. Here you create an Intent to launch the TaskDescriptionActivity from MainActivity. It needs to produce a result from TaskDescriptionActivity, because the app needs to know if there is a new task to add to your list or not. To accomplish this, you start the activity using
startActivityForResult(...).
Note: In situations where a result is not a requirement, calling
When the startActivity(...) will suffice.TaskDescriptionActivity finishes, it returns a result in an intent to the onActivityResult(...) method. Implement this callback to receive the result by adding the following method to the bottom of MainActivity: All appears to be well and good, but is it really?
Not quite. Forget Me Not needs to be able to move to another activity and extract task descriptions from it, so the next thing you’ll do is make one.
Creating an Activity
Android Studio makes it very easy to create an activity. All you need do is right-click on the package where you want to add the activity; in this case, the package is com.raywenderlich.todolist). Then navigate to New\Activity, and the choose Empty Activity, which is a basic template for an activity.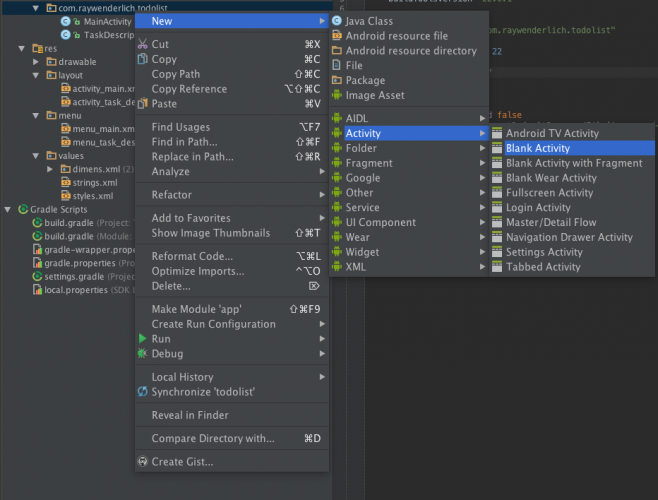
On the next screen, you enter the Activity Name and Android Studio will automatically fill the other fields based on that. Enter the activity name as
TaskDescriptionActivityClick Finish and put your hands in the air to celebrate. You’ve just created your first activity!
Android Studio will automatically generate the corresponding resources needed to create the activity. These are:
- Class: The class file is named TaskDescriptionActivity.java and located in your Java package. This is where you implement the activity’s behavior. This class must subclass the Activity class or an existing subclass of it.
- Layout: The layout file is located under res/layout and named activity_task_description.xml. It defines the placement of different UI elements on the screen when the activity is created.
<activity <activity android:name=".TaskDescriptionActivity" > </activity> |
activity element declares the activity. Android apps
have a strong sense of order, so all available activities must be
declared in the manifest to ensure the app only has control of
activities declared here. You don’t want your app to accidentally use the wrong activity, or even worse, have it use activities that are used by other apps without explicit permission.
There are several attributes that you can include in this element to define properties for the activity, such as a label or icon, or a theme to style the activity’s UI.
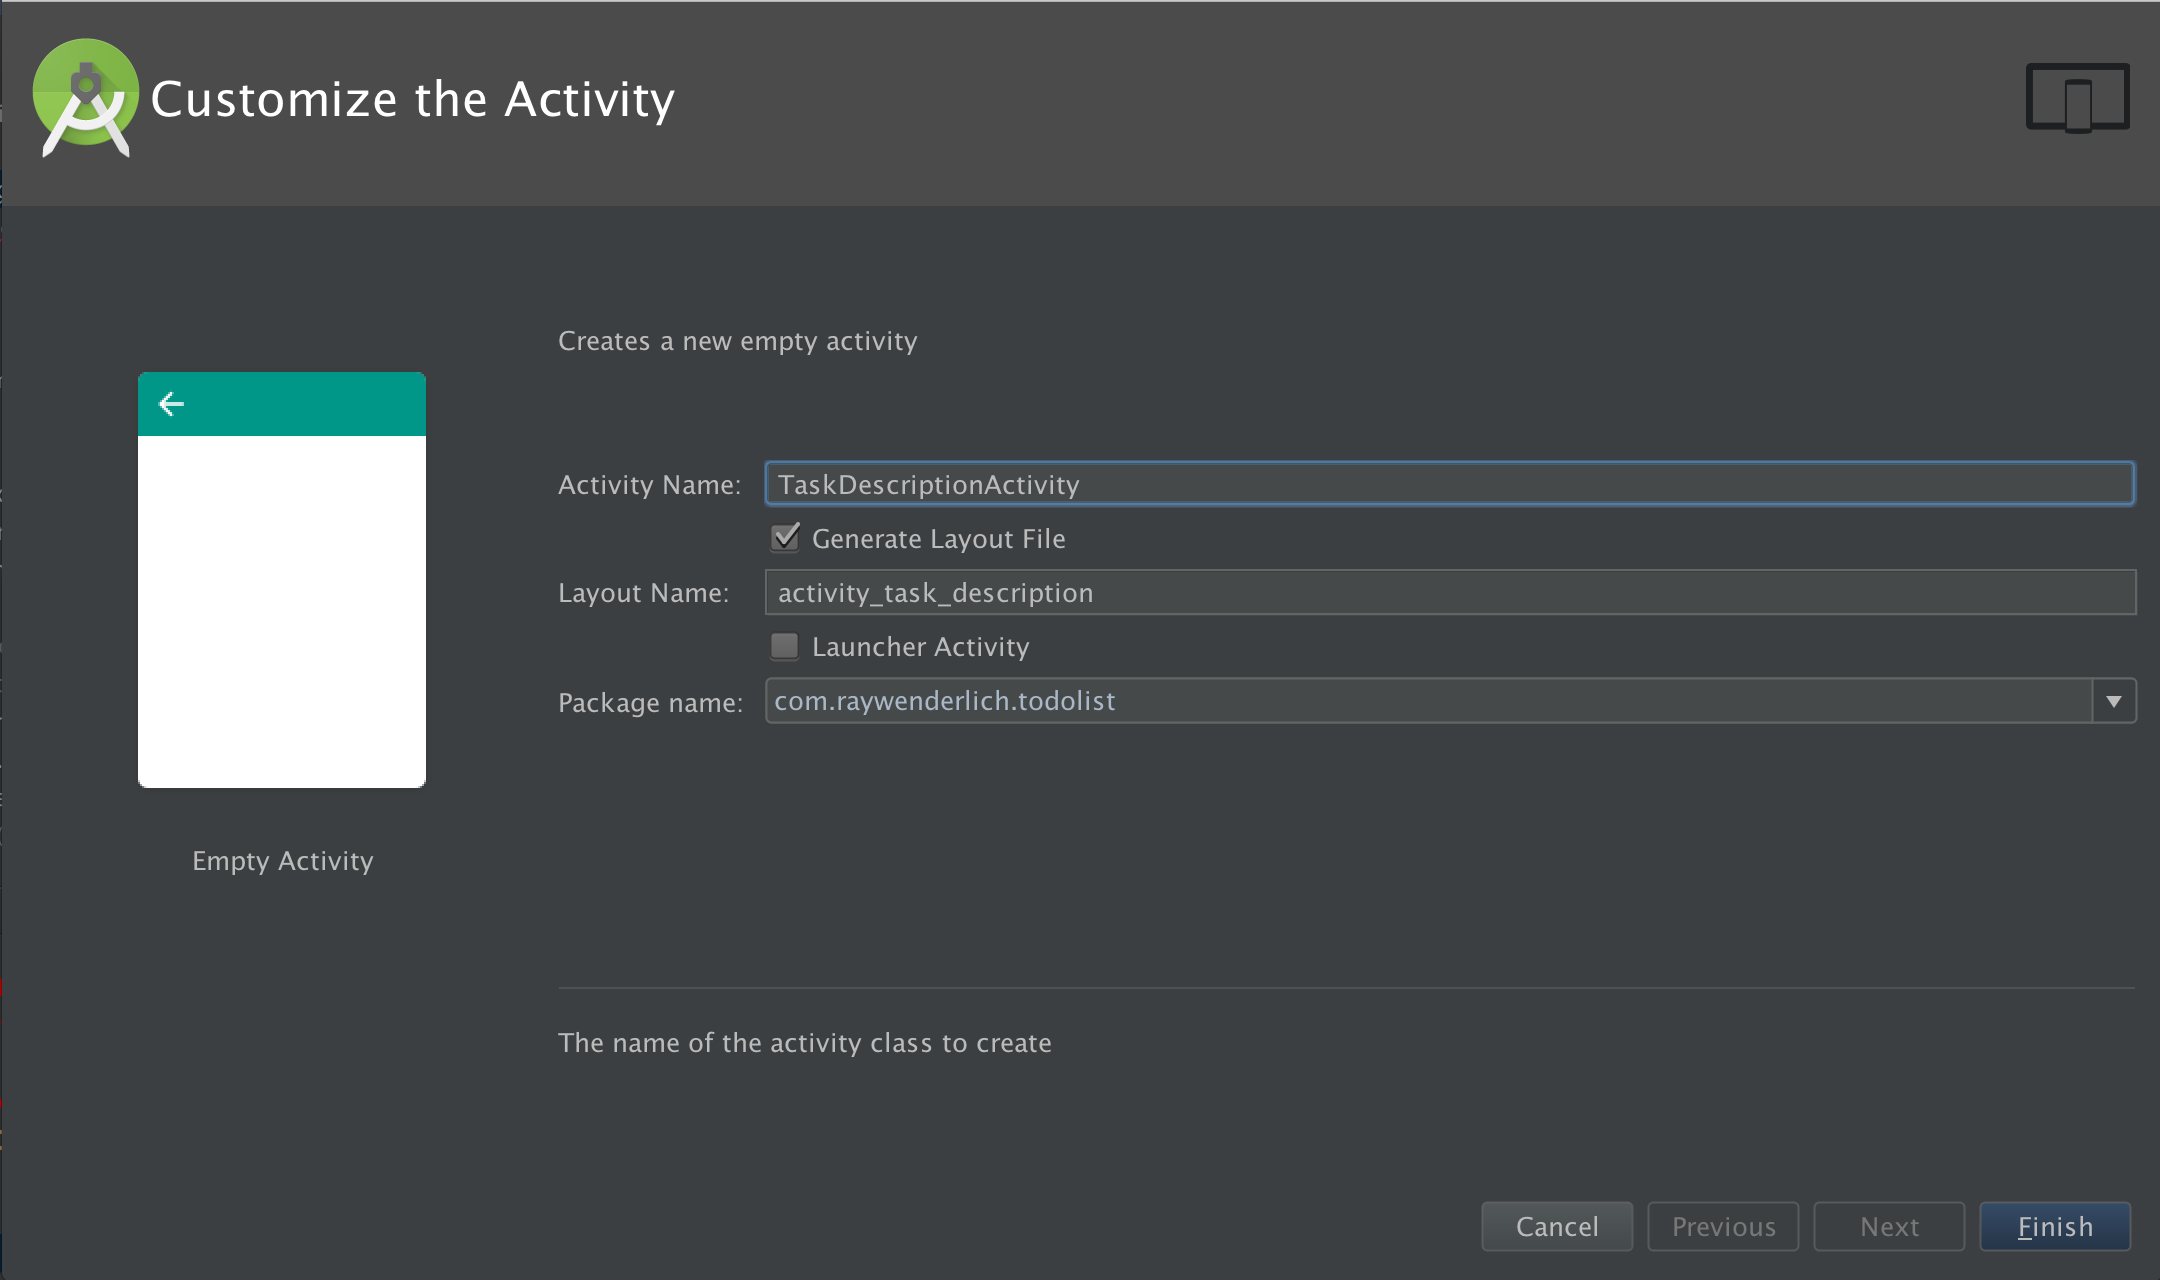
android:name is the only required attribute. It specifies the activity’s class name. Now build and run the app. When you tap on Add a Task, you’re presented with your newly generated new activity!

Looking good, except for the fact that it’s lacking substance. Now for a quick remedy to that!
In your newly generated TaskDescriptionActivity, paste the following into your class file, overwriting anything else except the class declaration and its brackets.
public static final String EXTRA_TASK_DESCRIPTION = "task"; private EditText mDescriptionView; @Override protected void onCreate(Bundle savedInstanceState) { super.onCreate(savedInstanceState); setContentView(R.layout.activity_task_description); mDescriptionView = (EditText) findViewById(R.id.descriptionText); } public void doneClicked(View view) { } |
<RelativeLayout xmlns:android="http://schemas.android.com/apk/res/android" xmlns:tools="http://schemas.android.com/tools" android:layout_width="match_parent" android:layout_height="match_parent" android:paddingBottom="@dimen/activity_vertical_margin" android:paddingLeft="@dimen/activity_horizontal_margin" android:paddingRight="@dimen/activity_horizontal_margin" android:paddingTop="@dimen/activity_vertical_margin" tools:context="com.raywenderlich.todolist.TaskDescriptionActivity"> <TextView android:id="@+id/descriptionLabel" android:text="@string/description" android:layout_width="wrap_content" android:layout_height="wrap_content" android:layout_alignParentTop="true" android:padding="20dp"/> <EditText android:id="@+id/descriptionText" android:layout_width="match_parent" android:layout_height="100dp" android:padding="20dp" android:layout_below="@+id/descriptionLabel"/> <Button android:id="@+id/doneBtn" android:text="@string/done" android:layout_width="wrap_content" android:layout_height="wrap_content" android:layout_below="@+id/descriptionText" android:padding="20dp" android:onClick="doneClicked"/> </RelativeLayout> |
Stopping an Activity
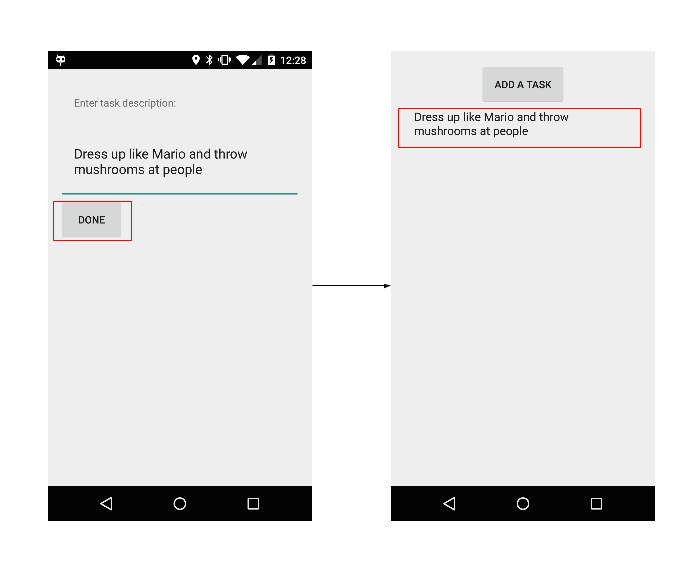
Just as important as starting an activity with all the right methods is properly stopping it.In
TaskDescriptionActivity, add the following to doneClicked, which is called when the Done button is clicked on this screen:// 1 String taskDescription = mDescriptionView.getText().toString(); if (!taskDescription.isEmpty()) { // 2 Intent result = new Intent(); result.putExtra(EXTRA_TASK_DESCRIPTION, taskDescription); setResult(RESULT_OK, result); } else { // 3 setResult(RESULT_CANCELED); } // 4 finish(); |
- You retrieve the task description from the
TextView. - You create a result intent to pass back to
MainActivityif the task description retrieved in step one is not empty. Then you bundle the task description with the intent and set the result toRESULT_OK, indicating that the user successfully entered a task. - You set the result to
RESULT_CANCELED, indicating there was no task entered by the user if the task description retrieved in step one is empty. - Here you close the activity.
finish() in step four, the callback onActivityResult(...) needs to be executed in MainActivity; in turn, it adds the task to the list.To do that you need to add the following method to the bottom of
MainActivity.@Override protected void onActivityResult(int requestCode, int resultCode, Intent data) { // 1 - Check which request you're responding to if (requestCode == ADD_TASK_REQUEST) { // 2 - Make sure the request was successful if (resultCode == RESULT_OK) { // 3 - The user entered a task. Add a task to the list. String task = data.getStringExtra(TaskDescriptionActivity.EXTRA_TASK_DESCRIPTION); mList.add(task); // 4 mAdapter.notifyDataSetChanged(); } } } |
- You check the
requestCodeto ensure the returned result is indeed for your add task request you started withTaskDescriptionActivity. - You make sure the
resultCodeisRESULT_OK— the standard activity result for a successful operation. - Here you extract the task description from the result intent and add it to your list.
- Finally, you call
notifyDataSetChanged()on your list adapter. In turn, it notifies thelistViewabout changes in your data model so it can trigger a refresh of its view.
Implementing Callbacks
Every to-do list needs to have a good grasp on date and time, so they should be the next thing you add to your app. OpenMainActivity and add the following after the existing member variable declarations at the top:private BroadcastReceiver mTickReceiver; |
BroadcastReceiver by adding the following to the bottom of onCreate():mTickReceiver = new BroadcastReceiver() { @Override public void onReceive(Context context, Intent intent) { if (intent.getAction().equals(Intent.ACTION_TIME_TICK)) { mDateTimeTextView.setText(getCurrentTimeStamp()); } } }; |
BroadcastReceiver that sets the date and time on the screen if it receives a time change broadcast from the system. You use getCurrentTimeStamp(), which is a utility method in your activity, to return the current date and time.
Note: If you’re not familiar with
Next add the following methods to BroadcastReceivers, you should refer to the Android Developer documentation.MainActivity underneath onCreate()@Override protected void onResume() { // 1 super.onResume(); // 2 mDateTimeTextView.setText(getCurrentTimeStamp()); // 3 registerReceiver(mTickReceiver, new IntentFilter(Intent.ACTION_TIME_TICK)); } @Override protected void onPause() { // 4 super.onPause(); // 5 if (mTickReceiver != null) { try { unregisterReceiver(mTickReceiver); } catch (IllegalArgumentException e) { Log.e(TAG, "Timetick Receiver not registered", e); } } } |
- You call
onResume()on the superclass. - You set the date and time
TextViewwith the current value. - You register the broadcast receiver in
onResume(). This ensures it will receive the broadcasts for ACTION_TIME_TICK. These are sent every minute after the time changes. - You call
onPause()on the superclass. - You unregister the broadcast receiver in
onPause(), so the app no longer receives the time change broadcasts. This cuts down unnecessary system overhead.
Persisting State
Every to-do list is good at remembering what you need to do, except for your friend Forget Me Not. Unfortunately, the app is quite forgetful at the moment. See it for yourself.Open the app and follow these steps.
- Press Add a Task.
- Enter “Replace regular with decaf in the breakroom” as the task description and press Done. You’ll see your new task in the list.
- Close the app from the recent apps.
- Open the app again.
Persisting Data Between Launches
OpenMainActivity, and add the following variables to the top of the class:And add the following underneath the rest of your activity lifecycle methods.
@Override protected void onStop() { super.onStop(); // Save all data which you want to persist. StringBuilder savedList = new StringBuilder(); for (String s : mList) { savedList.append(s); savedList.append(","); } getSharedPreferences(PREFS_TASKS, MODE_PRIVATE).edit() .putString(KEY_TASKS_LIST, savedList.toString()).commit(); } |
onStop() callback. As mentioned earlier, implementing this should be a best practice because it commits any unsaved changes.Add the following to
onCreate() below the existing mList initialization code:String savedList = getSharedPreferences(PREFS_TASKS, MODE_PRIVATE).getString(KEY_TASKS_LIST, null); if (savedList != null) { String[] items = savedList.split(","); mList = new ArrayList<String>(Arrays.asList(items)); } |
SharedPreferences and initialize mList by converting the retrieved comma separated string to an ArrayList.
Note: Here you used
Now, build and run the app. Add a task, close and reopen the app. Do
you see a difference? You are now able to retain tasks in your list!SharedPreferences since you were only saving primitive data types. For more complex data you can use a variety of storage options available on Android.
Configuration Changes
You need the ability to delete entries from Forget Me Not.Open
MainActivity, and at the bottom of the class add:private void taskSelected(final int position) { // 1 AlertDialog.Builder alertDialogBuilder = new AlertDialog.Builder(MainActivity.this); // 2 alertDialogBuilder.setTitle(R.string.alert_title); // 3 alertDialogBuilder .setMessage(mList.get(position)) .setPositiveButton(R.string.delete, new DialogInterface.OnClickListener() { public void onClick(DialogInterface dialog, int id) { mList.remove(position); mAdapter.notifyDataSetChanged(); } }) .setNegativeButton(R.string.cancel, new DialogInterface.OnClickListener() { public void onClick(DialogInterface dialog, int id) { dialog.cancel(); } }); // 4 AlertDialog alertDialog = alertDialogBuilder.create(); // 5 alertDialog.show(); } |
- You create an
AlertDialog.Builderwhich facilitates the creation of anAlertDialog. - You set the alert dialog title.
- You set the alert dialog message to be the description of the selected task.Then you also implement the
PositiveButtonto remove the item from the list and refresh it, and theNegativeButtonto dismiss the dialog. - You create the alert dialog from the
AlertDialog.Builderobject. - You display the alert dialog to the user.
onItemClick(...) in the OnItemClickListener of the listView in onCreate().taskSelected(i); |
To do this open values/strings.xml and within the
resources element add:<string name="alert_title">Task</string> <string name="delete">Delete</string> <string name="cancel">Cancel</string> |
CANCEL or DELETE the task from the list:
Open the app and tap on a task to trigger the alert dialog. Now rotate the device, and make sure you have rotation in the device settings set to auto-rotate.
As soon as you rotate the device, the alert dialog is dismissed. This makes for an unreliable, undesirable user experience. Users don’t like it when things just vanish from their screen without reason, so you need to make it so the user must explicitly dismiss the dialog.
Handling Configuration Changes
Configuration changes, such as rotation, keyboard visibility and so on, cause an activity to shut down and restart. You can find the full list of system events that cause an activity to be recreated here.There are a couple of ways you can handle a configuration change.
One way is to add the following line to the AndroidManifest.xml, just below MainActivity’s
android:name in the activity element. It should now look like this:android:configChanges="orientation|screenSize"> |
MainActivity will handle any
configuration changes that arise from a change in orientation or screen
size. This simple line prevents a restart of your activity by the
system, and it passes the work to MainActivity. There’s one more place to modify the code so the app will handle the configuration change in
MainActivity. Add the following method at the bottom of the class:@Override public void onConfigurationChanged(Configuration newConfig) { super.onConfigurationChanged(newConfig); } |
onConfigurationChanged() method since you’re not updating or resetting any elements based on screen rotation. onConfigurationChanged() is passed into a configuration object that contains the updated device configuration. You can determine the new configuration and make appropriate changes to update the resources used in your interface by reading fields in the
configuration. Now, build and run the app. Follow steps 1-2 described above again. This time, that dialog stays in place until you dismiss it.

An alternative way to handle configuration changes is to retain a stateful object that’s carried forward to the recreated instance of your activity. You can accomplish this by implementing the
onSaveInstanceState() callback. When you do this, the system saves your activity’s state in a
bundle, and you can restore it when you initiate the corresponding onRestoreInstanceState() callback. However, the bundle is not designed to hold large data sets such as bitmaps, and it can only store data that is serializable. The downside of the stateful object solution is that serializing and deserializing the data during a configuration change can come at a high cost. It can consume a lot of memory and slow down the activity restart process.
In such instances, retaining a
fragment is currently the most preferable way to handle a configuration change. You can learn more about fragments and how to use them to retain information when your activity is restarted in our Android Fragments Tutorial .Where To Go From Here?
Congratulations! You have just learned the basics of using activities in Android and now have an excellent understanding of the ever-important activity lifestyle.You covered quite a few concepts, including:
- How to create an activity
- How to stop an activity
- How to persist data when an activity stops
- How to work around a configuration changes

You can download the completed project here. If you’re still hungry for more, check out Google’s documentation.
I hope you enjoyed this introduction to Android activities tutorial, and if you have any questions, comments or awesome modifications to this project app please join the forum discussion and comment below!


0 comments:
Post a Comment
Note: only a member of this blog may post a comment.