 Android runs on a wide variety of devices that offer different screen
sizes and densities. Since the
Android runs on a wide variety of devices that offer different screen
sizes and densities. Since theearly days of the Android platform, system APIs have provided very powerful abstractions to design responsive UIs, which are also known as adaptive layouts.
This adaptive UI in Android tutorial will show you how to build apps that work across different devices by dealing with the fragmentation in the Android device market. You’ll learn about:
- Configuration qualifiers
- Alternative layouts and drawables
- And layout previews in Android Studio — an immensely useful tool
Getting Started
Open Android Studio and select Start a new Android Studio project: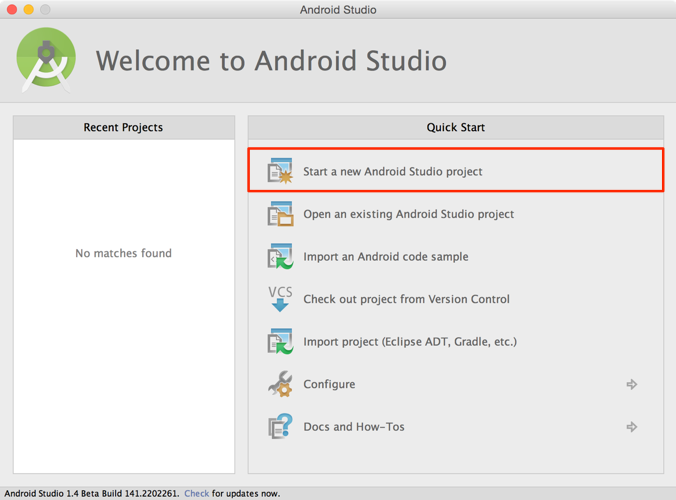
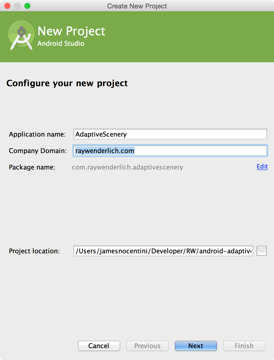
Set the application name to AdaptiveScenery and the company domain to raywenderlich.com, then click Next:
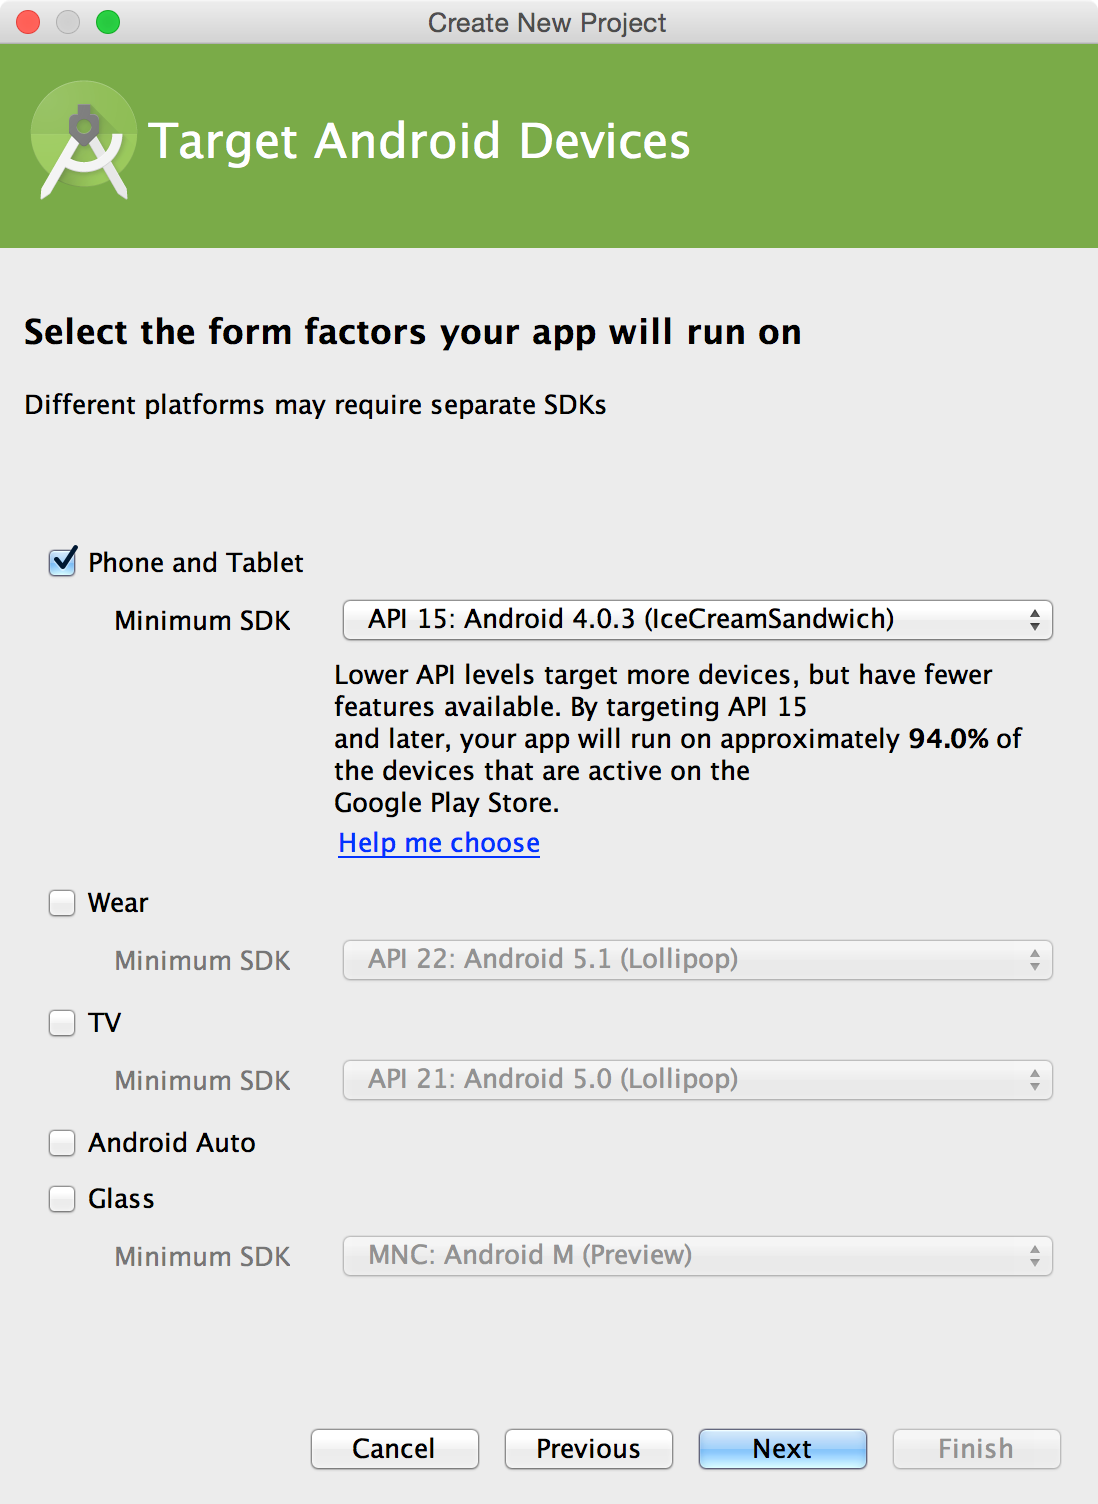
Select the Phone and Tablet target and set the Minimum SDK to 15, then click Next:
Pick the Blank Activity template and keep the default Activity Name set to MainActivity.
Once the project opens, add the following dependency to the build.gradle file of the app module like so:
dependencies { ... compile 'com.google.android.gms:play-services:7.8.0' } |
compile 'com.android.support:design:23.1.0'
|
Note: The Android platform is constantly updated and the
version numbers may have increased since we published this tutorial. You
can find details of the different versions, including the most recent
on the support library pages on the Android developer site.
Here you’re simply declaring the dependencies that you’ll use throughout this tutorial:- Google Services: This will display the location where the picture was taken on a map.
- Android Support Design Library: Available as part of the Android M release, it provides UI widgets that conform to material design specifications. For this tutorial, you’ll use the TabLayout widget.
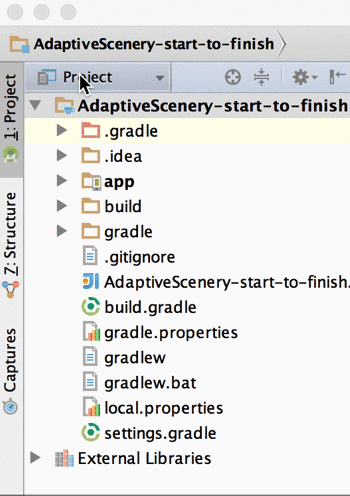
Note: During this tutorial, you’ll often switch between the Android and Project modes in the project navigator. Generally speaking:
- Android mode is the default when working within Android Studio because it provides a clean and simple file structure.
- Project mode is also necessary for building alternative layouts.
Working with Google Maps SDK
Okay, so you remember how you just added Google Services as a dependency? Well, there’s a little more to making the maps work; to use the Google Maps SDK in your application, you must add permissions and an API key.Open AndroidManifest.xml, and add the permissions right inside the manifest tag:
<uses-permission android:name="android.permission.INTERNET"/> <uses-permission android:name="android.permission.ACCESS_NETWORK_STATE"/> <uses-permission android:name="android.permission.WRITE_EXTERNAL_STORAGE"/> <uses-permission android:name="com.google.android.providers.gsf.permission.READ_GSERVICES"/> <!-- The following two permissions are not required to use Google Maps Android API v2, but are recommended. --> <uses-permission android:name="android.permission.ACCESS_COARSE_LOCATION"/> <uses-permission android:name="android.permission.ACCESS_FINE_LOCATION"/> |
Note: In order to use the Google Maps SDK, you need to obtain
an API key. The procedure is fairly complex, and changes frequently, but
Google has created some great step-by-step instructions. Before you
continue, jump over to Signup and API Keys
page of the development guide for Google Maps Android API. Follow the
instructions, and once you’ve got your API key then you’re ready to
continue with the tutorial.
Inside the application tag, add the Google Maps API key:<meta-data android:name="com.google.android.gms.version" android:value="@integer/google_play_services_version" /> <meta-data android:name="com.google.android.maps.v2.API_KEY" android:value="_INSERT_YOUR_API_KEY_HERE_" /> |
Building Layouts
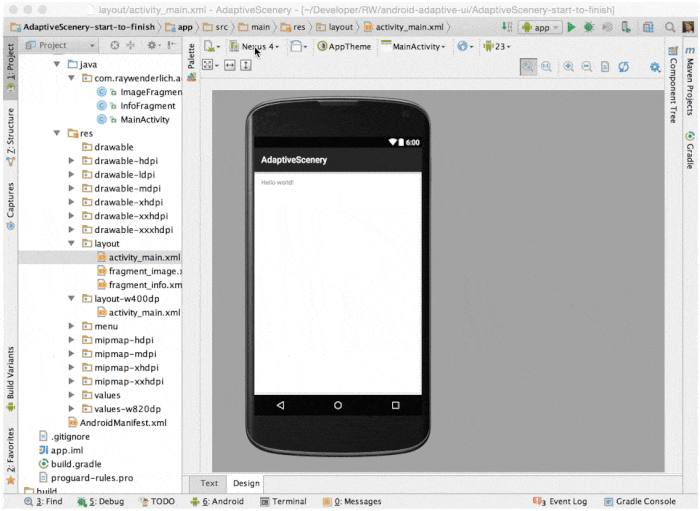
With the dependencies declared, you get to shift your focus to building some layouts!From the project navigator, open res/layout/activity_main.xml and you should see the default XML layout to display the “Hello world!” message as part of the Blank Activity project template.
Switch to the Design tab to preview this layout:

This simple application only contains one screen, which is represented by MainActivity.
An activity comprises a Java class — in this case MainActivity.java — and a layout file. In fact, one activity can have several layouts, as you’ll see shortly. For now, it’s important to remember that the existing layout file, activity_main.xml, is the default layout for smaller screens.
Before you go changing any XML layout files, it’s preferable to have a rough idea of what each layout should look like. You can take the low tech approach and draw them on a piece of paper, or go high tech with your favorite drawing app.
For this application, you’ll design and build three different layouts:

Each dark blue rectangle in those layouts represents a fragment. The functionality and layout within each fragment is not supposed to change, so you’ll have a single layout for each fragment for all devices.
What that means is that you can design your fragments once and use them everywhere; what actually changes across different devices is the relative placement of each fragment within the activity.
Universal Fragments
A best practice to ensure your fragment layouts are free of specific device dimensions is to design them before you create any alternative activity layouts, and that’s what you’re going to do in this section.First, you’ll create the fragment to display the image. Right-click on res/layout and choose New\Layout resource file. Set the File name to fragment_image and the Root element to RelativeLayout:

This RelativeLayout will contain an ImageView soon, but before adding that, you’ll import the image as a drawable.
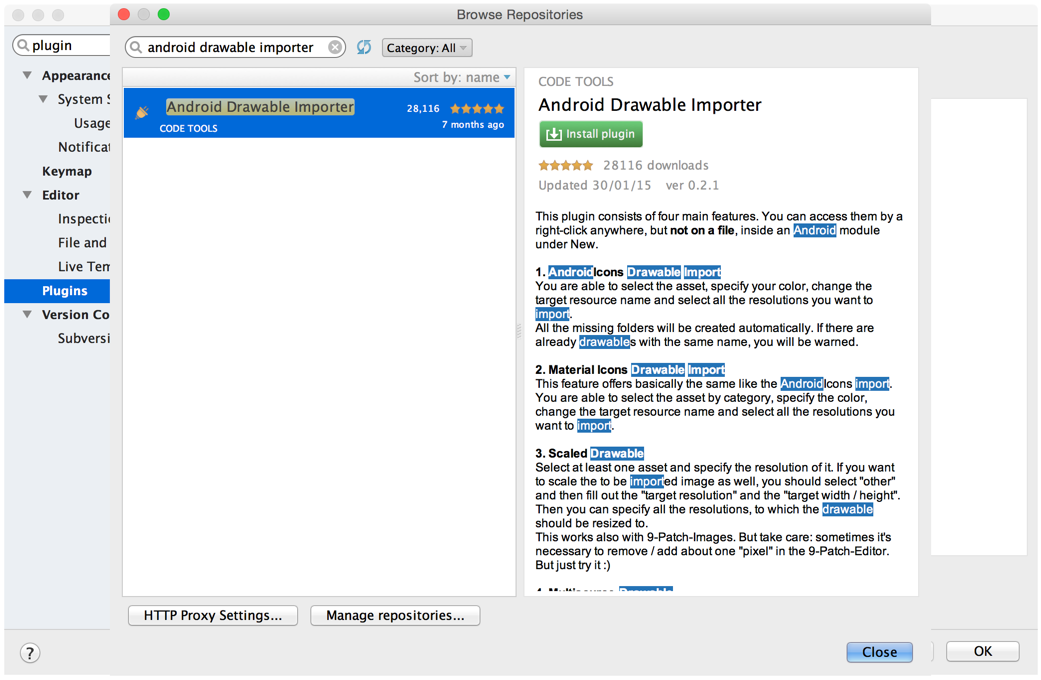
Android devices have different screen densities, and for that reason it’s a good practice to import static images in multiple sizes. The best way to do this is using the Android drawable importer plugin.
Install the plugin by opening the Android Studio preferences.
Select Editor\Plugins and then Browse Repositories. Search for Android Drawable Importer, and click Install Plugin.
You’ll need to restart Android Studio to finish installation.
Download this archive and unzip it. Inside you’ll find an image. Back in Android Studio, right-click on res/drawable and select New\Scaled drawable. Choose the scene.png you just downloaded and click OK:

You’ve now added six images to res/drawable, and each corresponds to the six screen densities categorized by the system:
- ldpi (low)
~120dpi - mdpi (medium)
~160dpi - hdpi (high)
~240dpi - xhdpi (extra-high)
~320dpi - xxhdpi (extra-extra-high)
~480dpi - xxxhdpi (extra-extra-extra-high)
~640dpi
<ImageView android:id="@+id/imageView" android:layout_width="match_parent" android:layout_height="match_parent" android:contentDescription="A photo of the scenery" android:cropToPadding="false" android:scaleType="centerCrop" android:src="@drawable/scene"/> |
- You’re specifying the scene you imported above as drawable by using the android:src XML attribute. Notice the drawable name is generic, so the system will pick the correct drawable according to the screen density of the device you’re running the app on.
- The dimensions of the ImageView may change in a way that doesn’t match with the imported drawable. Hence, you set the scaleType attribute to centerCrop to automatically resize and crop the image in this case.

Inflate the Layout
Next, you’ll create the corresponding Java class to inflate this layout. Right click on app/java/com.raywenderlich.adaptivescenery and select New\Java Class. Set the Name to ImageFragment and make sure it extends the Fragment class (in the android.support.v4.app package):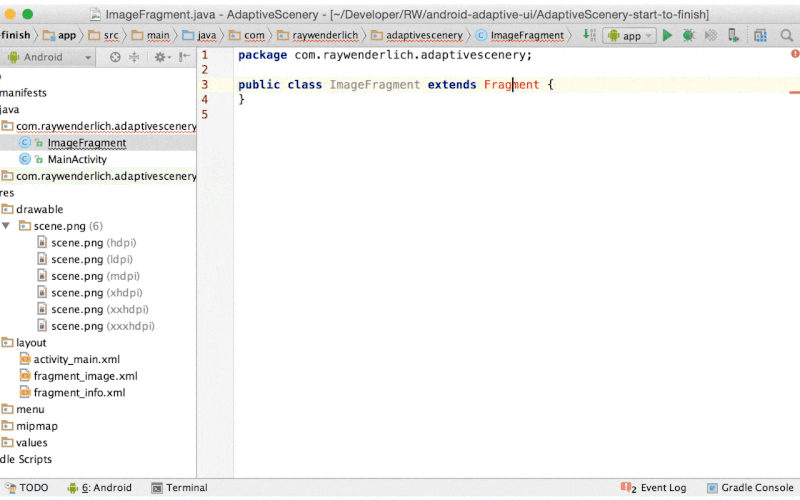
In the file, add the following no-parameter constructor and onCreateView to inflate the layout:
public class ImageFragment extends Fragment { public ImageFragment() { } @Nullable @Override public View onCreateView(LayoutInflater inflater, ViewGroup container, Bundle savedInstanceState) { return inflater.inflate(R.layout.fragment_image, container, false); } } |
Add a Fragment Layout and Class
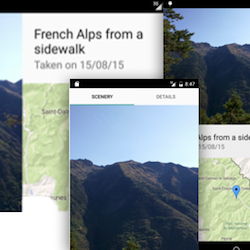
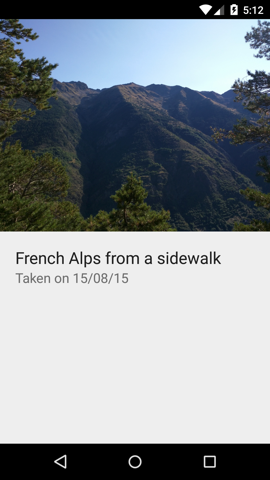
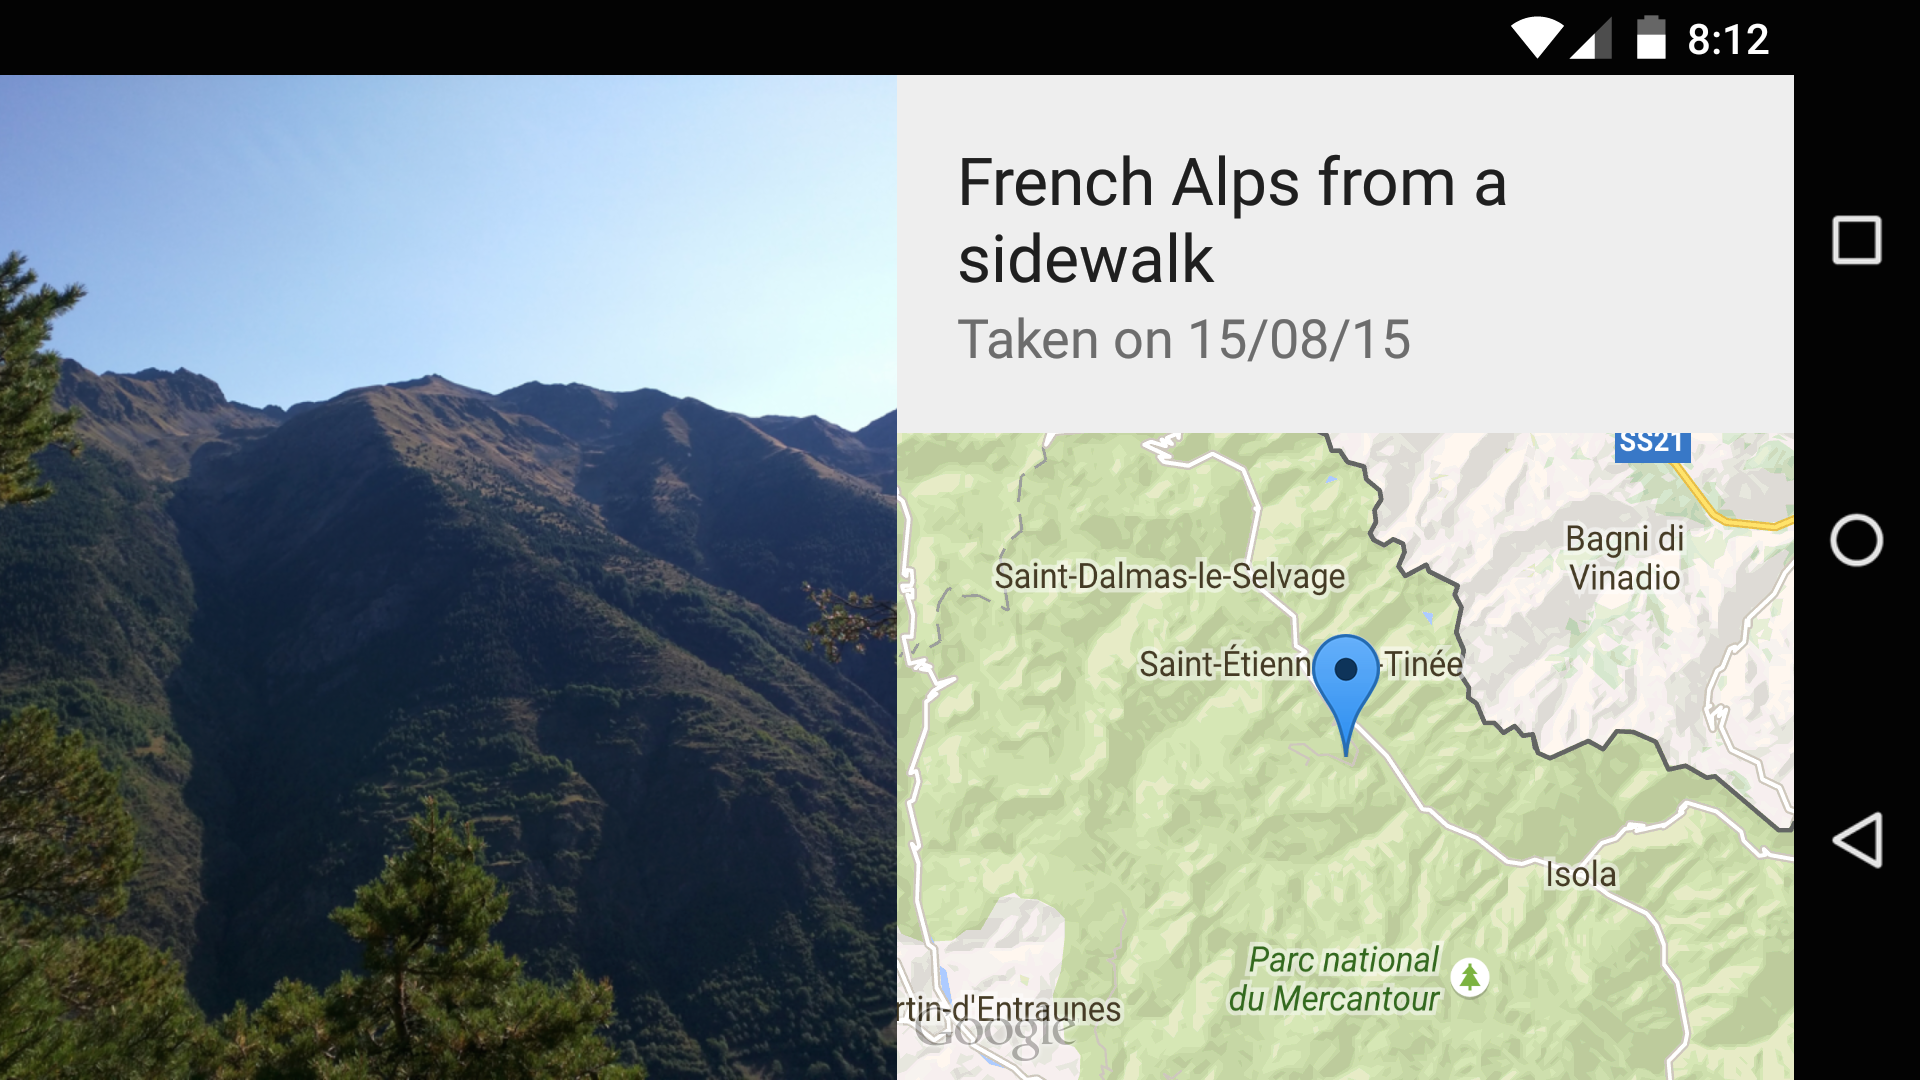
Next, you’ll create the fragment layout and class for the bottom half of the screen. Much like the image fragment, create a new layout calledfragment_info.xml with the following layout:<?xml version="1.0" encoding="utf-8"?> <LinearLayout xmlns:android="http://schemas.android.com/apk/res/android" xmlns:map="http://schemas.android.com/apk/res-auto" android:id="@+id/textContainer" android:layout_width="match_parent" android:layout_height="match_parent" android:layout_alignParentBottom="true" android:layout_centerHorizontal="true" android:layout_weight="1" android:orientation="vertical"> <LinearLayout android:layout_width="match_parent" android:layout_height="wrap_content" android:orientation="vertical" android:padding="20dp" android:paddingLeft="40dp"> <TextView android:id="@+id/textTitleView" android:layout_width="wrap_content" android:layout_height="wrap_content" android:text="French Alps from a sidewalk" android:textAppearance="?android:attr/textAppearanceLarge" /> <TextView android:id="@+id/textDateView" android:layout_width="wrap_content" android:layout_height="wrap_content" android:text="Taken on 15/08/15" android:textAppearance="?android:attr/textAppearanceMedium" /> </LinearLayout> <fragment android:id="@+id/map" android:name="com.google.android.gms.maps.SupportMapFragment" android:layout_width="match_parent" android:layout_height="match_parent" map:cameraTargetLat="44.22438242" map:cameraTargetLng="6.944561" map:cameraZoom="10"/> </LinearLayout> |
- Creating a
LinearLayoutwith a vertical orientation that contains twoTextViewelements (for a title and subtitle) - Adding a Google Map
fragmentelement to display the location of the scenery. The value of the Google Map specific XML attributes (cameraTargetLat,cameraTargetLng,cameraZoom) are hardcoded for this tutorial, but you would probably set them dynamically otherwise.
Add the following to it:
public class InfoFragment extends Fragment { public InfoFragment() { } @Nullable @Override public View onCreateView(LayoutInflater inflater, ViewGroup container, Bundle savedInstanceState) { return inflater.inflate(R.layout.fragment_info, container, false); } } |
onCreateView that returns the inflated layout.At this point, you’ve successfully put all the fragments you’ll need in place. Nicely done!! You’re about halfway through this tutorial, and it’s just going to get more fun from here.
Vertical Layout
Now you have your fragments, the next step is to add them to the activity.The system will pick the correct activity layout for the current device’s screen dimensions. To tell the system which resource to pick for a given dimension, you place the layout resource in a folder named in a particular way. Since Android 3.2 (API level 13), developers have used the swdp configuration qualifier.
Generally, you’d start with the default layout because it’s already in your project. But it’s not a requirement, so you’ll start with the medium layout. :]
Switch to the project mode in the project navigator.
Right-click on app/src/main/res and select New\Android resource directory. Set the Resource type to layout. Add a Screen Width qualifier of 400:

Click OK and you’ll see a second layout folder named layout-w400dp. This tells Android to use the resources in this folder only if the screen width is wider than 400dp.
Right-click on res/layout-sw400dp and select New\layout resource file. Set the File name to activity_main and the Root element to LinearLayout. Add the following fragment definitions right inside the LinearLayout:
<?xml version="1.0" encoding="utf-8"?> <LinearLayout xmlns:android="http://schemas.android.com/apk/res/android" xmlns:tools="http://schemas.android.com/tools" android:layout_width="match_parent" android:layout_height="match_parent" android:orientation="vertical"> <fragment android:id="@+id/imageFragment" android:name="com.updowninteractive.adaptivescenery.ImageFragment" android:layout_width="match_parent" android:layout_height="0dp" android:layout_weight="1" tools:layout="@layout/fragment_image"/> <fragment android:id="@+id/infoFragment" android:name="com.updowninteractive.adaptivescenery.InfoFragment" android:layout_width="match_parent" android:layout_height="0dp" android:layout_weight="1" tools:layout="@layout/fragment_info"/> </LinearLayout> |
- Orientation for the
LinearLayoutis set to vertical - Fragment dimensions: using the
layout_weightXML attribute you’re setting each fragment to take half of the screen height - Previewing fragments: the design pane may not have enough information to display the fragment. Here you use the
tools:layoutto set reference the fragment XML file to display in the Preview pane
At this stage, you could run the app on multiple Android devices or simulators, but this method of testing alternative layouts is time consuming and repetitive at best, and error prone at worst. There must be another way.
Thankfully, Android Studio has extensive previewing capabilities. Open the default activity_main.xml file, and on the Design tab select Preview All Screen Sizes from the device dropdown:
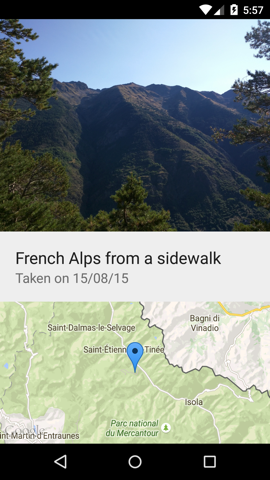
And as the layout previews indicate, if you run the app on the Nexus 6, it picks the vertical layout, whereas for smaller devices it displays “Hello world!”:

Theory Time: Android Alternative Layouts
First, there’s a few questions to mull over.- How can you predict which device will use a certain layout without using the preview assistant?
- What metric should you look out for in smartphone specs running Android to tell which layout will be used?
- You specified the screen width qualifier by dp unit, but what does that really mean?
However, pixel density doesn’t affect actual sizes and the layout. Most smartphone screen dimensions are in a density dependent unit, also known as the resolution, to reflect the higher quality displays.
You’ll need to convert device dimensions to dp to understand which layout each device will use:

As you can see, in dp, the width of the Nexus 5 is below the 400dp mark, whereas the Nexus 6 is above it.
Hence, you can calculate which devices will use various layouts by doing a little math.

Preparing to Build and Run
Before you run the app on the emulator or device, there are a few things to do. Since theMainActivity now handles fragments, you must change its parent class. In MainActivity.java, make sure that it extends FragmentActivity (or AppCompatActivity, itself a subclass of FragmentActivity). Some versions of Android Studio may have already done this for you.While you’re in there, go ahead and remove any references to a Toolbar or a Floating Action Button. Android Studio claimed it was building a “blank” activity with a new project and tried to sneak a few UI elements past you. :]
Note: Many Android developers like to use the Genymotion
emulator for its better performance in comparison with the standard
Android emulator. You can build and run this app using Genymotion, but
will not be able to use the maps in this tutorial because Genymotion
does not officially support Google Apps. There are ways to work around this, but they are outside the scope of this tutorial.
Now you could run the application on a device or emulator with a
screen width equal or higher than 400dp. This includes a Nexus 6, but
standard Android emulators can be inconsistent and you may need to try a
Nexus 7 to see the correct layout.Build and run.
That looks like the result you’re after here!
Rendering the Map
As you can see there’s plenty of empty space below the text. That’s where the map should go. The reason it’s not there, even though you’ve added support for Google Services, is because you’re missing a couple of initializing methods.Back in InfoFragment.java, add a property named mapFragment of type SupportMapFragment.
SupportMapFragment mapFragment;
|
private void loadMap(GoogleMap googleMap) { if (googleMap != null) { // 1 BitmapDescriptor defaultMarker = BitmapDescriptorFactory.defaultMarker(BitmapDescriptorFactory.HUE_AZURE); // 2 LatLng sceneryPosition = new LatLng(44.22438242, 6.944561); // 3 mapFragment.getMap().addMarker(new MarkerOptions() .position(sceneryPosition) .icon(defaultMarker)); } } |
- Create a marker to place on the map, using the default green color.
- Make a
LatLngobject that specifies the latitude and longitude of the marker on the map. - Creates the marker for the image on the fragment.
mapFragment and call loadMap once it has initialized:private void setUpMapIfNeeded() { if (mapFragment == null) { // 1 mapFragment = ((SupportMapFragment) getChildFragmentManager().findFragmentById(R.id.map)); if (mapFragment != null) { // 2 mapFragment.getMapAsync(new OnMapReadyCallback() { @Override public void onMapReady(GoogleMap map) { // 3 loadMap(map); } }); } } } |
- Find the map fragment using its id.
- Attach an
OnMapReadyCallbackto be informed when the map has loaded. - Once the map is ready to go, call the
loadMapmethod to set it up as you desire.
onActivityCreated and call the setUpMapIfNeeded after the call to the parent’s class initializer:@Override public void onActivityCreated(@Nullable Bundle savedInstanceState) { super.onActivityCreated(savedInstanceState); setUpMapIfNeeded(); } |
When Dimensions Make Your App Go Awry
By default, Android resizes your application layout to fit the current device. In most cases, it works fine but sometimes the dimensions are too different to display the layout as you intended: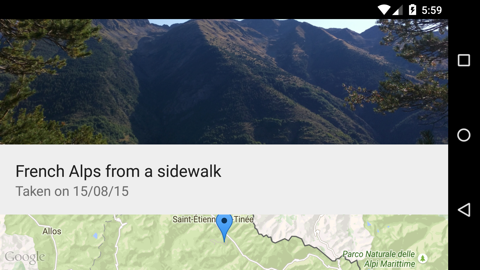
Note: You can rotate the emulator with control + fn + F11 on Android stock emulators or command + fn + F11 with Genymotion emulators.
But back to that last render. Ugh — landscape mode is none too kind
to your design. Fortunately, it’s not a complex undertaking to fix this;
you’ll add another layout for screen widths larger than 500dp, and for that one, you’ll place the fragments side-by-side.Large Layout: Dual-Pane
Switch to the Project mode in the project navigator and right-click on app/src/main/res. Select New\Android resource directory. Set the File name to layout and the Resource type to Layout, and then add a Screen Width qualifier of 500: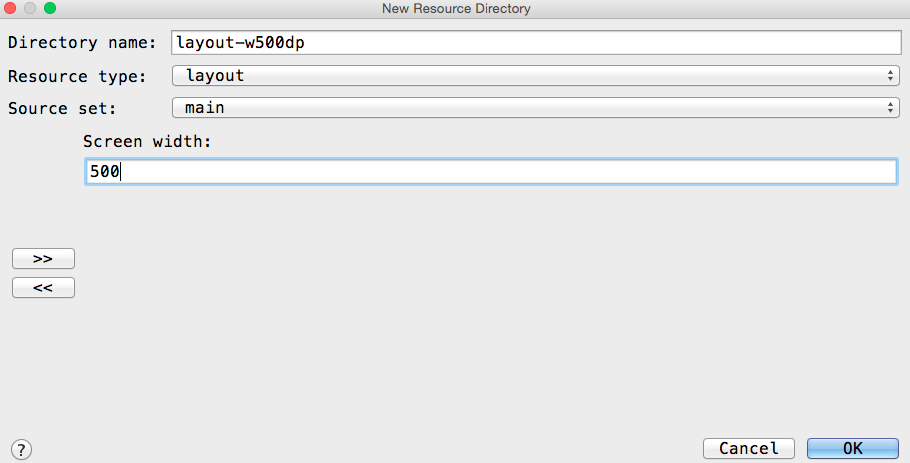
Click OK and you’ll see a third layout folder named layout-w500dp.
Next, right-click on app/src/main/res/layout-w500dp and choose New\Layout resource file. Set the File name to activity_main and the Root element to LinearLayout.
Open the new activity_main.xml and change the LinearLayout’s orientation to horizontal. Copy the same two fragments you used previously from layout-w400dp/activity/main.xml and adjust the height and width of each to occupy half of the screen horizontally, like this:
<?xml version="1.0" encoding="utf-8"?> <LinearLayout xmlns:android="http://schemas.android.com/apk/res/android" xmlns:tools="http://schemas.android.com/tools" android:layout_width="match_parent" android:layout_height="match_parent" android:orientation="horizontal"> <fragment android:id="@+id/imageFragment" android:name="com.updowninteractive.adaptivescenery.ImageFragment" android:layout_width="0dp" android:layout_height="match_parent" android:layout_weight="1" tools:layout="@layout/fragment_image"/> <fragment android:id="@+id/infoFragment" android:name="com.updowninteractive.adaptivescenery.InfoFragment" android:layout_width="0dp" android:layout_height="match_parent" android:layout_weight="1" tools:layout="@layout/fragment_info"/> </LinearLayout> |

Hooray! You’ve got your first alternative layout working.
Small Layout: Tab Layout
Now your app looks great on larger devices, but what about people who prefer a more trim device?Right now, for widths lower than 400dp, you’re still displaying “Hello world!”. For the default layout, which smaller screens will utilize, you’ll use a TabLayout component to swipe between fragments to have more real estate for the map and image.
Open app/src/main/res/layout/activity_main.xml and replace the XML layout with the following:
<?xml version="1.0" encoding="utf-8"?> <LinearLayout xmlns:android="http://schemas.android.com/apk/res/android" xmlns:app="http://schemas.android.com/apk/res-auto" android:id="@+id/myContainer" android:layout_width="match_parent" android:layout_height="match_parent" android:orientation="vertical"> <android.support.design.widget.TabLayout android:id="@+id/sliding_tabs" android:layout_width="match_parent" android:layout_height="wrap_content" app:tabGravity="fill" app:tabMaxWidth="0dp" app:tabMode="fixed" /> <android.support.v4.view.ViewPager android:id="@+id/viewpager" android:layout_width="match_parent" android:layout_height="0px" android:layout_weight="1" android:background="@android:color/white" /> </LinearLayout> |
- Using
LinearLayoutwith a vertical orientation as the root element - Providing UI controls to switch between tabs with the first child element set as a
TabLayout - Rendering the fragment corresponding to the selected tab by setting the second child element as a
ViewPager
Right-click on app/src/main/java/com.raywenderlich.adaptivescenery and choose New\Java Class. Set the Name to SceneryFragmentPagerAdapter. The class should extend FragmentPagerAdapter.
Update the generated code so that it matches the following:
public class SceneryFragmentPagerAdapter extends FragmentPagerAdapter { // 1: final int PAGE_COUNT = 2; private String tabTitles[] = new String[] { "Scenery", "Details" }; public SceneryFragmentPagerAdapter(FragmentManager fm) { super(fm); } @Override public int getCount() { // 2: return PAGE_COUNT; } @Override public Fragment getItem(int position) { // 3: switch (position) { case 0: return new ImageFragment(); case 1: return new InfoFragment(); default: return null; } } @Override public CharSequence getPageTitle(int position) { // 4: return tabTitles[position]; } } |
- Define the number of tabs and their titles as fixed member variables.
getCount()simply has to return the number of tabs.- The content for each tab is an instance of a fragment, and is returned by
getItem(). getPageTitle()returns the text that will appear on the tab.
Therefore you’ll check the screen width at runtime in the
MainActivity and wire up the ViewPager to the TabLayout if it meets this criterium.To calculate the screen size in dp, you’ll add a utility class. Right-click on app/src/main/java/com.raywenderlich.adaptivescenery and choose New\Java Class. Set the File name to ScreenUtility and paste in the following:
public class ScreenUtility { private float dpWidth; public ScreenUtility(Activity activity) { Display display = activity.getWindowManager().getDefaultDisplay(); DisplayMetrics outMetrics = new DisplayMetrics(); display.getMetrics(outMetrics); float density = activity.getResources().getDisplayMetrics().density; dpWidth = outMetrics.widthPixels / density; } public float getWidth() { return dpWidth; } } |
Display object.Finally, to associate the ViewPager and its adapter, switch to MainActivity.java and add the following to
onCreate:ScreenUtility utility = new ScreenUtility(this); if (utility.getWidth() < 400.0) { // 1: ViewPager viewPager = (ViewPager) findViewById(R.id.viewpager); viewPager.setAdapter(new SceneryFragmentPagerAdapter(getSupportFragmentManager())); // 2: TabLayout tabLayout = (TabLayout) findViewById(R.id.sliding_tabs); tabLayout.setupWithViewPager(viewPager); } |
- Get the ViewPager and set its PagerAdapter so that it can display items.
- Give the TabLayout the ViewPager

Notice that the vertical and dual-pane layouts are visible but the tab layout isn’t rendered. In the vertical and dual-pane layouts, the child elements in activity_main.xml are fragments which can be previewed using the
tools:layout
attribute. With the tab layout, the child elements are the view pager
and tab layout and the code to wire them up and load the fragments is
executed at runtime, that’s why a blank screen is rendered in Preview
mode.Build and run, using an emulator less than 400dp wide (such as a Nexus 5). You’ll see the new tab layout while the device is in portrait orientation:

Flip it to landscape, and you’ll see the wide screen view when the device is in landscape:
Notice that adaptive layout capabilities change the layout as well as the functionality at runtime!
Where to Go From Here
Well done! You’ve built your first Android app with alternative layouts, and you learned how activities can make use of multiple fragments, how drawables work with different displays by using dp and qualifiers, and how to make your app come to life on practically any Android device.Of course, there’s a lot more to Android than layouts, and no shortage of ways to build on the adaptive UI principles you discovered in this adaptive UI for Android tutorial. To challenge yourself, try the following:
- Use another available qualifier to have yet another type of layout. For example, what if you’d like to have a different background photo based on the locale qualifier?
- Or, try using size qualifier on other resources, such as strings. You could add a TextView which shows a short message, or a longer message with the same name if the screen in landscape?
Feel free to share your feedback, findings or ask any questions in the comments below or in the forums. Talk to you soon!


0 comments:
Post a Comment
Note: only a member of this blog may post a comment.